Setting the current date and time is very important. The current date and time settings are used as standard timer settings for functions that require them.
|
GMT:
|
The time at the Greenwich Observatory in England is called GMT (Greenwich Mean Time).
|
|
Time Zone:
|
The standard time zones of the world are expressed globally in terms of the difference in hours (up to 12 hours) from GMT (0 hours). A time zone is a region throughout which this time difference is the same.
|
|
Daylight Saving Time:
|
In some countries, time is advanced throughout the summer season. The period in which this is applied is called "Daylight Saving Time."
|
|
NOTE
|
|
You can also specify to automatically synchronize the date and time with a server on the network from the Settings/Registration screen. (See "Settings Common to TCP/IPv4 and TCP/IPv6.")
|
1.
Press  → [Preferences] → [Timer/Energy Settings] → [Date/Time Settings].
→ [Preferences] → [Timer/Energy Settings] → [Date/Time Settings].2.
Enter the current date (day, month, year) and time using  -
- (numeric keys).
- (numeric keys).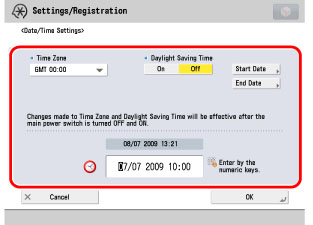
Enter the day and the month using four digits (including zeros).
Enter all four digits of the year, and the time in 24-hour notation, as four digits (including zeros) without a space.
Examples:
|
6 May
|
→0605
|
|
7:05 a.m.
|
→0705
|
|
11:18 p.m.
|
→2318
|
|
NOTE
|
|
If you make a mistake when entering values, press
→ enter the values again, starting with the day. |
Press the Time Zone drop-down list → select the time zone in which the machine is located.
Press [On] → [Start Date].
Select the month and day from the Month and Day drop-down lists, respectively.
Press [-] or [+] to enter the time of day you want Daylight Saving Time to take effect → press [OK].
Press [End Date] → select the month, day, and time at which Daylight Saving Time ends → press [OK].
|
NOTE
|
|
If you set Daylight Saving Time, the machine automatically sets the standard time of the machine one hour forward at the specified date and time.
|
3.
Press [OK].