You can store image forms and superimpose them on the output using the Superimpose Image mode in the Copy and Access Stored Files functions. For instructions on using the Superimpose Image mode, see "Composing Images" in Copy and "Superimpose Image" in Access Stored Files.
|
IMPORTANT
|
|
Up to 100 image forms can be stored. However, this number varies depending on the capacity of the hard disk.
Be sure to place the original that contains the image form on the platen glass. It is not possible to scan an image form from the feeder.
|
|
NOTE
|
|
Image forms can also be retrieved from a personal computer and stored in the machine.
To select an inch paper size, press [Inch-Size].
For instructions on entering characters, see "Entering Characters from the Touch Panel Display" and "Entering Characters Using a USB Keyboard."
If you press [OK] without entering any characters, the machine automatically assigns the image form a name using the year, month, day, and time the image form was stored.
[Register] is displayed only if the Duplex Color Image Reader Unit is attached.
|
1.
Press  → [Function Settings] → [Common] → [Print Settings] → [Register Form].
→ [Function Settings] → [Common] → [Print Settings] → [Register Form].2.
Press [Register].
3.
Select the size of the original that contains the image form → press [Next].
4.
Select [Solid] or [Transparent] → press [Next].
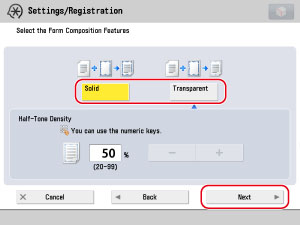
Press [-] or [+] to adjust the halftone density → press [Next].
5.
Set the desired scan settings.
If you want to change the zoom ratio, press [Copy Ratio]. (See "Copy" and "Scan and Store.")
If you want to change the scan density, press [Density]. (See "Exposure and Original Type Settings" in Copy and "Adjusting the Density" in Scan and Store.)
If you want to select the image quality for scanning, press [Original Type]. (See "Original Type Selection" in Copy.)
If you wan to change the sharpness, press [Sharpness]. (See "Adjusting the Contrast (Sharpness)" in Copy and "Adjusting the Contrast (Sharpness)" in Scan and Store.)
If you want to set the Nega/Posi mode, press [Nega/Posi]. (See "Inverting Images (Nega/Posi)" in Copy and "Inverting Images (Nega/Posi)" in Scan and Store.)
If you want to assign a name to the image form, press [Form Name] → enter a name → press [OK].
6.
Place the original that contains the image form on the platen glass → press  .
.
.Select the desired image form → press [Details].
To check the image of the stored form, print the form by pressing [Check Print]. (See "Composing Images" in Copy and "Superimpose Image" in Access Stored Files.)
Check the detailed information → press [Close].
If you want to change the name of the image form, press [Change Form Name].
Select the image form that you want to delete → press [Delete].
Press [Yes].