|
IMPORTANT
|
|
If Language Switch in Preferences (from the Settings/Registration screen) is set to 'On', the host name and folder path of the file server destination may not be displayed correctly, so you may not be able to refer to them.
|
|
NOTE
|
|
For examples of the settings needed to send to a file server, see "Network."
UPN can be used only if you are sending to a computer belonging to a domain operated with Active Directory.
|
1.
Press  → [Set Destination] → [Register Destinations] → [Register New Dest.].
→ [Set Destination] → [Register Destinations] → [Register New Dest.].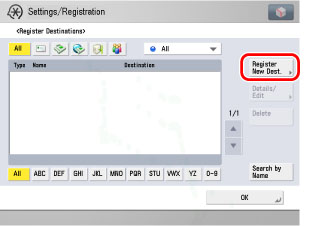
2.
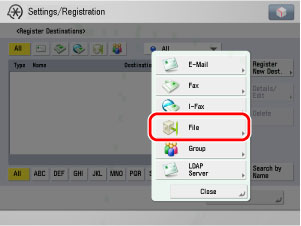
Press [File].
3.
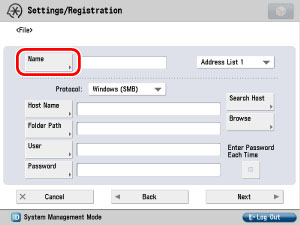
Press [Name].
4.
Enter a name for the recipient of the fax → press [OK].
|
NOTE
|
|
The first character that you enter for the name is used for sorting the destination list when you press keys, such as [ABC], [DEF], and [GHI], on the Address Book screen.
If [Search by Name] is pressed on the Address Book screen, a screen for narrowing the search in the Address Book is displayed.
For more information on refining the destination, see "Scan and Send."
|
5.
Press the Address Book drop-down list → select an address book from Address Book 1 to 10.
Address Books 1 to 10 are used to divide the Address Book into 10 parts, called subaddress books. This is a convenient way to classify destinations.
The file server address that you enter will be stored in the subaddress book that you select here.
6.
Press the Protocol drop-down list → select the desired protocol.
|
NOTE
|
|
For more information on the available protocols, see "Using the Keyboard."
|
7.
Set [Host Name], [Folder Path], [User], and [Password].
If [Enter Password Each Time] is set to 'On', when sending to a file server, a screen to enter the registered password is displayed.
|
NOTE
|
|
For instructions on specifying each of the settings for FTP, Windows (SMB), and WebDAV, see "Specifying the File Server Not Stored in the Address Book."
|
8.
Finish storing the address.
Press [Next].
Press [Access No.].
Press [Access No.] → enter the access number using  -
-  (numeric keys).
- (numeric keys).Press [Confirm] → re-enter the access number for confirmation using - (numeric keys) → press [OK] → [OK].
- (numeric keys) → press [OK] → [OK].If you do not want to set an access number for this destination, press [OK] without entering any number.
Press [OK].