You can set common communication settings for sending e-mail or I-fax.
1.
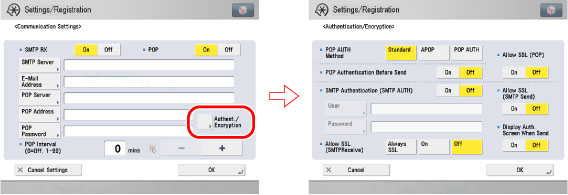
Press  → [Function Settings] → [Send] →[E-Mail/I-Fax Settings] →[Communication Settings].
→ [Function Settings] → [Send] →[E-Mail/I-Fax Settings] →[Communication Settings].2.
Specify the mail server for receiving e-mail/I-faxes.
The machine supports both the SMTP and POP3 functions.
The machine can receive I-fax images and communication error notices only.
Register the host name of the machine with the DNS server → specify the following.
Press [On] for <SMTP RX> → press [Off] for <POP>.
In [E-Mail Address], enter the e-mail address your machine will use. You can specify any user name (the part of the address located in front of the @ symbol). Enter the host name after the "@" symbol in the e-mail address.
If you select [Always SSL] for <Allow SSL (SMTPReceive)>, reception of only data encrypted using SSL is allowed and communications from the host not using SSL are rejected.
If you select [On] for <Allow SSL (SMTPReceive)>, depending on the request from the host, reception of data encrypted using SSL is allowed only when there is a request from the host.
|
IMPORTANT
|
|
Even if you select [On] for <Allow SSL (SMTPReceive)>, the data will not be encrypted if the SMTP host does not support encryption.
In order to select [Always SSL] or [On] for <Allow SSL (SMTPReceive)> to allow SSL transmission, it is necessary to generate a key pair in advance. For instructions on how to generate a key pair, see "Key Pair and Server Certificate Settings for Encrypted SSL Communication."
|
Press [On] for <POP> → press [Off] for <SMTP RX>.
In [E-Mail Address], enter the e-mail address your machine will use.
In [POP Server], enter the IP address or name of the POP server using the keyboard on the touch panel display.
In [POP Address], enter the login name for access to the POP server.
In [POP Password], enter the password for access to the POP server.
Set [POP Interval] to the interval you want the POP server to check for incoming e-mail. If the interval is set to '0', the POP server is not checked automatically. For instructions on how to manually check the POP server, see "Scan and Send."
Select the authentication method supported by the POP server from [Standard], [APOP], or [POP AUTH] for <POP AUTH Method>.
If you want to send encrypted data, press [On] for <Allow SSL (POP)>.
|
IMPORTANT
|
|
If you set more than '10 min' for <POP Interval>, the machine will not enter a complete Sleep mode.
If the POP server does not support SSL encryption, data is not encrypted when [On] is selected for <Allow SSL (POP)>.
In order to select [On] for <Allow SSL (POP)> to allow SSL transmission, it is necessary to generate a key pair in advance. For instructions on how to generate a key pair, see "Key Pair and Server Certificate Settings for Encrypted SSL Communication."
|
3.
Specify the mail server for sending e-mail/I-faxes.
If you are using an SMTP server that requires POP before SMTP (method for authenticating users who have logged in the POP server before sending e-mail):
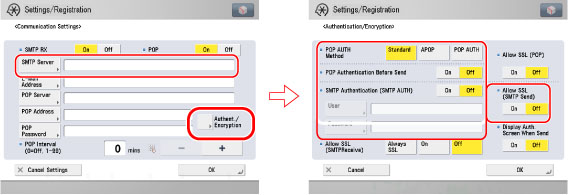
In [SMTP Server], enter the IP address or name of the SMTP server using the keyboard on the touch panel display.
Press [On] for <POP Authentication Before Send> → press [Off] for <SMTP Authentication (SMTP AUTH)>.
If you are using an SMTP server that requires SMTP Authentication (method for authenticating users who have logged in the SMTP server before sending e-mail):
In [SMTP Server], enter the IP address or name of the SMTP server using the keyboard on the touch panel display.
Press [On] for <SMTP Authentication (SMTP AUTH)> → press [Off] for <POP Authentication Before Send>.
In [User], enter the user name used for logging in to the SMTP server. If you are using a Microsoft SMTP server, enter the user name in [User] using the following format: user name@domain name.
In [Password], enter the password used for logging in to the SMTP server.
To encrypt data to be sent using SSL, select [On] for <Allow SSL (SMTP Send)>.
If you want to display the authentication screen when sending, set [Display Auth. Screen When Send].
|
IMPORTANT
|
|
If the SMTP host does not support encryption, data is not encrypted when [On] is selected for <Allow SSL (SMTP Send)>.
|
In [SMTP Server], enter the SMTP server IP address or name using the keyboard on the touch panel display.
Press [Off] both for <SMTP Authentication (SMTP AUTH)> and <POP Authentication Before Send>.