For information on necessary optional equipment to use this function, see "Optional Products Required for Each Function."
|
IMPORTANT
|
|
If you use the Fax function with the Remote Fax Kit, the following items are sent according to the settings of the Remote Fax Server.
ECM TX
Sending Speed
Long Distance
|
1.
Press  → [Set Destination] → [Register Destinations] → [Register New Dest.].
→ [Set Destination] → [Register Destinations] → [Register New Dest.].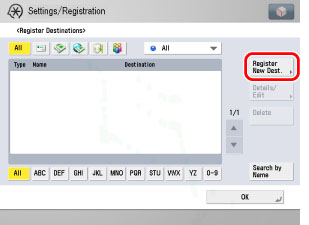
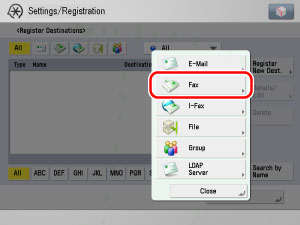
2.
Press [Fax].
3.
Press [Name].
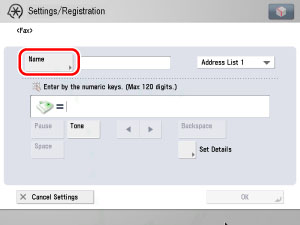
4.
Enter a name for the recipient of the fax → press [OK].
|
NOTE
|
|
The first character that you enter for the name is used for sorting the destination list when you press keys, such as [ABC], [DEF], and [GHI], on the Address Book screen.
If [Search by Name] is pressed on the Address Book screen, a screen for narrowing the search in the Address Book is displayed.
For more information on refining the destination, see "Using the Machine to Send/Receive a Fax."
|
5.
Press the Address Book drop-down list → select an address book from Address Book 1 to 10.
Address Books 1 to 10 are used to divide the Address Book into 10 parts, called subaddress books. This is a convenient way to classify destinations.
The fax number that you enter will be stored in the subaddress book that you select here.
6.
Enter the recipient's fax number using  -
-  (numeric keys),
  , and
, and  .
.
- (numeric keys), , and .|
[Pause]:
|
Press to insert a pause of several seconds in the fax number that you are dialing. If you insert a pause, the letter <p> is displayed between the numbers, and the letter <p> appears at the end of the number. When dialing an overseas number, insert a pause after the country code, and at the end of the telephone number. (See "Pause Time.")
|
|
[Tone]:
|
Press when you want to directly call an extension line that is connected to a PBX (Private Branch eXchange) which accepts only tone signals. If you press [Tone], the letter <T> appears. (See "Fax Line Settings.")
|
|
[
 ][ ][ ]: ]: |
Press to move the position of the cursor
|
|
[Backspace]:
|
Press to delete the last number entered.
|
|
[Space]:
|
Press to insert a space between numbers.
|
|
[+]:
|
Use to insert a country code. Press [+] after the country code, and before the fax number.
|
|
[Option]:
|
Press to specify the subaddress, password, ECM TX, sending speed, and type of call settings. These settings are optional.
|
|
[R]:
|
Press to use the R-Key. (See "Special Dialing.")
|
|
IMPORTANT
|
|
You cannot insert a pause or a space at the beginning of a number.
|
|
NOTE
|
|
If you enter a pause at the end of the number, the pause is always 10 seconds long.
|
Specify each setting → press [OK].
[Subaddress] and [Password]:
Press [Subaddress] → enter the recipient's subaddress using - (numeric keys), , and .
- (numeric keys), , and .Press [Password] → enter the recipient's password using - (numeric keys), , and .
- (numeric keys), , and .Press [Confirm] → re-enter the recipient's password for confirmation → press [OK].
Press [Space] to insert a space.
Press [Backspace] to delete the last digit entered.
If the recipient did not set a password for the target subaddress, you do not need to enter a password.
<ECM TX>:
Select [On] or [Off].
<Sending Speed>:
Press the Sending Speed drop-down list → select the desired sending speed.
If your document transmissions are slow in starting, this may mean that the telephone lines in your area are in poor condition. Select a slower speed. You can select [33600 bps], [14400 bps], [9600 bps], or [4800 bps].
<Long Distance>:
Press the Long Distance drop-down list → select the type of call.
Select [Long Distance (1)] if transmission errors occur frequently when you make overseas calls (when the number is stored in the Address Book). If errors persist, try selecting [Long Distance (2)] or [Long Distance (3)].
<Select Line>:
Press the Select Line drop-down list → select the line.
[Line 1]: Standard Line
[Line 2]: Additional Line
[Line 3]: Additional Line
[Line 4]: Additional Line
[Auto]: A line is selected according to the settings you made for Priority TX in TX Line Selection in Line Options in Function Settings (from the Settings/Registration screen). (See "Selecting the Type of Telephone Line.")
|
IMPORTANT
|
|
If you want to attach a subaddress to your send job, make sure that the recipient's fax machine supports ITU-T standard subaddresses.
|
|
NOTE
|
|
The Select Line drop-down list is displayed only if the Super G3 2nd Line Fax Board is installed in addition to installing the Super G3 FAX Board.
|
7.
Finish storing the address.
Press [Next].
Press [Access No.].
Press [Access No.] → enter the access number using - (numeric keys).
- (numeric keys).Press [Confirm] → re-enter the access number for confirmation using - (numeric keys) → press [OK] → [OK].
- (numeric keys) → press [OK] → [OK].If you do not want to set an access number for this destination, press [OK] without entering any number.
Press [OK].