|
|
Top ContentsHelpGlossary ContentsHelpGlossary |
||
|---|---|---|---|
|
Category
|
|
 Category TopOverview of the imageRUNNER ADVANCE 6075/6075i/6065/6065i/6055/6055iFlow of Copy OperationsCancelling a Copy JobReserved CopyingPreset ZoomZoom by PercentageAuto ZoomFit to PageReducing/Enlarging Using the Original and Copy SizesSetting the X and Y Axes IndependentlyPaper SelectionCopy SampleRecalling Previous Copy JobsMemory KeysConfirming/Changing/Cancelling Selected SettingsInterrupt ModeWhat are Options?Book→2-PagesTwo-Sided Copying
 Collating CopiesPage Order (Collate)Same Page (Group)Page Order (Staple)Booklet ModeJob BuildImage CombinationFront CoverInsert SheetsDifferent Size OriginalsExposure and Original Type SettingsOriginal Type SelectionTransparency Cover SheetsEmbedding Hidden Text in the BackgroundDocument Scan LockPage NumberingCopy Set NumberingAdjusting the Contrast (Sharpness)Frame EraseWatermark PrintingDate PrintingShifting the Original ImageGutter ModePrint & CheckInverting Images (Nega/Posi)Image RepeatCombining Multiple Batches of Originals with Different Copy SettingsJob Done NoticeMirror ImagePrint on TabStoring Scanned Originals in Mail Box from Copy ScreenComposing ImagesCopying Effectively with the Cascade Copy Printer (Cascade Copying)Various Features of the Express Copy Basic Features ScreenOperating the Express Copy Basic Features ScreenSetting Standard Keys on the Express Copy Basic Features ScreenUnavailable Combination of Functions
|
IMPORTANT
|
|
For information on the modes which cannot be set in combination with this mode, see "Unavailable Combination of Functions."
Printing performance may not be optimal, depending on the original content and combination of settings.
|
|
NOTE
|
|
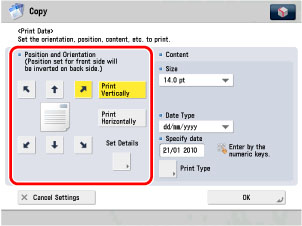
You can also adjust the position of watermark and date. (See "User-Defined Text for Page Numbers and Watermarks.")
If the Watermark/Print Date mode is used with the Add Cover/Insert Sheets mode or the Cover/Job Separator mode (for the Mail Box function), the watermark/date will not be printed on the inserted pages.
|
|
NOTE
|
|
If you set any two of the Page Numbering, Copy Set Numbering, Watermark, or Print Date modes to print in the same position, a message asking for your confirmation is displayed when you press
 . . |
 -
-  (numeric keys) to enter values.
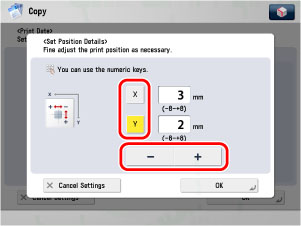 - (numeric keys).
|
NOTE
|
|
If no date is set, the date set in Date/Time Settings in Preferences (Settings/Registration) is printed. Confirm that the date and time settings are correct.
|
| © CANON Inc. 2010 All Rights Reserved. | Disclaimer CopyrightTrademarksOffice LocationsUSRM1-6162-00 CopyrightTrademarksOffice LocationsUSRM1-6162-00 |
|---|