Most operations of this machine are done from the touch panel display. To use the Copy functions, press the appropriate key in accordance with the messages displayed on the touch panel display.
After the power is turned ON, the Main Menu screen appears on the touch panel display. Press [Copy] to display the Regular Copy Basic Features screen. From Settings/Registration, you can set the machine to display the Express Copy Basic Features screen. (See "Initial Function at Power ON.")
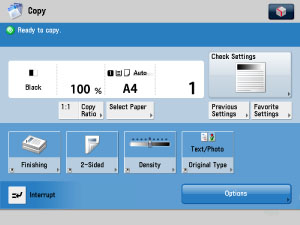
Regular Copy Basic Features Screen
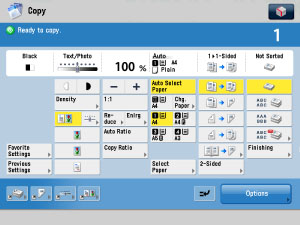
Express Copy Basic Features Screen
The Express Copy Basic Features screen simplifies the copying procedures of the Regular Copy Basic Features screen.
|
NOTE
|
|
You can conduct the same range of settings from both the Regular Copy Basic Features screen and the Express Copy Basic Features screen. You can set to display from the Settings/Registration screen. (See "Initial Function at Power ON.")
After specifying the copy settings on the Regular Copy Basic Features screen, the copy settings are not retained when you switch to the Express Copy Basic Features screen, or vice versa.
If you press
 on the Express Copy Basic Features screen, the display returns to the Express Copy Basic Features screen (default setting). Also, if you press on the Regular Copy Basic Features screen, the display returns to the Regular Copy Basic Features screen (default setting). on the Express Copy Basic Features screen, the display returns to the Express Copy Basic Features screen (default setting). Also, if you press on the Regular Copy Basic Features screen, the display returns to the Regular Copy Basic Features screen (default setting). |
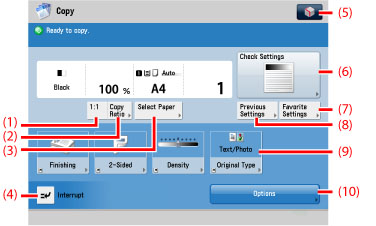
The screen below, which appears when [Copy] is selected, is called the Regular Copy Basic Features screen.
|
(1)
|
1:1
Press to make copies in the same size as your original.
|
|
(2)
|
Copy Ratio
Press to reduce or enlarge the copy size.
|
|
(3)
|
Select Paper
Press to select the paper size/type and the paper source.
|
|
(4)
|
Interrupt
Press to interrupt a copy job to make priority copies.
|
|
(5)
|
 You can specify the following four settings.
Register/Edit Favorite Settings
Register to Quick Menu
Change Default Settings
Register Options Shortcuts
|
|
(6)
|
Check Settings
Press to confirm, change, and cancel the copy settings.
|
|
(7)
|
Favorite Settings
Press to register frequently used copy settings.
|
|
(8)
|
Previous Settings
Press to store or recall copy modes.
|
|
(9)
|
Shortcuts to [Options]
Press to select a [Options] mode. [Finishing], [2-Sided], [Density], and [Original Type] are set as default.
|
|
(10)
|
Options
Press to select a Options mode. [Finishing], [2-Sided], [Density], and [Original Type] are displayed on the Regular Copy Basic Features screen as default and are the [Options] shortcuts.
|
The screen below, which appears on the touch panel display when you press [Options] on the Regular Copy Basic Features screen, is called the Options screen. This screen is divided into three screens. Pressing [ ] or [
 ] displays the next or previous screen. All special copy modes are displayed here. In some cases, when a mode is selected, a more detailed screen for the selected mode appears. To close the Options screen and return to the Regular Copy Basic Features screen, press [Close]. Pressing
  after selecting a mode displays the Tutorial screen containing guidance information. This is useful when you want to learn more about the selected mode.
] or [] displays the next or previous screen. All special copy modes are displayed here. In some cases, when a mode is selected, a more detailed screen for the selected mode appears. To close the Options screen and return to the Regular Copy Basic Features screen, press [Close]. Pressing after selecting a mode displays the Tutorial screen containing guidance information. This is useful when you want to learn more about the selected mode.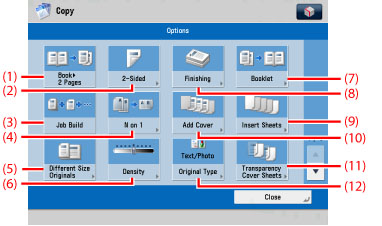
|
(1)
|
Book
 2 Pages 2 PagesPress to select or cancel the Book
2-Pages mode. This mode enables you to copy facing pages of an opened book onto separate copy sheets. |
|
(2)
|
2-Sided
Press to make [1-Sided
2-Sided], [2-Sided2-Sided], [2-Sided1-Sided], or [Book2-Sided] copies. |
|
(3)
|
Job Build
Press to select or cancel the Job Build mode. This mode enables you to divide the originals into several parts, scan them, and then print them all together. This is convenient when you cannot place all of the originals that you want to copy at one time.
|
|
(4)
|
N on 1
Press to automatically reduce two, four, or eight originals to fit onto a one-sided or two-sided copy sheet.
|
|
(5)
|
Different Size Originals
Press to make copies feeding different size originals together in one group, by placing them in the feeder.
|
|
(6)
|
Density
Press to adjust the copy density.
|
|
(7)
|
Booklet
Press to make copies of several originals to form a booklet.
|
|
(8)
|
Finishing
Press to select the Collate, Group, or Staple mode.
|
|
(9)
|
Insert Sheets
Press to add sheet insertions, or chapter pages between specified pages.
|
|
(10)
|
Add Cover
Press to add covers.
|
|
(11)
|
Transparency Cover Sheets
Press to insert a sheet between each transparency when copying transparencies. You can make the same prints on the interleaf sheets as those on the transparencies.
|
|
(12)
|
Original Type
Press to make copies according to the type of original (original that contains text only, photo only, or both text and photo). |
The screen below appears if you press [] on the Options screen.
] on the Options screen.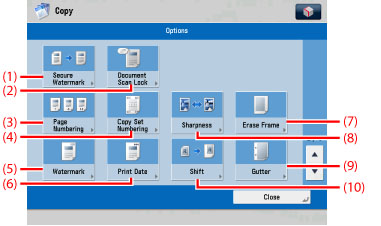
|
(1)
|
Secure Watermark
Press to embed hidden text in the background. The hidden text will become visible if the resulting output is copied.
|
|
(2)
|
Document Scan Lock
Press to embed tracking information on copies.It increases the security by preventing unauthorized copies.
|
|
(3)
|
Page Numbering
Press to include page numbers on copies.
|
|
(4)
|
Copy Set Numbering
Press to include copy set numbers on copies.
|
|
(5)
|
Watermark
Press to include the watermark on copies.
|
|
(6)
|
Print Date
Press to include the date on copies.
|
|
(7)
|
Erase Frame
Press to eliminate dark border areas and lines that appear around original images or shadows from binding holes.
|
|
(8)
|
Sharpness
Press to sharpen or soften the image of the original on the copy.
|
|
(9)
|
Gutter
Press to create gutters along the sides of a copy sheet.
|
|
(10)
|
Shift
Press to shift the position of the original image on the copy sheet.
|
The screen below appears if you press [] on the Options screen.
] on the Options screen.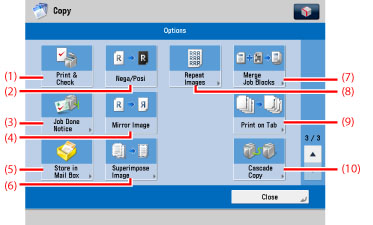
|
(1)
|
Print & Check
Press to confirm scanned images page by page before copying when you scan originals on the platen glass.
|
|
(2)
|
Nega/Posi
Press to make copies of the original image by inverting the gradations of black-and-white.
|
|
(3)
|
Job Done Notice
Press to have the machine notify the user through e-mail when the copy job is done.
|
|
(4)
|
Mirror Image
Press to copy the original image reversed, as if it were a reflection in a mirror.
|
|
(5)
|
Store In Mail box
Press to store originals scanned from the Copy screen as a file in a Mail Box.
|
|
(6)
|
Superimpose Image
Press to superimpose an image stored in memory onto the original image for copying.
|
|
(7)
|
Merge Job Blocks
Press to scan multiple batches of originals with different copy settings and print them as one document.
|
|
(8)
|
Repeat Images
Press to repeatedly copy the image of an original in either the vertical or horizontal direction.
|
|
(9)
|
Print on Tab
Press to copy onto the tabs on tab paper.
|
|
(10)
|
Cascade Copy
Press to copy from this machine and a cascade copy printer.
|