The Secure Watermark mode enables you to embed hidden text in the background of copies. You can embed text such as "CONFIDENTIAL," the date and time, or a department name. The embedded text appears when the copies are copied.
|
Original
|
Copy A
(Secure Watermark Is Selected) |
Copy B
(Copy of Copy A) |
||
 |
 |
 |
|
 |
|
|
|
|
|
|
|
Original
|
Copy C
([Print Horizontally] Is Selected) |
Copy D
(Copy of Copy C) |
||
|
|
|
|
|
 |
|
IMPORTANT
|
|
For information on the modes which cannot be set in combination with this mode, see "Unavailable Combination of Functions."
You cannot change the copy exposure while copying in the Secure Watermark mode.
Printing performance may not be optimal, depending on the original content and combination of settings.
|
1.
Place your originals → press [Options] → press [Secure Watermark].
2.
Select the type of secure watermark (Watermark, Date, Copy Set Numbering, Serial Number, ID/User Name).
If [Serial Number] is selected, the Serial Number, displayed on the bottom left of the screen when you press  on the control panel, is printed on the output.
If [ID/User Name] is selected and you are using a login service, the current ID or user name is printed on the output.
on the control panel, is printed on the output.If [ID/User Name] is selected and you are using a login service, the current ID or user name is printed on the output.
|
NOTE
|
|
[ID/User Name] is grayed out and cannot be selected if you are not using a login service.
|
Select a preset watermark from the drop-down list.
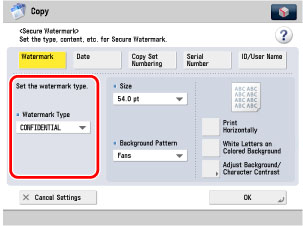
Press [Enter] → enter the text → press [OK].

You can also select the text which has been registered in Register Characters for Page No./Watermark in Function Settings from the Settings/Registration screen.
|
IMPORTANT
|
|
If you want to register your newly created secure watermark to be selected whenever necessary, press [Register] → enter the text to be registered.
|
Enter the date using  -
-  (numeric keys) → select the date format from the Date Type drop-down list.
- (numeric keys) → select the date format from the Date Type drop-down list.
|
NOTE
|
|
There are six different date formats that you can select in the drop-down list.
If you do not specify a date, the date set in Date/Time Settings in Preferences (from the Settings/Registration screen) is printed. Confirm that the date and time settings are correct
|
Enter the starting number using - (numeric keys).
- (numeric keys).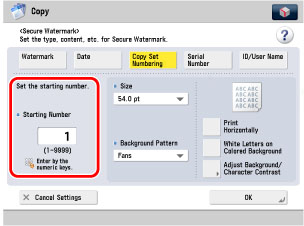
3.
Specify the print settings for the watermark.
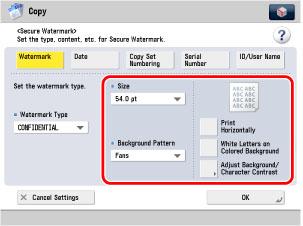
Select the text size from the drop-down list.
Select the text size from [36.0 pt], [54.0 pt], and [72.0 pt].
Select the Background Pattern from the drop-down list.
If you do not want to add the Background Pattern, select [None].
|
IMPORTANT
|
|
To print the characters vertically across the page, press [Print Horizontally].
To use white letters on a coloured background, press [White Letters on Colored Backgnd].
|
4.
Press [Adjust Background/Character Contrast] → adjust the contrast of the embedded letters and the background pattern.
If you do not want to adjust the contrast, proceed to step 5.
Press [Sample Print] → select the paper source → press [OK].
The sample print is output.
|
NOTE
|
|
The sample print includes the hidden text and the background for each relative contrast value.
The area within the frame on the sample print is the output sample for the currently set relative contrast value.
|
Refer to the sample print → set the value for the best sample print for [Relative Contrast Value] using [ ] [
] [ ].
].
] [].Refer to the sample print to adjust [Relative Contrast Value].
If you increase the value for [Relative Contrast Value], the text gets denser, and if you decrease the value, the text gets lighter.
The setting range for the Relative Contrast Value will differ, depending on the Standard Value Settings you have set.
If you increase the value for [Relative Contrast Value], the text gets denser, and if you decrease the value, the text gets lighter.
The setting range for the Relative Contrast Value will differ, depending on the Standard Value Settings you have set.
|
Standard Value Settings
|
Relative Contrast Value
|
|
1
|
0 to +7
|
|
4
|
-3 to +7
|
|
8 to 56
|
-7 to +7
|
|
60
|
-7 to +4
|
|
64
|
-7 to 0
|
|
IMPORTANT
|
|
Any value from -7 to +7 may be used.
|
Press [Standard Value Set.].
Press [Sample Print] → select the paper source → press [OK].
A standard value sample print is output.
|
NOTE
|
|
The sample print includes the hidden text and the background for each relative contrast value.
The area within the frame on the sample print is the output sample for the currently set standard value.
|
Refer to the sample print and specify the standard value using [] [] → press [OK].
] [] → press [OK].Refer to the sample print to adjust the standard value.
If you increase the standard value, the text gets denser, and if you decrease the value, the text gets lighter.
If you increase the standard value, the text gets denser, and if you decrease the value, the text gets lighter.
|
IMPORTANT
|
|
Any value from 1 to 64 may be used.
|
Press [Latent Area Density].
Specify the density of the latent image using [-] or [+] → press [OK].
If you increase the value for [Latent Area Density], the embedded text gets denser, and if you decrease the value, the text gets lighter.
|
IMPORTANT
|
|
Any value from 1 to 36 may be used.
|
5.
Press [OK].