|
|
Top ContentsHelpGlossary ContentsHelpGlossary |
||
|---|---|---|---|
|
Category
|
|
 Category Top
 Overview of This FunctionAdvanced Space/Network SettingsMail Box Advanced SpaceNetworkMemory MediaFlow of Operations for Printing Files Stored in a Mail BoxFlow of Operations for Printing Files Stored in the Advanced SpaceFlow of Operations for Printing Files Stored on the NetworkFlow of Operations for Printing Files Stored in a Memory MediaPaper SelectionCancelling a Job While Printing Reserving JobsArranging Files Stored in a Mail BoxChecking a File's Detailed InformationPreviewFile OptionsPrinting ListsArranging Folders/Files Stored in the Advanced Space Checking Detailed Information of the Advanced SpaceEditing the Personal SpaceFolder OperationsChecking a File's Detailed InformationFile OptionsArranging Folders/Files Stored on the Network Checking Detailed Information of the StorageFolder Operations Checking a File's Detailed InformationFile OptionsArranging Folders/Files Stored in a Memory Media Checking Detailed Information of a Memory MediaFolder OperationsChecking a File's Detailed InformationFile OptionsRemoving the Memory MediaPrinting a SampleStoring Print SettingsAdjusting Density during PrintingMerging FilesFavorite SettingsCollating PrintsPage Order (Collate)Same Page (Group)Page Order (Staple)Two-Sided PrintingWhat are Options?Adding a CoverInserting Sheets Job SeparatorBooklet ModeShifting the Original ImageEmbedding Hidden Text in the BackgroundDocument Scan LockSuperimpose ImageGutterPage NumberingCopy Set Numbering Watermark Printing Date Printing Print on Tab Resolution Halftones Matching the Paper Size When Printing Enlarging the Printing Area Printing Multiple Pages on One Page Adding Comments When Printing PDF Files Printing a PDF File With a Password Changing the Print Size Image Orientation Specifying the Position to Print Sending a FileUnavailable Combination of Functions (Print Function for the Files Stored in a Mail Box)Unavailable Combination of Functions (Print Function for PDF Files)Unavailable Combination of Functions (Print Function for TIFF/JPEG Files)
|
IMPORTANT
|
|
For information on the modes which cannot be set in combination with this mode, see "Unavailable Combination of Functions (Print Function for the Files Stored in a Mail Box)."
This mode can be used only for printing a file stored in a mail box.
The Copy Set Numbering mode cannot be used with files with a resolution of less than 600 x 600 dpi.
Printing performance may not be optimal, depending on the file content and combination of settings.
|
|
NOTE
|
|
If the copy set number has fewer than five digits, the machine prints it as follows:
Example: If the copy set number is 10, "00010" is printed.
If the Copy Set Numbering mode is used with the Cover, Insertion Sheets or Job Separator mode, copy set numbers are not printed on the inserted pages.
|
|
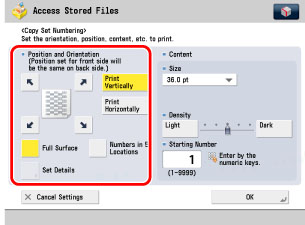
[Print Vertically]:
|
Prints the copy set number vertically.
|
|
[Print Horizontally]:
|
Prints the copy set number horizontally.
|
|
NOTE
|
|
If Copy Set Numbering Option Settings in Function Settings (from the Settings/Registration screen) is set to 'On', [Numbers in 5 Locations] is grayed out and cannot be selected. (See "Copy Set Numbering Options.")
If you set any two of the Page Numbering, Copy Set Numbering, Watermark Printing, or Print Date modes to print in the same position, a message asking for your confirmation is displayed when you press
 . . |
|
NOTE
|
|
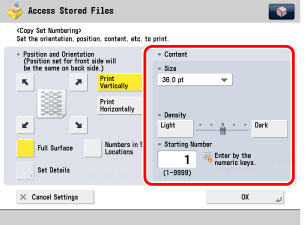
If Copy Set Numbering Option Settings in Function Settings (from the Settings/Registration screen) is set to 'On', the size of the copy set numbers becomes [10.5 pt.], [12.0 pt.], [14.0 pt.].
|
| © CANON Inc. 2010 All Rights Reserved. | Disclaimer CopyrightTrademarksOffice LocationsUSRM1-6162-00 CopyrightTrademarksOffice LocationsUSRM1-6162-00 |
|---|