Prints the date onto the output.
|
IMPORTANT
|
|
For information on the modes which cannot be set in combination with this mode, see "Unavailable Combination of Functions (Print Function for the Files Stored in a Mail Box)."
This mode can be used only for printing a file stored in a mail box.
The Print Date mode cannot be used with files with a resolution of less than 600 × 600 dpi.
Printing performance may not be optimal, depending on the file content and combination of settings.
|
|
NOTE
|
|
If the Print Date mode is used with the Cover, Insertion Sheets or Job Separator mode, the date will not be printed on the inserted pages.
|
1.
Select the desired Mail Box.
2.
Select the file that you want to print → press [Print] → [Change Print Settings] → [Options].
3.
Press [Print Date].
4.
Set the position and orientation of the date.

|
[Print Vertically]:
|
Prints the date vertically.
|
|
[Print Horizontally]:
|
Prints the date horizontally.
|
|
NOTE
|
|
If you set any two of the Page Numbering, Copy Set Numbering, Watermark Printing, or Print Date modes to print in the same position, a message asking for your confirmation is displayed when you press
 . . |
5.
Press [Set Details].
Press [X] and [Y] → press [-] or [+] to set their respective positions → press [OK].
6.
Select the size of the date → select the date format → enter the date using  -
- (numeric keys).
- (numeric keys). 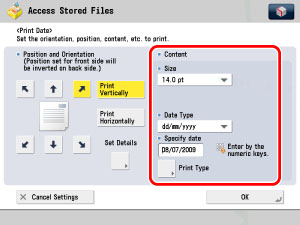
Select the size of the page numbers from [10.5 pt], [12.0 pt], and [14.0 pt].
There are six types of date format you can select from.
|
NOTE
|
|
If you do not specify a date, the date set in Date/Time Settings in Preferences (the Settings/Registration screen) is printed. Confirm that the date and time settings are correct.
|
Press [Print Type] → select [Transparent] or [Overlay] → press [OK].
If [Transparent] is selected, you can also adjust the halftone density by pressing [Light] or [Dark].
7.
Press [OK].