This section describes the procedure for printing files stored in the Advanced Space on the machine. If the machine is used as a server, you can open and print files from your computer.
|
IMPORTANT
|
|
To use the Advanced Space, it is necessary to set it according to your needs. For details, see "Advanced Space/Network Settings."
To print a PDF file from this machine, the PS Printer Kit or Direct Print Kit (for PDF/XPS) is necessary.
|
|
NOTE
|
|
You can select and print up to six files in the same space at a time. However, you cannot select and print files with different file formats or a folder and a file at the same time.
You can only select multiple files when the files are stored in the same space.
To cancel all settings, press [Back to Default Set.]. (The machine restores the default settings for Access Stored Files.)
Before using the Mail Box function, it is useful to read the following topics:
Main power and control panel power (See "Main Power and Control Panel Power.")
Entering characters from the touch panel display (See "Entering Characters from the Touch Panel Display.")
Routine maintenance (See "Routine Maintenance" and "Routine Maintenance (Cleaning Function).")
If the Log in screen for User Access Control for Advanced Space is displayed, enter the user name and password registered in the User Access Control for Advanced Space. (See "Authentication Screen Displayed on the Touch Panel Display.")
|
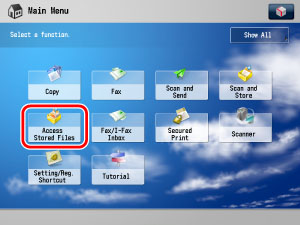
1.
Press [Access Stored Files] on the Main Menu screen.
2.
Press [Advanced Space].

3.
If the Log In screen is displayed, enter the user name and password press [OK].

After you are finished using the machine, press  (Log In/Out) to log out.
(Log In/Out) to log out.If you are using SSO-H, press [Store Password] to store your user name and password. Next time you log in to the Advanced Space, the user name and password will already be entered and you can display the Space Selection screen by simply pressing [OK].
If the Log In screen is not displayed, this step is not necessary.
4.
Select [Shared Space] or [Personal Space].

If the Log In screen is not displayed, you cannot create Personal Space.
5.
Select the folder with the file to print.
6.
Select the file that you want to print → press [Print].
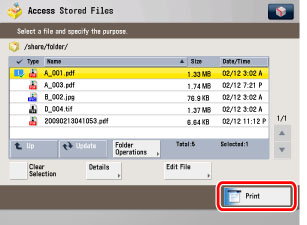
If there are seven or more stored documents, press [ ] or [
 ] to scroll through the stored files..
] or [] to scroll through the stored files..You can select and print multiple files with the same settings if they are in the same file format.
However, you can only print up to six files at a time.
You cannot select and print multiple files if their file formats, such as JPEG and TIFF, are different from each other.
|
NOTE
|
|
The selected files are numbered in the order specified, and are printed in that order.
You can cancel a selection by selecting the file again.
To cancel all files, press [Clear Selection].
When there are two or more files stored in the space, you can press [Name] or [Date/Time] to sort the list of files.
When you close the space after sorting the files, the files will be unsorted the next time you open the space.
If you press [Name], or [Date/Time] with a file selected, that file is unselected, and the top of the file list is displayed.
|
7.
If the Select Paper screen is displayed, select the paper source press [OK].

The Select Paper screen is displayed only if you are printing a JPEG or TIFF file.
If you are printing a PDF file, Auto Select Paper is selected.
To change the paper source, see step 3 of "Paper Selection."
|
NOTE
|
|
For more information on paper types, see "Available Paper Stock."
|
8.
Select the print settings on the Print Settings screen.

To change the number of prints, enter the desired number using  -
-  (numeric keys).
- (numeric keys).To print all pages, press [All Pages].
To specify which page to print, press [Specify Pages].
|
NOTE
|
|
You can set paper selection, 2-Sided printing, finishing, and special features on the Print Settings screen.
|
9.
Press [Start Printing].
If there is a current or reserved print job, the machine will start printing your file after that job is complete.
When printing starts, the following screen appears.
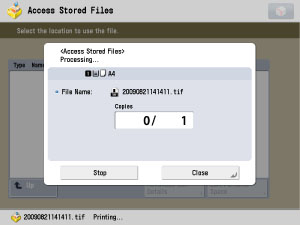
When printing is complete, the display returns to the Space Selection screen.
|
NOTE
|
|
If you notice a difference between the document size specified when scanning originals and the actual print size, you can adjust the print size in [Fine Adjust Zoom] in Adjustment/Maintenance (Settings/Registration). (See "Fine Adjust Zoom.")
To cancel printing, press [Stop]. (You cannot cancel printing by pressing
 .) .)To reserve the next print job, press [Close] → select the space containing the file you want to print → select the file → press [Start Printing]. (See "Reserving Jobs.")
|