e‑Manual TopContentsHelpGlossary
Category
Top » Security » Copy Set Numbering Options

Category Top

Increasing Security

Restricting Access by Authentication

Specifying the System Manager Settings

Department ID Management

Registering the Department ID, Password, and Page Limit

Changing the Password and Page Limit

Deleting the Department ID and Password

Checking and Printing Counter Information

Clearing Page Totals

Accepting Print and Scan Jobs with Unknown IDs

User Setting Information Management Service

User Access Control for Advanced Space

Logging In to the User Management Page

Registering/Editing User Access Control for Advanced Space User Information

Editing User Information by General User

Authentication Screen Displayed on the Touch Panel Display

List of Error Messages and Their Causes and Remedies on Web Browser (User Access Control for Advanced Space)

List of Error Messages and Their Causes and Remedies on Touch Panel Display (User Access Control for Advanced Space)

Network Security

Key Pair and Server Certificate Settings for Encrypted SSL Communication

Advanced Space Settings

Setting the Advanced Space

Setting the Network

MEAP Settings

Preventing Information Leakage

Generating and Confirming a Key Pair and Device Signature Certificate and User Certificate for Adding Digital Signatures to PDF or XPS Files

Confirming the Device Signature Certificate

Checking a User Signature Certificate

Secure Watermark/Document Scan Lock

Forced Secure Watermark

Forced Document Scan Lock

Printer Driver Secure Watermark

Printer Driver Document Scan Lock

Adjusting the Secure Watermark Contrast

Adjusting Embedded Dots

Detecting Document Scan Lock

Copy Set Numbering Options

Specifying Encrypted Secured Printing Settings

Restricting the Send Function

Setting the Address Book

Setting the Control Panel Display

Setting the Management on the Hard Disk

Completely Erasing Unnecessary Data from the Hard Disk

Initializing All Data/Settings

TPM Settings

Device Management

USB Settings

Device Information Settings

Specifying Device Information Delivery Settings

Registering/Deleting/Printing Delivery Destinations

Setting Automatic Delivery

Setting Manual Delivery

Restricting the Reception of Device Information

Restoring Device Information

Restricting the Type of Information That Is Updated

Checking/Printing the Communication Log

Limiting Functions

Setting Remote UI

Clearing the Message Board

Available Settings for Administrator Table

Collapse all|Expand all
Copy Set Numbering Options
You can specify the detailed settings of the Copy Set Numbering mode for both the Copying and Mail Box functions. For instructions on using the Copy Set Numbering mode, see "Copy" and "Access Stored Files."

1.
Press → [Function Settings] → [Common] → [Print Settings] → [Copy Set Numbering Option Settings].
2.
Select [On] or [Off] for <Number Option>.
[On]:
[Full Surface] and [Numbers in 5 Locations] are grayed out, and cannot be selected on the Position and Orientation screen when you set the Copy Set Numbering mode. The font sizes of the copy set numbers are as follows: [Small]: 10.5 point, [Medium]: 12 point, [Large]: 14 point
[Off]:
[Full Surface] and [Numbers in 5 Locations] can be selected on the Position and Orientation screen when you set the Copy Set Numbering mode. The font sizes of the copy set numbers are as follows: [Small]: 12 point, [Medium]: 24 point, [Large]: 36 point
If you select [On]:
Select [On] or [Off] for each of the items → press [Next].
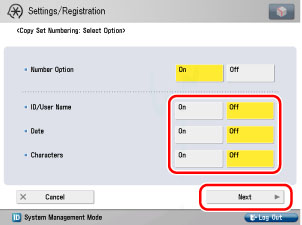
<ID/User Name>
[On]:
The ID/user name is printed.
[Off]:
The ID/user name is not printed.
<Date>
[On]:
The date is printed.
[Off]:
The date is not printed.
<Text>
[On]:
User-defined text is printed.
[Off]:
User-defined text is not printed.
If you select [On] for <Date>, select the date format → press [Next].
If you select [On] for <Text>, press [Enter] → enter the text to print → press [OK] → [Next].
If you have registered characters in Register Characters for Page Numbering/Watermark in Function Settings (from the Settings/Registration screen), you can select the characters from the list.
Select the way you would like to align the selected or entered characters on the page → press [OK].
If you select [Off]:
Press [OK].