This mode enables you to make prints with the entire original image shifted by a designated width to the left, right, top, or bottom in order to create a gutter on the prints. Use this mode to make prints ready for placement in ring binders.
|
Left Margin
Selected |
Right Margin
Selected |
Top Margin
Selected |
Bottom Margin
Selected |
|
 |
 |
 |
 |
 |
|
IMPORTANT
|
|
For information on the modes which cannot be set in combination with this mode, see "Unavailable Combination of Functions (Print Function for the Files Stored in a Mail Box)."
This mode can be used only for printing a file stored in a mail box.
The Gutter mode shifts the entire original image by the designated width. Therefore, an original whose image extends all the way to the edges of the sheet may be partially cut off on the print.
|
|
NOTE
|
|
You can choose to only create a gutter on the back side of a print. Therefore, originals that already have a gutter can be printed in the 1-Sided
 2-Sided mode or 2-Sided1-Sided mode. 2-Sided mode or 2-Sided1-Sided mode. |
1.
Select the desired Mail Box.
2.
Select the file that you want to print → press [Print] → [Change Print Settings] → [Options].
3.
Press [Gutter].
4.
Select the desired gutter type.
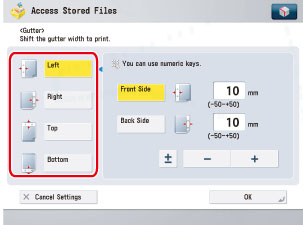
5.
Select [Front Side] or [Back Side] → press [-] or [+] to set the gutter width → press [OK].
|
IMPORTANT
|
|
If you are using the Gutter and 2-Sided Printing modes together and printing a file that already has a gutter, set the Gutter mode for the back only.
If you are using the Gutter and 2-Sided Printing modes together and printing a file that does not have a gutter, set the Gutter mode for both the front and back.
|
|
NOTE
|
||
|
If you enter a value other than 0, you can switch between positive and negative gutter width by pressing [±].
|