This section describes the flow of basic sending operations.
For Scan and Send, the following sending methods are available.
If <Enable Fax in Scan and Send Function> is set to 'On' in Display Fax Function in Display Settings in Preferences (Settings/Registration), you can scan originals and send them as faxes. (See "Display Fax Function.")
For instructions on specifying a fax number, see "Flow of Sending Fax Operations."
You can scan a document and send it as an attached file in an e-mail message. The scanned document can be sent as a PDF, XPS, JPEG, or TIFF file.
You can scan a document and send it to a destination via the Internet as an I-fax. An I-fax can only be sent to machines that can receive faxes via the Internet.
You can send a job to any computer that acts as a file server on the network.
You can scan a document and store it in a mail box. If you include a mail box as one of the destinations to which you are sending your document, the document is stored in the selected mail box for later use. Documents stored in a mail box can be printed and sent to other destinations.
|
IMPORTANT
|
|
If you are using Microsoft Exchange Server 5.5, 2000, or 2003, a sending error may occur when you send an e-mail message in the following cases:
When a user is logged in to the machine using the SSO-H
When <SMTP Authentication (SMTP AUTH) > in <POP AUTH Method> is set to 'On' in Communication Settings in E-Mail/I-Fax Settings in Function Settings (Settings/Registration)
In these cases, you should add the user logged in to the machine using the SSO-H to [Send on behalf of] in <Delivery Options> in Exchange General. For more information, contact your system administrator.
|
|
NOTE
|
|
Before using the Send function, it is useful to read the following topics:
Main power and control panel power. (See "Main Power and Control Panel Power.")
For instructions on entering characters using the keys displayed on the touch panel display, see "Entering Characters from the Touch Panel Display."
Routine maintenance (See "Routine Maintenance" and "Routine Maintenance (Cleaning Function).")
The maximum number of send jobs that the machine can handle is 120, including jobs with error codes. However, the actual number of send jobs that the machine can handle may be less than 120, depending on the following conditions:
Multiple documents are being sent at the same time
Large documents are being sent
A large amount of memory is being used for the Mail Box and the Fax/I-Fax Inbox
You can print a report that contains the results of all send jobs. (See "Send TX Report" and "Communication Management Report.")
If you are using a login service, it is necessary to log in to the machine with the appropriate procedure for the login service you are using.
If you are using the optional Card Reader to perform Department ID Management, see "Card Reader -C1."
If you are using Department ID Management, see "Entering the Department ID and Password."
If you are using the SSO-H login service, see "Using a Login Service."
|
1.
Press [Scan and Send] on the Main Menu screen.
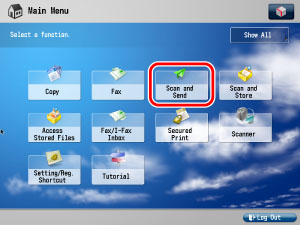
The Scan and Send Basic Features screen appears.

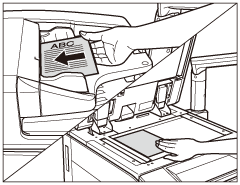
2.
Place your originals.
|
NOTE
|
|
For instructions on placing your originals, see "Duplex Color Image Reader Unit-C1."
|
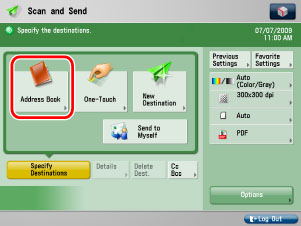
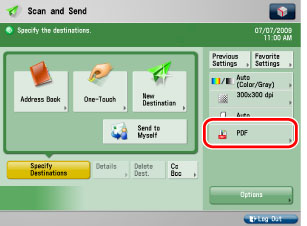
3.
Specify the destinations.
|
IMPORTANT
|
|
If a destination type is set to 'On' in Limit New Destination in Common Settings in Send in Function Settings (Settings/Registration), you cannot enter a destination in [New Destination]. You have to select a stored destination by pressing [Address Book], [Address Book (Remote)], [Address Book (LDAP Server)], or [One-Touch]. (See "Restricting New Addresses.")
|
|
NOTE
|
|
The maximum of destinations can be specified at the same time is 256. If you specify a group, which is made up of several destinations, each destination is counted as a separate address.
The icons that are displayed on the screen are:
 : E-mail : E-mail : FAX : FAX : I-Fax : I-Fax : File Server : File Server : Group : Group : Mail Box : Mail Box : Bcc : Bcc : Cc : Cc |
Press [Address Book] → select the desired destination. (See "Specifying Destinations Using the Address Book (Local).")
|
NOTE
|
|
Besides Local Address Book, you can specify the destination from the Remote Address Book or LDAP Server, depending on the setting.
|
Press [One-Touch] → select the one-touch button that contains the desired destination. (See "Specifying Destinations Using One-Touch Button.")
Press [New Destination] → select a sending method → enter the desired destination. (See "Specifying the E-Mail Address Not Stored in the Address Book," "Specifying the I-Fax Address Not Stored in the Address Book," and "Specifying the File Server Not Stored in the Address Book.")
Press [Send to Myself]. (See "Sending Documents to Yourself.")
|
NOTE
|
|
[Send to Myself] is displayed only if authentication by SSO-H Network Settings is set.
|
Press [Cc Bcc] → specify the e-mail addresses. (See "Setting Cc and Bcc Addresses.")
|
NOTE
|
|
Only e-mail addresses can be specified as Cc and Bcc addresses.
The maximum number of Cc and Bcc destinations that can be sent at one time is 256 including the destination specified for [To]. Mail boxes are not included in this count.
|
Press [Favorite Settings] → select the button that contains the desired destination. (See "Favorite Settings.")
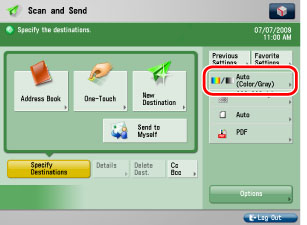
4.
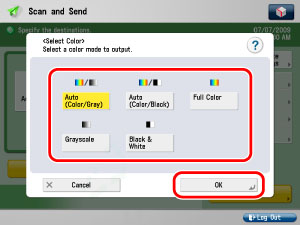
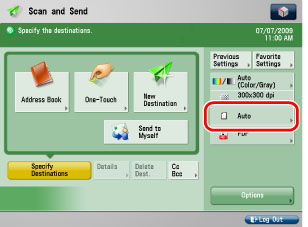
Press the Select Color button → select a colour mode → press [OK].
|
IMPORTANT
|
|
When [Auto(Color/Gray)] or [Auto(Color/Black)] is set and your originals contain colour sections, the machine scans them in the Full Color mode. However, the machine may scan the colour originals in the Grayscale or Black-and-White mode under the following conditions. To avoid this, set the colour mode to 'Full Color'. (See "Colour Settings.")
If the originals contain a few colour sections
If the colour sections are located only on the left side on the left side (within 10 mm from the left edge) or on the right side (within 17 mm from the right edge) of the originals when placing the originals into the feeder
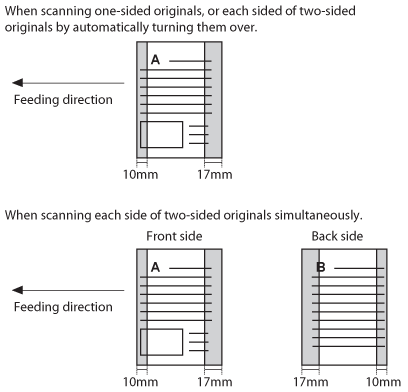 If the originals contain light colour densities
If the colour sections of the originals are close to black
|
|
NOTE
|
|
For instructions on setting the colour mode, see "Colour Settings."
|
5.
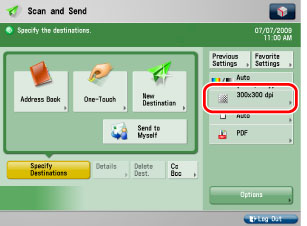
Press the Resolution button → select a resolution → press [OK].

To set the color mode to [Auto(Color/Gray)], [Auto(Color/Black)], [Full Color], or [Grayscale] when resolution is set to 200 × 400 dpi, 400 × 400 dpi, or 600 × 600 dpi, it is necessary to install the Additional Memory Type B (512MB) to expand the memory capacity of the machine. If the Additional Memory Type B (512MB) is not installed when color mode is set to [Auto(Color/Gray)], [Auto(Color/Black)], [Full Color], or [Grayscale], the resolution cannot be set to 200 × 400 dpi, 400 × 400 dpi, or 600 × 600 dpi.
|
NOTE
|
|
For instructions on setting the resolution, see "Resolution Settings."
|
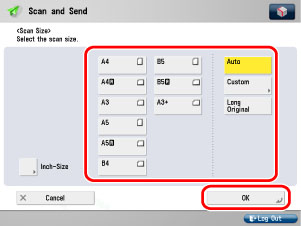
6.
Press the Scan Size button → select a scan size → press [OK].
|
NOTE
|
|
For instructions on setting the scan size, see "Scan Size Settings."
|
7.
Press the File Format button → select a file format → press [OK].
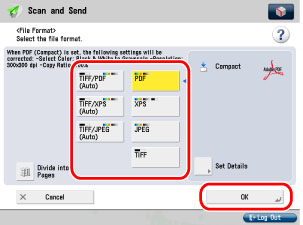
This part of the procedure is not necessary if any one of the following is true:
A fax address is specified as the destination
An I-fax address is specified as the destination
A mail box is specified as the destination
|
NOTE
|
|
For instructions on setting the file format, see "Setting the File Format to Send a Document in."
|
8.
Press [Options] → select the desired mode → press [Close].
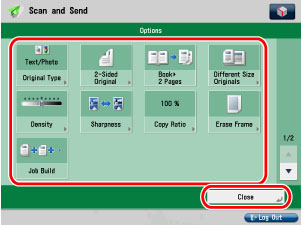
[Options] 1/2
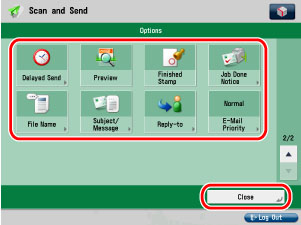
[Options] 2/2
|
NOTE
|
|
For instructions on setting the original type, see "Original Type."
For instructions on scanning 2-sided originals, see "2-Sided Original."
For instructions on scanning a book or bound original see "Book → 2 Pages."
For instructions on scanning different size originals, see "Different Size Originals."
For instructions on adjusting original density, see "Density."
For instructions on adjusting original resolution, see "Sharpness."
For instructions on setting the scanning ratio of the original size, see "Copy Ratio."
For instructions on erasing shadows and line that appear on scanned originals, see "Erase Frame."
For instructions on sending large number of originals, see "Job Build."
For instructions on setting the Delayed Send mode, see "Delayed Send."
For instructions on setting the Preview mode, see "Preview."
For instructions on setting the Finished Stamp mode, see "Finished Stamp."
For instructions on setting the Job Done Notice mode, see "Job Done Notice."
For instructions on setting the file name when sending an e-mail/I-fax or sending to server/mail box, see "File Name."
For instructions on setting the file name when sending an e-mail/I-fax or sending to server/mail box, see "Subject/Message."
For instructions on setting the reply-to destination when sending an e-mail/I-fax, see "Reply-to."
For instructions on setting the e-mail priority when sending an e-mail, see "E-Mail Priority."
If <Enable Fax in Scan and Send Function> is set to 'On' in Display Fax Function in Display Settings in Preferences (Settings/Registration), you can also specify the following optional modes.
For information on setting the sender name and the direct sending mode, see "Specifying the Sender's Name When Sending Fax" and "Memory Sending and Direct Sending."
|
9.
Press  .
.
.Scanning starts.
The scanned data is sent to the specified destination when scanning is complete.
If the original is placed on the platen glass, follow the instructions that appear on the touch panel display → press . When scanning is complete, press [Start Sending].
. When scanning is complete, press [Start Sending].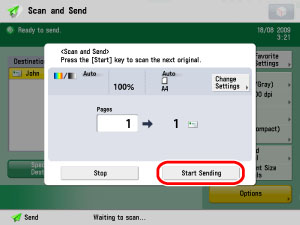
Scan the original again from the first page if a message is displayed indicating that scanning is cancelled because the data size for the scanned original exceeds the maximum data size. Scanning may be possible if you set 'High Ratio' for [Data Compression Ratio], 'Low' for [Sharpness], and lower the resolution.
|
IMPORTANT
|
|
The size of the original is detected automatically.
|
|
NOTE
|
|
If you want to send to an e-mail or I-fax address, a screen to enter the user name and password may be displayed, depending on the e-mail/I-fax settings. If the screen is displayed, enter the user name and password registered in SMTP Authentication. For instructions on setting the user name, password, and screen display, see the following. (See "E-Mail/I-Fax Settings.")
You can set the user name and password in <Authentication/Encryption> in Communication Settings in E-Mail/I-Fax Settings in Send in Function Settings (Settings/Registration).
The screen is displayed if [Display Auth. Screen When Send] is set to 'On' in <Authentication/Encryption> in Communication Settings in E-Mail/I-Fax Settings in Send in Function Settings (Settings/Registration).
If [Use SMTP Authentication for Each User] in E-Mail/I-Fax Settings is set to 'On', you can register the user name and password of the logged in user by pressing [
 ] on the top right of the screen and then selecting [Set SMTP Authentication] from the displayed menu. ] on the top right of the screen and then selecting [Set SMTP Authentication] from the displayed menu.If the destination includes the file server that you set [Enter Password Each Time] to 'On' when the file server is specified as the destination or when the file server is included in the group destination, one-touch button, or favorite settings, a screen prompting you to enter user name and password is displayed. Enter the previously set password. (See "Storing File Server Addresses in the Address Book (Local).")
If Preview mode is set, you can verify the images from the Preview screen before sending your document. (See "Preview.")
|
10.
If you want to cancel sending, press  .
.
.|
NOTE
|
|
You can press
to cancel a send job that is being scanned.For instructions on cancelling a send job, see "Cancelling a Job."
You can also cancel a send job from the Status Monitor/Cancel screen. (See "Using the Status Monitor/Cancel Screen.")
|
11.
When scanning is complete, remove your originals.