You can select a destination stored in the Address Book or a one-touch button, or specify a new address altogether. You can also recall the stored destinations and settings for scan/send in favorite settings. (See "Favorite Settings.")
This section describes the procedures for specifying a file server on the network that has not been stored in the Address Book as the destination of a send job.
For instructions on specifying a fax number, see "Specifying Destinations Not Stored in the Address Book."
|
IMPORTANT
|
|
The destination that you just specified is not stored in the Local Address Book. It is deleted once the document is sent.
Windows 2000/XP/Vista/7/Server 2003/Server 2008 restricts the number of users or clients that can be accessed. Once the limit of users or clients has been reached, it is not possible to send documents to a file server using Windows 2000/XP/Vista/7/Server 2003/Server 2008.
If Language/Keyboard Switch On/Off is set to 'On' in Display Settings in Preferences (Settings/Registration), the host name and folder path of the file server destination may not be displayed correctly, so you may not be able to refer to them.
|
|
NOTE
|
|
To view the detailed information of a selected destination, select the destination → press [Details].
You can change, edit, or delete destinations on the Scan and Send Basic Features screen before scanning. (See "Checking/Changing a Destination" and "Deleting a Destination.")
The maximum of destinations can be specified at the same time is 256. If you specify a group, which is made up of several destinations, each destination is counted as a separate address.
If you frequently send documents to the same destinations, store these destinations in the Local Address Book beforehand. (See "Storing File Server Addresses in the Address Book (Local).")
Set the following items when sending to a file server:
Protocol
Host Name
Folder Path
User
Password
For examples of the settings that are needed to send documents to a file server, see "Network."
|
You can specify a file server as the destination directly from the keyboard displayed on the touch panel display. Press [Host Name], [Folder Path], [User], and [Password] to specify the file server settings.
If you select [Windows(SMB)] as the server protocol, you can specify a file server connected to a specific network by pressing [Browse] on the File screen. You can either specify a file server from a workgroup, or specify the domain name of an Active Directory Server on the machine.
If you select [Windows(SMB)] as the protocol, you can specify a file server connected to a specific network by pressing [Host Search] on the File screen.
1.
Press [New Destination].

2.
Press [File].

3.
Press the Protocol drop-down list → select the desired server protocol.
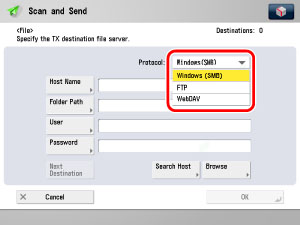
The following server protocols may be used.
Confirm the system environment of the destination before sending.
System Requirements for IPv4 Compatible Server:
|
Protocol
|
System Requirements
|
Application
|
|
FTP
|
Sun Solaris V.2.6 or later
Mac OS X or later Red Hat Linux 7.2 |
-
|
|
Windows 2000 Server
|
Internet Information Services 5.0
|
|
|
Windows XP Professional
|
Internet Information Services 5.1
|
|
|
Windows Server 2003
|
Internet Information Services 6.0
|
|
|
Windows Vista
Windows Server 2008 |
Internet Information Services 7.0
|
|
|
Windows 7
|
Internet Information Services 7.5
|
|
|
Windows(SMB)
|
Windows 2000/XP
Windows Server 2003 Windows Vista Windows Server 2008 Windows 7
|
-
|
|
Mac OS X v10.2
Red Hat Linux 7.2 |
Samba 2.2/3.0
|
|
|
WebDAV
|
Sun Solaris V.2.6 or later
Red Hat Enterprise Linux AS/ES/WS 4.0 or later Windows 2000 Server Windows XP Professional Windows Server 2003 Windows Vista Windows Server 2008 |
Apache 2.0
|
|
Mac OS X
|
Apache 1.3
|
|
|
Windows 2000 Professional
Windows 2000 Server |
Internet Information Services 5.0
|
|
|
Windows XP Professional
|
Internet Information Services 5.1
|
|
|
Windows Server 2003
|
Internet Information Services 6.0
|
|
|
Windows Vista
Windows Server 2008 |
Internet Information Services 7.0
|
|
|
Windows 7
|
Internet Information Services 7.5
|
System Requirements for IPv6 Compatible Server:
|
Protocol
|
System Requirements
|
Application
|
|
FTP
|
Solaris Version 9.0 or later
Red Hat Enterprise Linux AS/ES/WS 4.0 or later
Mac OS X 10.3 or later
|
-
|
|
SMB
|
Windows Vista
Windows Server 2008
Windows 7
|
-
|
|
WebDAV
|
Solaris Version 9.0 or later
|
Apache 2.0
|
|
Windows Server 2003
|
Internet Information Services 6.0
|
|
IMPORTANT
|
|
If you are using WebDAV and connect to the Internet using proxies, the proxy server must support IPv6.
This machine does not support WebDAV transmissions to Windows Vista. However, it is possible to view documents sent to the WebDAV server on the network from Windows Vista.
|
4.
Specify each setting → press [OK].
If you select [Windows(SMB)] as the server protocol, you can specify the file server by pressing [Browse]. For instructions on using the Browse key, see "Using the Host Search Key (Windows (SMB))."
If you select [Windows(SMB)] as the server protocol, you can specify the file server by pressing [Search Host]. For instructions on using the Host Search key, see "Using the Host Search Key (Windows (SMB))."
[Host Name]:
Press [Host Name] → enter a host name → press [OK].
A host name is a name assigned to a host computer that provides services on the Internet. A specific host name is assigned to each host computer to identify it on the Internet. In this entry box, enter the name of the file server on the network as the destination of the send job.
When [FTP] or [WebDAV] is selected as the server protocol, you can also specify a port number after the host name address by entering a colon (:) and the port number.
Example: 192.168.100.50:21000
When sending to an IPv6 host, specify the following settings for [Host Name].
[IPv6 Address]: <Port Number>
Example: [5aed:90a0:bc05:01d2:568a:2fc0:0001:12ee]:21000
Make sure to enter the same port number for the Host Name as the one specified for the FTP server or WebDAV server to which you are sending your documents.
When [WebDAV] is selected as the server protocol, the HTTP protocol is used if you specify 'HTTP://' as the scheme at the start of the host name, and the SSL + HTTP (HTTPS) protocol is used if you specify 'HTTPS://' as the scheme at the start of the host name. Specifying 'HTTPS://' as the scheme enables SSL communications between the server and the machine. However, the route between the server and the machine is only encrypted, and a server certificate validity check is not performed using a CA certificate.
[Folder Path]:
Press [Folder Path] → enter a folder path → press [OK].
A folder path is a series of characters that signify the location of the folder. Specify a folder in the file server as the destination of the send job.
[User]:
Press [User] → enter the user name → press [OK].
If [Windows(SMB)] is selected as the server protocol, enter the required user name information in the manner shown below:
To enter the user name only
Example: user_name
Maximum 20 characters
Example: user_name
Maximum 20 characters
To enter the user name and the domain name
Example: domain_name\user_name
Domain name: Maximum 15 characters
User name: Maximum 20 characters
Example: domain_name\user_name
Domain name: Maximum 15 characters
User name: Maximum 20 characters
To enter a UPN (User Principal Name)
Example: user_name@domain_name.com
Maximum 128 characters
[Password]:
Example: user_name@domain_name.com
Maximum 128 characters
[Password]:
Press [Password] → enter a password → press [OK].
Setting the password is optional.
After pressing [OK], the password appears as asterisks (********) on the File settings screen.
|
NOTE
|
|
UPN (User Principal Name) can be used only if you are sending to a computer belonging to a domain operated with Active Directory.
When sending to a file server on the Internet using WebDAV, proxy server settings may be required, depending on the environment of the destination. (See "Settings Common to TCP/IPv4 and TCP/IPv6.")
|
5.
To add destination, press [Next Destination] and repeat the procedure of step 4.
6.
Press [OK].
1.
Press [New Destination] → [File].
2.
Press the Protocol drop-down list → select [Windows(SMB)].
3.
Press [Browse].
|
IMPORTANT
|
|
After turning the main power ON, you must wait for the time set in Startup Time Settings to elapse before pressing [Browse]. Network transmission is not possible until this startup time has elapsed. (See "Startup Time Settings.")
|
4.
Select the desired workgroup.
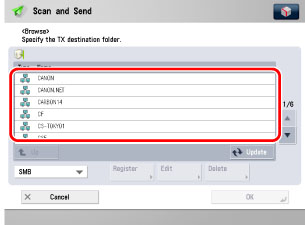
You can also select the workgroup from a list of Active Directory server domain names that are registered in the machine by pressing [Directory] from the drop-down list.
Press [Register].
Enter a domain name → press [OK].
|
NOTE
|
|
You can register up to five Directory servers.
To edit the domain name, select the domain name that you want to edit → press [Edit].
To delete the domain name, select the domain name that you want to delete → press [Delete] → press [Yes] on the pop-up screen that appears when you press [Delete].
|
5.
Select the desired file server → press [Down].
To move up one level, press [Up].
6.
If the Enter Network Password screen is displayed, enter your user name and network password.
Specify each setting → press [OK].
|
[User]:
|
Press [User] → enter your user name → press [OK].
|
|
[Password]:
|
Press [Password] → enter your network password → press [OK].
|
After pressing [OK], the password that you entered appears as asterisks (********) on the Enter Network Password screen.
|
IMPORTANT
|
|
Searching for a destination via an LDAP server is not possible if the time setting of the server and the time setting of the machine are more than five minutes apart. If you cannot send even when the user name and password are correct, check the time settings on the server and the machine.
|
7.
Press [Down] → select the folder on the specified server to which you want to send your documents → press [OK].
To go down one level, press [Down].
To move up one level, press [Up].
8.
To add destination, press [Next Destination] and repeat the procedure from steps 2 to 8.
9.
Confirm your settings → press [OK].
1.
Press [New Destination] → [File].
2.
Press the Protocol drop-down list → select [Windows(SMB)].
3.
Press [Search Host].
4.
Enter the search conditions → press [Start Searching].
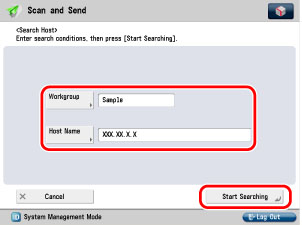
[Workgroup]:
Press [Workgroup] → enter the workgroup name → press [OK].
[Host Name]:
Press [Host Name to Search] → enter the IP address, FQDN, or NetBIOS name → press [OK].
|
NOTE
|
|
When entering a NetBIOS name, you can also enter wildcard characters, such as * and ?, as part of your search.
When searching for the host name using wildcard characters, make sure to also enter a workgroup name.
Examples:
* (asterisk): Replaces one or more characters (up to 15 characters).
Example: tri* → trinity, trinity1, trinity0002 ?: Replaces only one character.
Example: tr?nity → trinity |
5.
Select the file server from the search results.
Specify the file server in accordance with steps 5 to 7 of "Using the Browse Key (Windows (SMB))."
Specify the file server in accordance with steps 4 to 7 of "Using the Browse Key (Windows (SMB))."
6.
To add destination, press [Next Destination] and repeat the procedure from steps 2 to 6.
7.
Confirm your settings → press [OK].