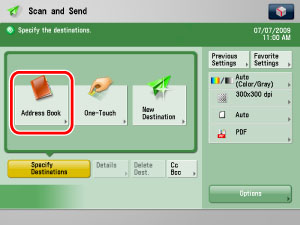
If you register a destination in the Local Address Book, you can save yourself the effort of entering the destination every time it is used. That destination can also be selected from the Local Address Book for use in any other customized setting.
You can register a protocol, host name, folder path, etc. for storing scanned documents in a file server.
The Local Address Book is a feature used for storing fax, e-mail, I-fax, and file server destinations. The Local Address Book is divided into 10 Address Lists and one-touch buttons. You can store up to 1,800 destinations, including 1,600 destinations in the Local Address Book, and 200 destinations in one-touch buttons. Registering a destination in the Local Address Book saves you the effort of entering that destination's address each time you send a job.
By storing your own e-mail address, you can specify a reply-to e-mail address and use the Job Done Notice function.
|
IMPORTANT
|
|
If Language/Keyboard Switch On/Off is set to 'On' in Display Settings in Preferences (Settings/Registration), the host name and folder path of the file server destination may not be displayed correctly, so you may not be able to refer to them.
|
|
NOTE
|
|
For instructions on registering a fax number, see "Storing Fax Numbers in Address Book (Local)."
Since each address entry is treated as a single entry, if an e-mail address is registered in a group address, that e-mail address and the group address are counted as two entries.
Destinations stored in the Address Book can be exported to your computer as a file, which can later be imported in the machine. For information on exporting the Local Address Book, see "Saving/Loading the Address List."
If you want to manage destinations with the Manage Address Book Access Numbers mode, set the Manage Address Book Access Numbers in Set Destination (Settings/Registration) to On. (See "Access Number Management.")
If there is any required destination setting that has not yet been set after registering the access number, the screen for specifying the destination settings is displayed again.
You can enter up to seven digits for the access number. If you enter fewer than seven digits, the machine stores the access number with leading zeros.
Example: If <321> is entered, <0000321> is stored. You cannot store an access number with only zeros as the number, such as <0000000>. If you enter a number that begins with zeros, the leading zeros are ignored. Example: If <02> or <002> is entered, <0000002> is stored. For examples of the settings needed to send to a file server, see "Network."
UPN can be used only if you are sending to a computer belonging to a domain operated with Active Directory.
|
1.
Press [Address Book].
2.
Press [Register]

3.
Press [Register New Dest.].

4.
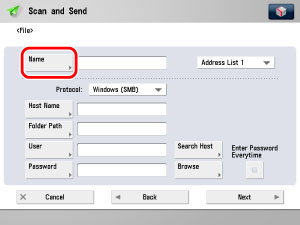
Press [File].

5.
Press [Name] → enter a name of the file server address → press [OK].
|
NOTE
|
|
If you want to search the destination, search is performed using the text entered here. To search, you can sort the destination by the initial letter or narrow the search for destination by using a maximum of 24 characters. For more information on refining the destination, see "Specifying Destinations Using the Address Book (Local)."
|
6.
Press the Address List drop-down list → select one of the numbered address books.
Address Lists 1 to 10 are used to divide the Address Book into 10 parts. This is a convenient way to classify destinations.
The file server address that you enter will be stored in the Address List that you select here.
7.
Press the Protocol drop-down list → select the desired protocol.
|
NOTE
|
|
For more information on the available protocols, see "Using the Keyboard."
|
8.
Set [Host Name], [Folder Path], [User], and [Password].
If [Enter Password Each Time] is set to 'On', when sending to a file server, a screen to enter the registered password is displayed. If you want to register as a group address, set [Enter Password Each Time] to 'Off'. If it is set to 'On', you cannot send to the group address.
|
NOTE
|
|
For instructions on specifying each of the settings for FTP, Windows (SMB), and WebDAV, see "Specifying the File Server Not Stored in the Address Book."
|
9.
Finish storing the address.
Press [Next].
Press [Access No.].
Press [Access No.] → enter the access number using  -
-  (numeric keys).
- (numeric keys).Press [Confirm] → re-enter the access number for confirmation using - (numeric keys) → press [OK] → [OK].
- (numeric keys) → press [OK] → [OK].If you do not want to set an access number for this destination, press [OK] without entering any number.
Press [OK].