You can manually specify the scan size when the machine cannot detect the paper size automatically, such as when scanning transparencies. Specify the scan size as well, if you want to scan an A3 original with an image that extends all the way to the edges without the periphery of the original being cut off. You can also store the specified scan size.
|
IMPORTANT
|
|
You cannot select [Auto] when scanning the following types of originals. Specify the size of these documents manually.
Nonstandard size originals
Highly transparent originals, such as transparencies
Originals with an extremely dark background
Originals smaller than A5
If the original is placed in the feeder, you cannot scan by selecting [Custom] in Scan Size.
If the colour mode is set to [Auto(Color/Black)],[Auto(Color/Gray)], [Full Color], or [Grayscale], a long originals cannot be selected. However, if only an I-fax address is specified as the destination, a long originals can be selected regardless of the colour mode settings.
If you select [Custom] in Scan Size, you cannot select [Finished Stamp].
|
|
NOTE
|
|
If you scan a registered scan size, the scanned image is not rotated automatically.
If the Preview mode is set, you can verify the images from the Preview screen before sending your document. (See "Preview.")
To cancel all settings, press
 . . |
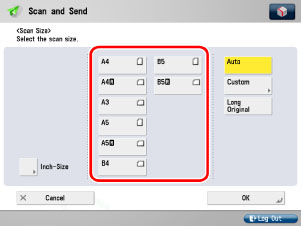
1.
Place your originals → press the Select Scan Size button.

2.
Select the scan size.
Select the desired scan size.
|
NOTE
|
|
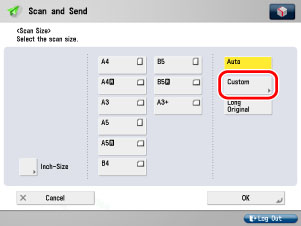
To select an inch paper size, press [Inch-Size].
If you want to scan originals longer than 432 mm, press [Long Original]. The maximum length of originals that you can scan is 630 mm.
If you select the following colour modes, you cannot select [Long Original].
[Auto(Color/Gray)]
[Auto(Color/Black)]
[Full Color]
[Grayscale]
|
Press [Custom].
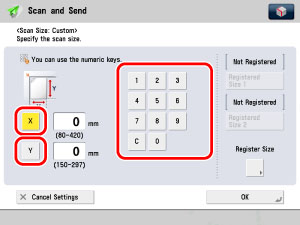
Press [X] (horizontal axis) → enter a value.
Press [Y] (vertical axis) → enter a value.
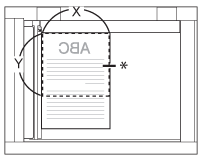
The Platen Glass
* Scanning Area
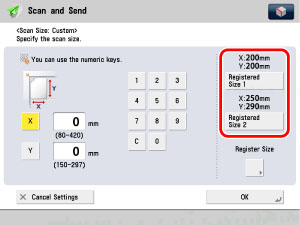
Press [Custom].
Press [Registered Size 1] or [Registered Size 2].
|
NOTE
|
|
To select a registered scan size, you need to register the scan size beforehand. (See "Registering the Scan Size.")
The registered scan size is displayed on top of the key in which it is registered.
|
3.
Press [OK].
1.
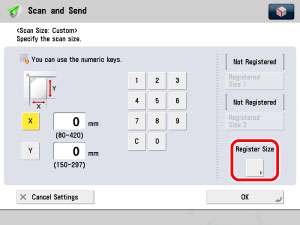
Press the Select Scan Size button → Select [Custom].
2.
Press [Register Size].
3.
Press [Registered Size 1] or [Registered Size 2] → enter the scan size using the numeric keys on the touch panel display.
Press [X] (horizontal axis) → enter a value.
Press [Y] (vertical axis) → enter a value.
|
NOTE
|
|
If you register a new scan size in a key that already has a scan size stored in it, the new scan size overwrites the previously registered scan size.
|
4.
Press [OK].