 e‑Manual
|
Top Contents Contents Help Help Glossary Glossary |
||
|---|---|---|---|
|
Category
|
|
 Category Top
 Setting the Machine (PS/PCL/UFR II Printer)
 Printing Flow With This Machine
 Operations and Terms Used In This Manual
 Personality
 Printer Settings
 Accessing the Printer Settings Menu
 Accessing the Report Settings Menu
 Procedure for Checking and Changing Jobs
 Checking and Changing Print Jobs
 Cancelling Print Jobs
 Temporarily Stopping Print Jobs
 Form Feeding Print Data
 Skipping an Error during Printing
 Overview of Printer Settings
 Restricting Printer Jobs
 Detecting and Installing Drivers that Support Functions Specified on the Machine into Your Computer
 Settings
 Copies
 2-Sided Printing
 Paper Feed
 Paper Output
 Print Quality
 Layout
 Auto Continue
 Job Securing Time
 Timeout
 Print After Completing RIP
 Booklet
 Saddle Stitch
 Creep Correction
 Use Cover Inserter
 Transparency Interleaving
 Copy Set Numbering
 Personality
 Mode Priority
 Initialize
 UFR II Settings
 Halftones
 Paper Save
 PCL Settings
 Paper Save
 Orientation
 Font Number
 Point Size
 Pitch
Pitch Form Lines
 Symbol Set
 Custom Paper
 Unit of Measure
 X dimension
 Y dimension
 Append CR to LF
 Enlarge A4 Print Width
 Halftones
 PS Settings
 Job Timeout
 Print PS Errors
 Halftones
 Grayscale Conversion
 Dot Gain Adjustment
 Imaging Settings
 Image Orientation
 Zoom
Zoom Print Position
 Show Warnings
 Enlarge Print Area
 Halftones
 Grayscale Conversion
 PDF Settings
 Enlarge/Reduce to Fit Size
 Enlarge Print Area
 N on 1
 Comment Print
 Halftones
 Grayscale Conversion
 Dot Gain Adjustment
 Utility Menu
 Overview of Report Settings
 PCL Menu
 PS Menu
 Overview of Direct Printing
 System Requirements
 Printing PDF Files Directly from the Remote UI
 Printing PS/EPS Files Directly from the Remote UI
 Printing Image Files Directly from the Remote UI
 Printing XPS Files Directly from the Remote UI
 Printing Directly Using the Command Prompt
 Responding to Error Messages
 Resetting the Machine after a Service Call Message
 When a Message Is Displayed
 Printing Problems
 If Trouble Occurs When Downloading Fonts or Macros from a Personal Computer
 Some Basic Facts about Fonts
 What Is a Font?
 Attributes of Fonts
 Fonts and Scalable Fonts
 Checking the Font Lists for Available Fonts
 Typeface Samples
 Standard Scalable Fonts (PCL)
 Bitmapped Fonts (PCL)
 OCR Code Scalable Fonts (PCL)
 PS Fonts
 Symbol Sets
 ASCII
ASCII DeskTop
 ISO 8859-1 Latin 1
 ISO 8859-10 Latin 6
 ISO 8859-2 Latin 2
 ISO 8859-9 Latin 5
 ISO French
 ISO German
 ISO Italian
 ISO Norwegian
 ISO Spanish
 ISO Swedish
 ISO United Kingdom
 Legal
Legal Math-8
 MC Text
 Microsoft Publishing
 PC-1004
 PC-775
 PC-8
PC-8 PC-8 D/N
 PC-850
 PC-852
 PC-Turkish
 Pi Font
 PS Math
 PS Text
 Roman-8
 Symbol
 Ventura International
 Ventura Math
 Ventura US
 Windows 3.0 Latin 1
 Windows 3.1 Latin 1
 Windows 3.1 Latin 2
 Windows 3.1 Latin 5
 Windows Baltic
 Wingdings
 Unicode
 OCR-A
OCR-A OCR-B
OCR-B Dingbats
 ISO Latin 9
 PC-8 Greek
 PC-858
 PC-860
 PC-865
 Roman 9
 Configuration Page Sample
 Release Notes
 Printing from a Computer (Windows)
 Printing Fundamentals
 Printing
 Setting Printer Conditions Beforehand
 Setting the Printer Configuration
 Viewing the Online Help
 Printing Functions
 Common Functions
 [Page Setup] Sheet
 [Finishing] Sheet
 [Paper Source] Sheet
 [Quality] Sheet
 [Device Settings] Sheet
 Scaling Documents
 Printing Multiple Pages on One Sheet
 2-sided Printing
 Booklet Printing
 Poster Printing
 Watermark Printing
 Viewing the Print Preview
 Selecting a Profile for Printing
 Registering a Profile for Printing
 Printing from a Computer (Mac)
 Printing Fundamentals
 Printing with the Printer Driver
 Configuring the Print Settings Beforehand
 Setting the Printer Configuration
 Viewing the Online Help
 Printing Functions
 Common Functions
 [Layout] Preferences Pane
 [Finishing] Preferences Pane
 [Paper Source] Preferences Pane
 [Quality] Preferences Pane
 [Special Features] Preferences Pane
 Scaling Documents
 Printing Multiple Pages on One Sheet
 2-sided Printing
 Booklet Printing
 Printing a Color Document in Grayscale
 Using [Presets] for Printing
|
IMPORTANT
|
|
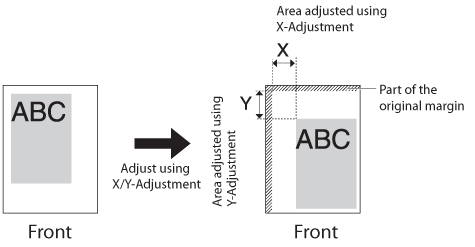
Please note that if the gutter setting or print position is adjusted to place print data outside the printable area, the portion outside the printable area is not printed.
|
|
NOTE
|
|
If this setting is used in combination with 'Offset Short Edge/Offset Long Edge', the values of the two settings are added together.
Pressing [
 ] increases the setting value by 0.5 mm each time the key is pressed.Pressing [ ] increases the setting value by 0.5 mm each time the key is pressed.Pressing [ ] decreases the value by 0.5 mm each time. Holding down either [ ] decreases the value by 0.5 mm each time. Holding down either [ ] or [ ] or [ ] continuously speeds up the value alteration. ] continuously speeds up the value alteration. |
|
Long Edge*, Short Edge
|
|
Two-sided printing
in portrait orientation
|
Two-sided printing
in landscape orientation
|
||
|
Front
|
Back
|
Front
|
Back
|
 |
 |
 |
 |
|
Two-sided printing
in portrait orientation
|
Two-sided printing
in landscape orientation
|
||
|
Front
|
Back
|
Front
|
Back
|
 |
 |
 |
 |
|
NOTE
|
|
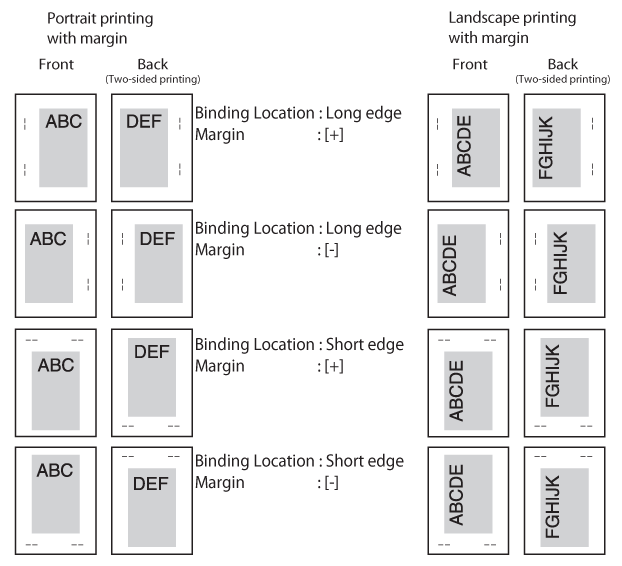
You cannot create a binding margin with this setting alone. Use this setting in combination with the Margin setting to create a binding margin.
For two-sided printing, the orientation of the image on the back side of the page may be changed by this setting.
|
|
-50.0 to +50.0 mm; 0.0* mm
|
 ] to increase the width of the inside margin.
 ] to increase the width of the outside margin.
|
[0.00 inches]
|
[+]
|
[-]
|
|
 |
 |
 |
 |

|
-50.0 to +50.0 mm; 0.0* mm
|

|
-50.0 to +50.0 mm; 0.0* mm
|
