Follow the steps below for Direct Printing of a TIFF/JPEG image file from the Remote UI. For more information on the basic operations of the Remote UI, see "Remote UI."
Direct printing of image files for JPEG images supports specifications for ITU-T Recommendation T.81.
TIFF images support specifications for Adobe TIFF Revision 6.0.
|
IMPORTANT
|
|
Images files in the JPEG 2000 format cannot be printed.
|
|
NOTE
|
|
This machine supports the following encoding methods for JPEG images.
Supported encoding
Baseline DCT encoding Non-supported encoding
Extended encoding Lossless encoding Hierarchical encoding This machine supports the following encoding methods for TIFF images.
Supported encoding
Uncompressed ITU-T Recommendation T.4 one-dimensional encoding ITU-T Recommendation T.4 two-dimensional encoding ITU-T Recommendation T.6 basic facsimile encoding ITU-T Recommendation T.81 JPEG (Basic DCT methods only) PackBits (Apple Macintosh PackBits methods) LZW Non-supported encoding
ITU-T Recommendation T.82 JBIG (Bi-level black-and-white) ITU-T Recommendation T.43 JBIG (Colour) ITU-T Recommendation T.44 MRC Even in cases where you cannot print a file or if the print output is out of alignment using the Direct Print function, you may still be able to open the file in an application and print it using the printer driver.
|
1.
Start your web browser → enter the appropriate URL into [Address] or [Location].
http://<the IP address of the device>/
|
NOTE
|
|
If you do not know the appropriate URL, consult your system administrator.
When the printer's host name is registered on the DNS server, you can enter it in place of the IP address in [Host Name/Domain Name].
Example : http://my_printer.xy_dept.company.com |
2.
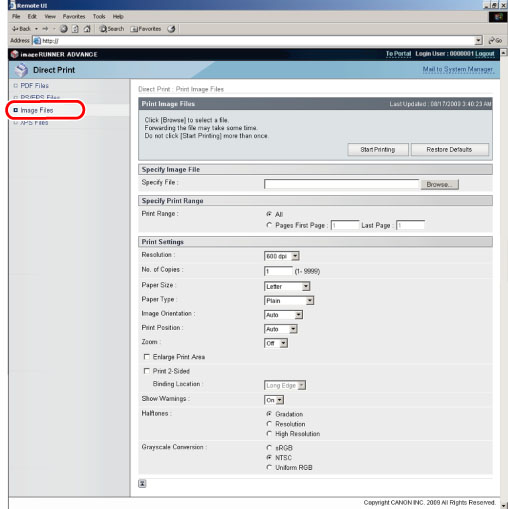
Click [Direct Print] → select [Image Files] from the menu that appears under [Direct Print].
If Department ID Management is set, a dialog box prompting you to enter the Department ID and password appears. Enter the Department ID and password → click [OK].
3.
Specify the location of the Image file that you want to print.
Click [Browse] → click [Open] after selecting the file.
4.
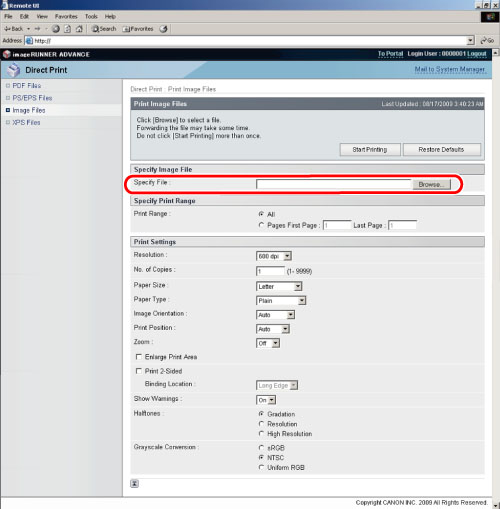
Specify the settings for [Specify Print Range].
Select [All] to print every page.
If you want to specify the pages to print by the page number, click [Pages] → enter the page numbers. Only the setting for the item whose radio button is selected will be effective.
5.
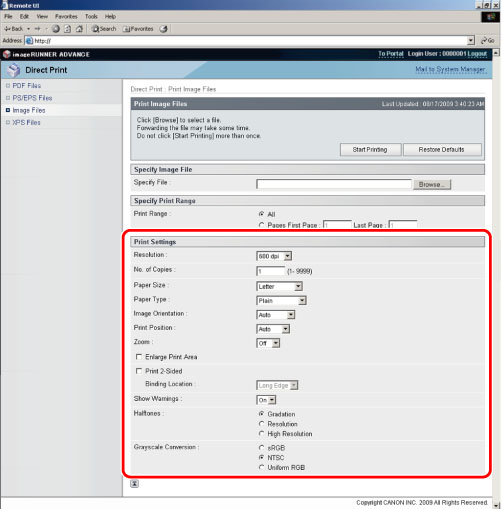
Specify the settings under [Print Settings] according to your preference.
|
[Resolution]
|
This setting specifies the resolution for printing.
Resolution is expressed in units of dpi (dots per inch), indicating the number of dots in one inch. The higher the value, the greater the resolution, allowing finer expression of detail. If [1200 dpi] is selected, the outline of characters and diagrams can be finely printed. This is suited to printing data containing fine lines and small characters.
If [600 dpi] is selected, you can perform printing suited to general documents and tables.
|
|
[No. of Copies]
|
This setting enables you to specify the number of copies printed.
|
|
[Paper Size]
|
This setting specifies the output paper size.
If [Auto] is selected, the most appropriate paper source is selected according to the PDF file page size.
If a setting other than [Auto] is selected, the file is printed so that the orientation of the long edge of the PDF file page size and the long edge of the selected paper matches.
If the PDF file page size exceeds the largest or smallest size of the user defined paper, jobs are cancelled. (They are not included in the Prints count.)
|
|
[Paper Type]
|
This setting specifies the output paper type.
|
|
[Image Orientation]
|
This setting specifies whether to print an image vertically or horizontally.
If [Auto] is selected, orientation is automatically adjusted by comparing length and width of the image. If the width is greater, the image is printed horizontally. If the length is greater, the image is printed vertically.
If [Vertical] is selected, the image is printed vertically regardless of its dimensions.
If [Horizontal] is selected, the image is printed horizontally regardless of its dimensions.
|
|
[Print Position]
|
This setting specifies the print position for the image.
If [Auto] is selected, the image is printed in the specified position of the paper if the print position for the image is specified. If the print position is not specified, the image is printed in the centre of the paper.
If [Center] is selected, the image is printed in the centre of the paper regardless of whether the print position of the image is specified.
If [Top Left] is selected, the image is printed in the top left of the paper regardless of whether the print position of the image is specified.
|
|
[Zoom]
|
This setting enlarges or reduces the size of an image to match the printable area of the paper size specified.
If [Auto] is selected, the size of the image is automatically enlarged or reduced to match the printable area of the specified paper size. If the size of the image is larger than the printable area, it is automatically reduced. If the size of the image is smaller than the printable area, it is automatically enlarged.
|
|
[Enlarge Print Area]
|
This setting specifies whether to enlarge the printable area to the edge of the paper.
|
|
[Print 2-Sided]
|
This setting specifies whether to print on one-side or both sides of the paper.
|
|
[Binding Location]
|
This setting specifies whether to place the binding position along the long edge or the short edge of the paper. If the margin is specified on the touch panel display, the binding margin position is automatically adjusted on the front and back sides of the paper.
|
|
[Show Warnings]
|
This setting specifies the action to be taken if an error associated with printing an image occurs on the machine.
If [On] is selected, an error message is displayed.
If [Off] is selected, an error message is not displayed.
|
|
[Halftones]
|
This setting specifies how to express halftones in black and white data.
Print data is expressed in dots. Fine gradations, edges, and shades are expressed by using dither patterns, which are groups of dots. This is called halftone processing. If [Gradation] is selected, you can print with both smooth gradation and outlines, which is best to print graphs and graphics that use gradation.
If [Resolution] is selected, you can print text with distinct outlines, which is best to print text and thin lines.
If [High Resolution] is selected, finer printing can be done than with [Resolution], although toner stability is somewhat weaker. This is suited to printing small characters and fine lines, and outlines (such as from CAD data) sharply.
|
|
[Grayscale Conversion]
|
You can select ways to convert colour values to a grayscale value when you print colour print data.
If [sRGB] is selected, you can calculate the grayscale value by the colour conversion method based on sRGB.
If [NTSC] is selected, you can calculate the grayscale value by the colour conversion method based on NTSC.
If [Uniform RGB] is selected, counts the average value of the Red, Green, and Blue values as the grayscale value.
|
6.
Click [Start Printing].
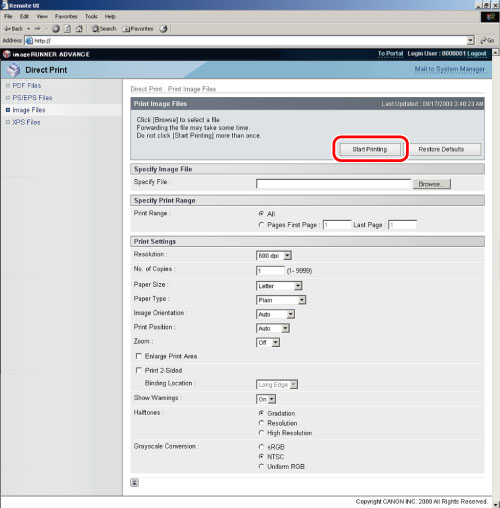
Click [Restore Defaults] to return the settings to their default values.
Do not click [Start Printing] continuously during file transfer. The file transfer process may take some time, but continuously clicking [Start Printing] may cause the file to crash and not transfer.
After sending of a print job is completed, the screen changes and the following message appears.

Click [to Job List] to verify sent print jobs that have already been sent.