Follow the steps below for Direct Printing of a PS/EPS file from the Remote UI. For more information on the basic operations of the Remote UI, see "Remote UI."
|
NOTE
|
|
Even in cases where you cannot print a file or if the print output is out of alignment using the Direct Print function, you may still be able to open the file in an application and print it using the printer driver.
|
1.
Start your web browser → enter the appropriate URL into [Address] or [Location].
http://<the IP address of the device>/

|
NOTE
|
|
If you do not know the appropriate URL, consult your system administrator.
When the printer's host name is registered on the DNS server, you can enter it in place of the IP address in [Host Name/Domain Name].
Example : http://my_printer.xy_dept.company.com |
2.
Click [Direct Print] → select [PS/EPS Files] from the menu that appears under [Direct Print].
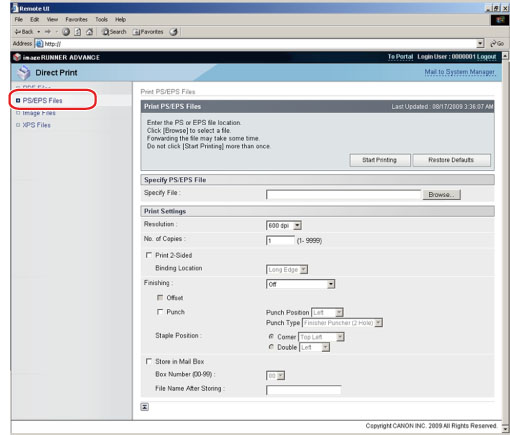
If Department ID Management is set, a dialog box prompting you to enter the Department ID and password appears. Enter the Department ID and password → click [OK].
3.
Specify the location of the PS/EPS file that you want to print.
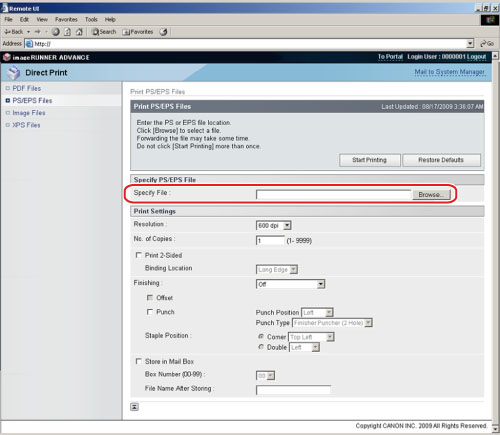
Click [Browse] → click [Open] after selecting the file.
4.
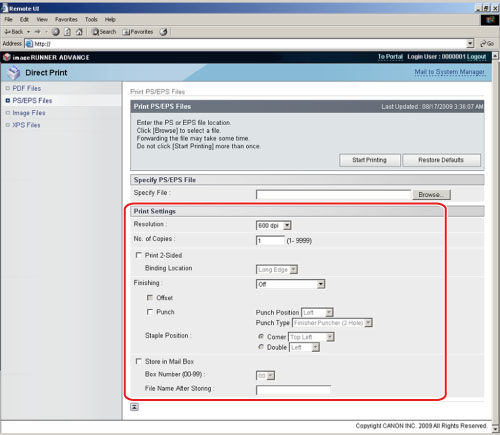
Specify the settings under [Print Settings] according to your preference.
|
[Resolution]
|
This setting specifies the resolution for printing.
Resolution is expressed in units of dpi (dots per inch), indicating the number of dots in one inch. The higher the value, the greater the resolution, allowing finer expression of detail.
If [600 dpi] is selected, you can perform printing suited to general documents and tables.
If [1200 dpi] is selected, characters and lines can be finely printed.
|
|
[No. of Copies]
|
This setting enables you to specify the number of copies printed.
|
|
[Print 2-Sided]
|
This setting specifies whether to print on one-side or both sides of the paper.
|
|
[Binding Location]
|
This setting specifies whether to place the binding position along the long edge or the short edge of the paper. If the margin is specified on the touch panel display, the binding margin position is automatically adjusted on the front and back sides of the paper.
|
|
[Finishing]*
|
This setting specifies whether to print in pages or copies.
If [Off] is selected, all copies of the same page are printed before the next page is printed.
If [Collate (Page Order)] is selected, all pages of each copy are printed before the next copy is printed.
If [Group (Same Pages)] is selected, all copies of the same page are printed before the next page is printed.
If [Staple] is selected, all pages of each copy (collating) are printed and stapled.
[Punch] allows you to punch holes in the printed-paper. Select the checkbox and specify [Punch Position] or [Punch Type].
If [Punch Position] is selected, you can select one of either [Left], [Right], [Top], or [Bottom].
If [Punch Type] is selected, you can select [Finisher Puncher] or [Puncher Unit].
You can specify [Staple Position] from one of either [Corner] or [Double].
If [Corner] is selected, you can select one of either [Top Left], [Top Right], [Bottom Left], or [Bottom Right].
If [Double] is selected, you can select one of either [Left], [Right], [Top], or [Bottom].
If you select both the staple and punch settings, specify the punch and staple settings so the positions match. If the positions do not match (for example, the staple position is on the right and the punch position is on the left), both settings are void and the paper is printed without either stapling or punching.
The number of holes that can be punched varies depending on the type of puncher unit of the attached finisher.
|
|
[Offset]*
|
If the checkbox and [Collate (Page Order)] are selected in [Finishing], all pages of each copy (collating) are printed, and every other complete copy is offset to indicate where each copy starts.
If the checkbox and [Group (Same Pages)] are selected in [Finishing], all copies of the same page are printed before printing the next page. Every other complete set of pages is offset to indicate where each new set starts.
|
|
[Store in Mail Box]
|
To store the data in a user box, select [Store in Mail Box] and then select the destination user box.
|
|
[File Name After Storing]
|
To store the data in a user box, you can specify the document name.
The document name cannot exceed 24 characters. |
* The settings and settings values displayed on the Remote UI differ depending on which options are attached.
5.
Click [Start Printing].
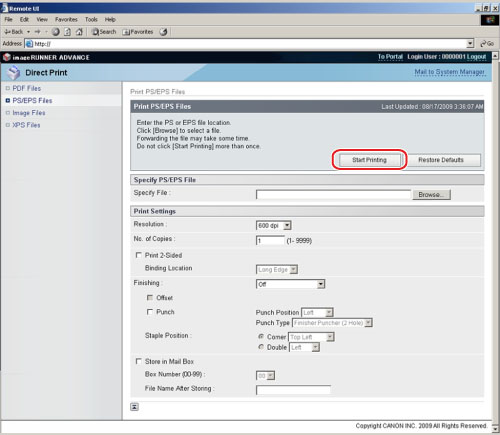
Click [Restore Defaults] to return the settings to their default values.
Do not click [Start Printing] continuously during file transfer. The file transfer process may take some time, but continuously clicking [Start Printing] may cause the file to crash and not transfer.
After sending of a print job is completed, the screen changes and the following message appears.
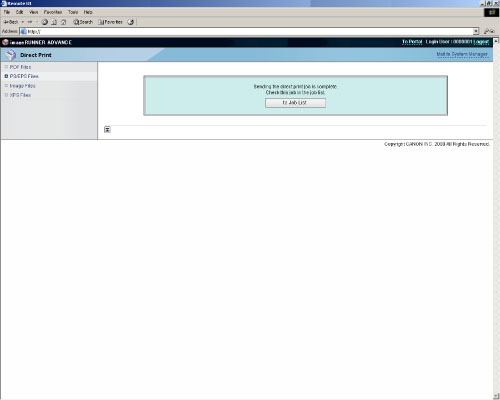
Click [to Job List] to verify sent print jobs that have already been sent.