The procedure for printing a document created in application software is as follows.
|
Note
|
|
Printing methods may differ depending on the applications you are using. For details, see the instruction manuals provided with the application software.
In Mac OS X 10.5.x, the [Page Setup] dialog box may not be displayed, depending on the application software you are using. If this is the case, you can specify the page size, page orientation, and scaling in the [Print] dialog box. How to display the [Print] dialog box is shown in step 6.
The screen may differ according to the operating system, as well as the type and version of the printer driver.
|
1.
Start the application software, and open the document you want to print.
2.
Select [Page Setup] from the [File] menu.
The [Page Setup] dialog box is displayed.
3.
Select [Page Attributes] from [Settings].
The [Page Attributes] preferences pane is displayed.
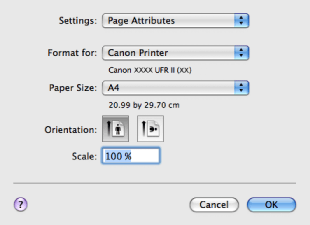
4.
Select the name of the printer you are using from [Format for], and set the paper size, orientation, and scale.
5.
Click [OK].
6.
Select [Print] from the [File] menu.
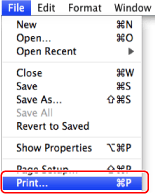
The [Print] dialog box is displayed.
7.
Select the name of the printer you are using from [Printer].
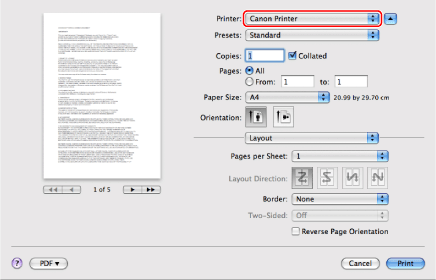
8.
Set the number of copies, which pages to print, etc.
9.
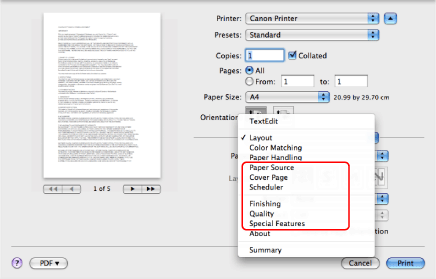
Select the appropriate preferences panes, and configure the print settings.
Select one of the following preferences panes:
[Paper Source] preferences pane
[Finishing] preferences pane
[Quality] preferences pane
[Special Features] preferences pane
|
Note
|
|
For details about the settings in each preferences pane, see the online help (see "Viewing the Online Help").
|
10.
Click [Print].
Printing begins.