You can perform [Cancel] when you want to cancel a print job at the time data is currently being received or executed. It does not affect the print data of a following job or a job the machine has not yet started processing.
|
NOTE
|
|
If you are not logged in as an Administrator, you can only cancel your own jobs.
|
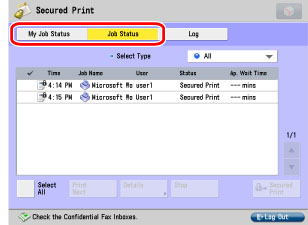
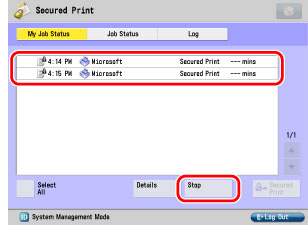
To cancel jobs from the Secured Print screen, follow the steps below.
1.
Press either [My Job Status] or [Job Status].
|
NOTE
|
|
You can set the Secured Print screen to be the initial screen, when the main power is turned ON or after an Auto Clear, with "Default Screen at Startup" in Preferences (from the Settings/Registration screen). (See "Default Screen at Startup.")
|
2.
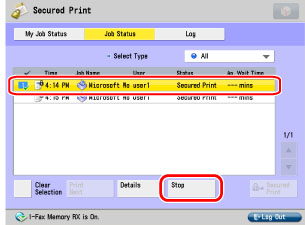
Select the job to be cancelled → press [Stop].
|
NOTE
|
|
To cancel multiple jobs, select jobs displayed in the list in the order to be cancelled → press [Stop].
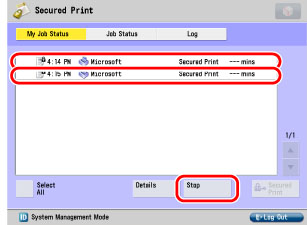 To cancel all jobs, press [Select All] → press [Stop].
  |
3.
Press [Yes].
If you do not want to cancel, press [No].
|
NOTE
|
|
You cannot cancel other users' jobs. However, if you are logged in as an Administrator, you can cancel the other users' jobs.
<NG> is displayed in the print job log screen for cancelled print jobs.
|
To cancel jobs from the Status Monitor/Cancel screen, follow the steps below.
1.
Press [Job Status].
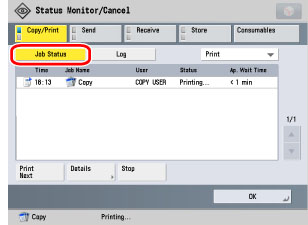
2.
Select the job to be cancelled→press [Stop].
|
NOTE
|
|
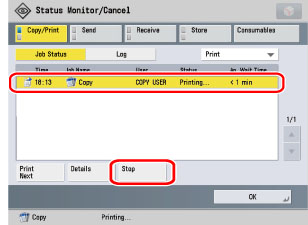
You cannot select and cancel multiple jobs.
|
3.
Press [Yes].
If you do not want to cancel, press [No].
|
NOTE
|
|
<NG> is displayed in the print job log screen for cancelled print jobs.
|
4.
Press [OK].
You can delete (reset) print data in memory and any jobs being processed.
|
IMPORTANT
|
|
If the machine is being used in a network, please note that resetting the printer function may affect data being received from other users.
If you reset the printer function, data is deleted for print jobs that have already been received, or received while the printer function is being reset. However, in some cases, the data is not deleted from the machine's memory, and the print job may not print correctly. Canon recommends that you reset the printer function to delete the data and print the job again.
|
1.
Display the desired screen with the following procedure.
Press  → [Function Settings] → [Printer] → [Printer Settings] → [Utility] → [Reset Printer].
→ [Function Settings] → [Printer] → [Printer Settings] → [Utility] → [Reset Printer].2.
Press [Yes].
If you do not want to reset the printer, press [No].
3.
Press [OK].
The screen returns to the Basic Features screen.