This section describes how to scan a document and store it in the memory media.
This section describes the procedure with the memory media already attached to the USB port. For instructions on removing the memory media, see "Removing the Memory Media."
|
IMPORTANT
|
|
The default setting for displaying memory media is 'Off'. To use the memory media, set [Store Location Display Settings] in Preferences (Settings/Registration) to 'On'. (See "Store Location Display Settings.")
The following type of memory media is supported:
USB memory
The following memory media file system is supported:
FAT32
Memory media with security functions and memory card readers connected via USB are not supported.
Memory media used with an extension cable is not supported.
Memory media used via a USB hub is not supported.
Memory media that does meet the USB specification is not supported.
Some memory media cannot be used.
The following conditions must be met to use the memory media.
[Use MEAP Driver for USB External Device] in [USB Settings] in Preferences (Settings/Registration) is set to 'Off'. (See "Using the MEAP Driver for USB External Memory Device Connections.")
|
|
NOTE
|
|
Before using the Mail Box function, it is useful to read the following topics:
Main power and control panel power (See "Main Power and Control Panel Power.")
Entering characters from the touch panel display (See "Entering Characters from the Touch Panel Display.")
Routine maintenance (See "Routine Maintenance" and "Routine Maintenance (Cleaning Function).")
To scan in colour when resolution is set to 200 × 400 dpi, 400 × 400 dpi, or 600 × 600 dpi, it is necessary to install the Card Reader to expand the memory capacity of the machine.
You can scan and store up to 999 pages at one time. If two-sided originals are scanned using the feeder, you can store up to 1,000 pages. Once the maximum number of originals you can scan is reached, a message asking whether to store appears.
Do not insert the USB memory into the USB port at an angle. If you insert it at an angle or insert the USB memory that does not meet the USB specification, the USB port may be damaged.
To cancel all settings, press [Back to Default Set.]. (The machine restores the default settings for Scan and Store.)
|
1.
Press [Scan and Store] on the Main Menu screen.

2.
Press [Memory Media].
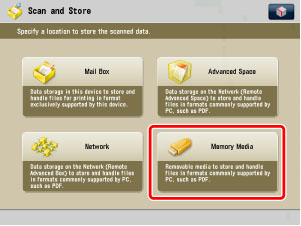
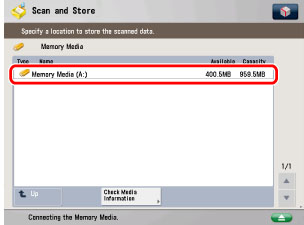
3.
Select the desired memory media.
|
NOTE
|
|
If the Multimedia Reader/Writer is installed, you can use the SD card, Memory Stick, CF card, and Microdrive. For more information, see "Multimedia Reader/Writer ."
|
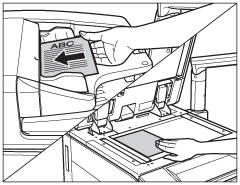
4.
Place your originals.
|
NOTE
|
|
For instructions on placing originals, see "Duplex Color Image Reader Unit-C1."
|
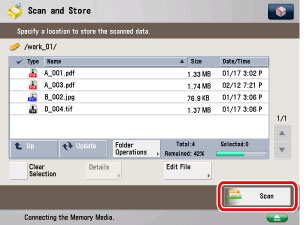
5.
Press [Scan].
6.
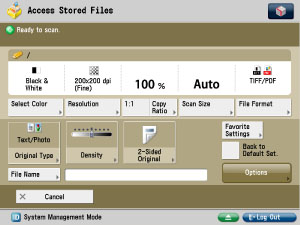
Specify the desired scan settings.
|
IMPORTANT
|
|
When the [Auto (Color/Black)] or Auto (Color/Gray) mode is set and your originals contain colour sections, the machine scans them in the Full Color mode. However, the machine may scan the colour originals in the Black-and-White mode under the following conditions. To avoid this, set the colour mode to 'Full Color'. (See "Changing Colour Modes.")
If the originals contain a few colour sections
If the colour sections are located only in the range indicated by the diagram below, when loading the originals in the feeder
 If the colour sections of the originals are close to black
If the originals contain light colour densities
|
|
NOTE
|
|
To adjust the resolution when scanning an original, see "Resolution."
To change the zoom ratio, see "Preset Zoom" and "Zoom by Percentage."
To specify the file format when scanning an original, see "Setting the File Format and Storing Files with Various Settings."
To select the original type when scanning an original, see "Original Type Selection."
To adjust the scan exposure when scanning an original, see "Adjusting the Density."
To scan two-sided originals, see "Scanning Two-Sided Originals."
To register favorite settings, press [Favorite Settings].
You can set various modes when scanning originals, similar to the Copy function.
|
Press [File Name] → enter a name for the file → press [OK].
|
IMPORTANT
|
|
You cannot use the following characters in a file name: \ / : , * ? " < > |
You cannot use . (period) or space for the first or last character of the file name.
|
|
NOTE
|
|
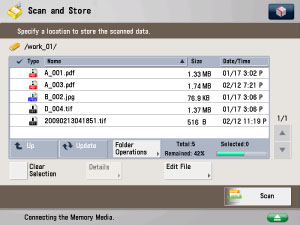
If you create a file without assigning it a name, the machine automatically assigns the file a name using the year, month, day, and time the file was created.
For example, if a file is created at 1:35 PM, 41 seconds, on 15.01.09 and it is saved in JPEG file format, its file name will be <20090115133541.jpg>. If you enter a file name that already exists, (1) to (9) is added to the file name. Example: a(1).pdf
If [Divide into Pages] is set for file format, consecutive three digit numbers are added to the file names. Example: a_001.pdf, a_002.pdf, a_003.pdf
|
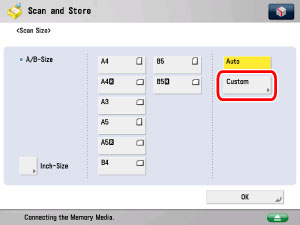
Press [Scan Size].
Select the original size → press [OK].

|
IMPORTANT
|
|
The Auto (Automatic Document Size Selection) mode cannot be used with the Original Frame Erase or Book Frame Erase mode.
You cannot select [Auto] when scanning the following types of originals. Specify the size of the document manually.
Nonstandard size originals
Highly transparent originals, such as transparencies
Originals with an extremely dark background
A5R originals that are placed on the platen glass
|
|
NOTE
|
|
To select an inch paper size, press [Inch-Size].
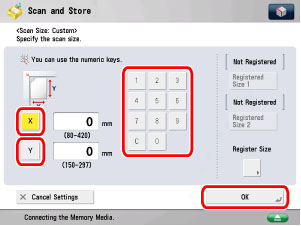
You can press [Custom] and specify the paper size to a custom size by entering a number.
|
Press [Custom].
Enter the size.
Press [X] (horizontal axis) → enter a value for the paper size in inch using the numeric keys on the screen.
Press [Y] (vertical axis) → enter a value for the paper size in inch using the numeric keys on the screen.
Press [OK].
Platen Glass
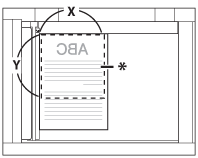
* Scanning Area
|
NOTE
|
|
If the same values are used often, you can register the size by pressing [Register Size] → [Registered Size 1] or [Registered Size 2].You can recall the registered size by pressing [Registered Size 1] or [Registered Size 2].
|
7.
Press  .
.
. If the following screen is displayed, follow the instructions on the touch panel display → press once for each original. When scanning is complete, press [Start Storing].
once for each original. When scanning is complete, press [Start Storing].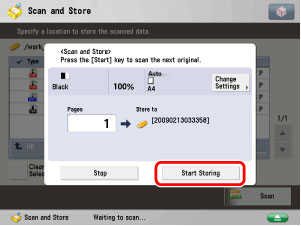
When scanning is complete, the scanned data is stored in the selected memory media.
|
IMPORTANT
|
|
You cannot change settings, such as the document size or the scanning ratio, while the machine is scanning.
|
|
NOTE
|
|
If you want to cancel scanning, press [Stop] or
 . . |
8.
When scanning is complete, remove your originals.