The Memory RX (Receive) Inbox in the Memory RX Inbox is an inbox for receiving and storing documents received by Fax and I-Fax. Documents received in the Memory RX Inbox are stored without being printed. You can print or send the stored documents later, or whenever necessary.
|
IMPORTANT
|
|
To receive fax documents, the optional product is required. For information on the optional products required to use this function, see "Optional Products Required for Each Function."
If you want to use Memory Lock, you must first set [Use Fax Memory Lock] and [Use I-Fax Memory Lock] to 'On' in Set Fax/I-Fax Inbox in Common Settings in Receive/Forward in Function Settings (Settings/Registration). (See "Specifying the Fax/I-Fax Inbox Settings.")
|
|
NOTE
|
|
If the message prompting you to enter the password appears, enter the number registered in Memory RX Inbox PIN in Set Fax/I-Fax Inbox in Common Settings in Receive/Forward in Function Settings (Settings/Registration). (See "Specifying the Fax/I-Fax Inbox Settings.")
|
|
IMPORTANT
|
|
No more documents can be stored in inboxes if any of the following is true: (The numbers below may vary depending on the remaining capacity of the hard disk.)
When a total of 2,000 documents have been stored in the Mail Box and the Fax/I-Fax Inbox
When a total of about 8,000 pages of documents have been stored in the Mail Box and the Fax/I-Fax Inbox
|
1.
Set Memory Lock to 'On' from the Settings/Registration screen.
|
NOTE
|
|
The following messages are displayed while Memory Lock is being set to 'On':
<I-Fax Memory RX is on.>: I-Fax documents will be received in memory. <Fax Memory RX is on.>: Fax documents will be received in memory. |
2.
The machine is now ready to receive documents in memory.
|
NOTE
|
|
The message <Check the Memory RX Inbox> is displayed when a document is received in the Memory RX Inbox.
|
You can use the Memory Lock mode outside of the preset Memory Lock start and end times.
1.
Press [Memory RX Inbox] on the Memory RX Selection screen → press [Memory RX Inbox].

2.
Select [On] or [Off] for I-Fax Memory Lock and/or Fax Memory Lock.

|
[On]:
|
Documents are received and stored in the Memory RX Inbox.
|
|
[Off]:
|
Documents are received and printed.
|
|
NOTE
|
|
If Memory Lock start and end times have been set, the time at which Memory Lock will automatically switch 'Off' is displayed when you set Fax/I-Fax Memory Lock to 'On', and the time at which Memory Lock will automatically switch 'On' is displayed when you set Memory Lock to 'Off'.
If I-Fax Memory Lock is set to 'Off', documents received through the I-Fax function are printed and deleted from the Memory RX Inbox.
If Fax Memory Lock is set to 'Off', documents received through the Fax function are printed and deleted from the Memory RX Inbox.
|
3.
Press [Back] repeatedly until the Memory RX Inbox Selection screen appears.
1.
Press [Memory RX Inbox] on the Memory RX Selection screen → press [Memory RX Inbox].
2.
Select the document whose detailed information you want to check → press [Details].
|
NOTE
|
|
If you select multiple documents and press [Details], only the details of the selected (highlighted) document are displayed.
|
|
NOTE
|
|
To delete multiple documents in the Memory RX Inbox, select and delete one document at a time.
|
1.
Press [Memory RX Inbox] on the Memory RX Selection screen → press [Memory RX Inbox].
2.
Select the document that you want to delete → press [Delete].
|
NOTE
|
|
You can cancel a selection by selecting the document again.
To cancel all documents, press [Clear Selection]. ([Clear Selection] changes to [Select All (Max 32 Files)].)
|
3.
A screen appears, asking for your confirmation to delete the document, press [Yes].
|
IMPORTANT
|
|
You can print documents stored in the Memory RX Inbox only with the settings that were used when the documents were received.
A document stored in the Memory RX Inbox is automatically deleted after it is printed.
|
|
NOTE
|
|
You can print only one document at a time. You cannot print multiple documents stored in the Memory RX Inbox simultaneously.
If Fax Memory Lock and I-Fax Memory Lock are set to 'Off', any documents stored in the Memory RX Inbox are printed and deleted from memory. (See "Specifying the Fax/I-Fax Inbox Settings.")
|
1.
Press [Memory RX Inbox] on the Memory RX Selection screen → press [Memory RX Inbox].
2.
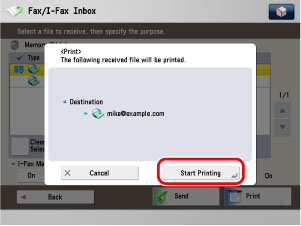
Select the document that you want to print → press [Print].
3.
A screen appears, asking for your confirmation to print the document, press [Start Printing].
|
NOTE
|
|
To receive fax documents, the optional product is required. For information on the optional products required to use this function, see "Optional Products Required for Each Function."
|
1.
Press [Memory RX Inbox] on the Memory RX Selection screen → press [Memory RX Inbox].
2.
Select the document that you want to send → press [Send].
To select all of the documents (up to 32 documents from the top), press [Select All (Max 32 Files)]. If a document is already selected, this key changes to [Clear Selection].
|
NOTE
|
|
A maximum of 32 documents stored in the same inbox can be selected and sent at the same time.
A maximum of 999 pages can be sent simultaneously.
|
3.
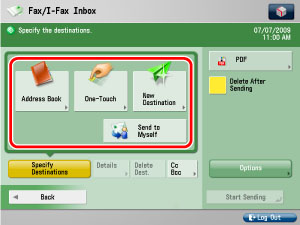
Specify the destinations.
If you want to return to the previous screen, press [Back].
|
IMPORTANT
|
|
If a destination type is set to 'On' in Limit New Destination in Common Settings in Send in Function Settings (Settings/Registration), you cannot enter a destination in [New Destination]. You have to select a stored destination by pressing [Address Book (Local)], [Address Book (Remote)], [Address Book (LDAP Server)], or [One-Touch]. (See "Restricting New Addresses.")
|
|
NOTE
|
|
A maximum of 256 destinations can be specified at the same time. If you specify a group, which is made up of several destinations, each destination is counted as a separate address.
If the destination includes the file server that you set [Enter Password Each Time] to 'On' when the file server is specified as the destination or when the file server is included in the group destination, one-touch button, or favorite settings, a screen prompting you to enter user name and password is displayed. Enter the previously set password. (See "Storing File Server Addresses in the Address Book (Local).")
If you want to automatically delete the selected document after it is sent, press [Delete After Sending].
While the document is being sent, you cannot print or store it in another inbox.
If the selected destination is a group address that includes an inbox, the document you are sending will not be sent to (and stored in) that inbox.
|
Press [Address Book] → select the desired destination. (See "Scan and Send.")
Besides Address Book (Local), you can specify the destination from the Address Book (Remote) or Address Book (LDAP Server), depending on the setting.
|
NOTE
|
|
You must first set the settings to use the Address Book (Remote). (See "Remote Address Book" and "Setting the Make Remote Add. Book Open.")
You may have to set up the LDAP servers beforehand, depending on the network environment. (See "Registering an LDAP Server.")
|
Press [One-Touch] → select the one-touch button that contains the desired destination. (See "Specifying Destinations Using One-Touch Button.")
Press [New Destination] → select a sending method → enter the desired destination. (See "Scan and Send.")
|
NOTE
|
|
The maximum number of Cc and Bcc destinations that can be sent at one time is 256 including the destination specified for [To].
|
Press [Send to Myself]. (See "Sending Documents to Yourself.")
|
NOTE
|
|
[Send to Myself] is displayed only if authentication by SSO-H Network Settings is set.
|
Press [Cc Bcc] → specify the e-mail addresses. (See "Setting Cc and Bcc Addresses.")
|
NOTE
|
|
Only e-mail addresses can be specified as Cc and Bcc addresses.
The maximum number of Cc and Bcc destinations that can be sent at one time is 256 including the destination specified for [To].
|
4.
Press the File Format button → select a file format.
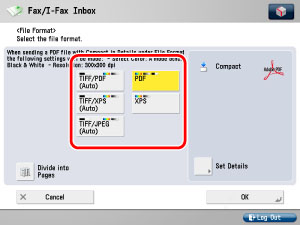
This part of the procedure is not necessary if any one of the following is true:
A fax address is specified as the destination.
An I-fax address is specified as the destination.
A User Inbox is specified as the destination.
|
IMPORTANT
|
|
Some file format may require optional product. For information on the optional products, see "Optional Products Required for Each Function."
|
|
NOTE
|
|
For instructions on setting the file format, see "Setting the File Format to Send a Document in."
|
5.
Press [Options] → select the desired mode.

|
NOTE
|
|
For details on the Options, see "Useful Send Function (Options)" and "Useful Fax Function (Options)."
|
6.
Press [Close] → [Start Sending].