The key pair and server certificate are required for performing SSL encrypted communication, for use with the following items. This section describes how to specify the key pair and server certificate settings from the control panel of the machine.
[IPP Print Settings] (See "Settings Common to TCP/IPv4 and TCP/IPv6.")
[E-Mail/I-Fax Settings] (See "Common Communication Settings for E-Mail/I-Fax.")
[Remote UI] (See "Setting Remote UI.")
MEAP functions via a web browser (See "MEAP Settings.")
[Device Information Delivery Settings] (See "Registering/Deleting/Printing Delivery Destinations.")
Department IDs/Passwords Confirmation (See "Settings Common to TCP/IPv4 and TCP/IPv6.")
Advanced Space open to the public as a WebDAV server: See"Setting the Advanced Space to be Open to the Public as a WebDAV/SMB Server."
It is necessary to generate and register a key pair in order to use encrypted SSL communication for IPP printing, e-mail and I-faxes, the Remote UI, MEAP functions via a web browser, device information delivery, and the Advanced Space which is open to the public as a WebDAV server, or confirm Department IDs and passwords.
A key pair and server certificate are preinstalled in the machine. You can also use this key pair and server certificate to enable encrypted SSL communication.
The procedure for generating and registering a key pair and self-signed server certificate using the control panel of the machine is as follows:
|
IMPORTANT
|
|
Up to six key pairs can be registered.
|
1.
Press  → [Management Settings] → [Device Management].
→ [Management Settings] → [Device Management]. 2.
Press [Certificate Settings] → [Generate Key].
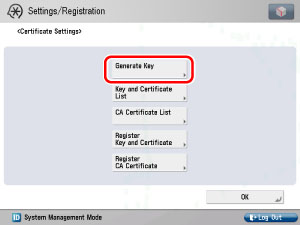
3.
Press [Generate Network Communication Key] → specify the following.
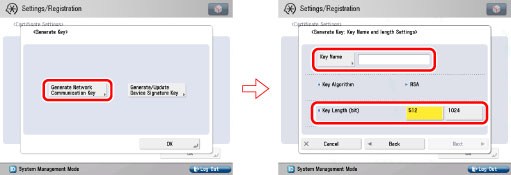
In [Key Name], enter a name for the key pair → select a key length.
|
IMPORTANT
|
|
Up to 24 alphanumeric characters can be entered for [Key Name].
You cannot generate a key pair with a key length other than 512 or 1024 bit.
|
|
NOTE
|
|
You cannot specify 'Device Signature Key' (used for key pairs for adding digital signatures to PDFs or XPSs) or 'AMS' (used for key pairs for access restrictions) as the name for the key pair.
|
4.
Press [Next] → set the self-signed server certificate.
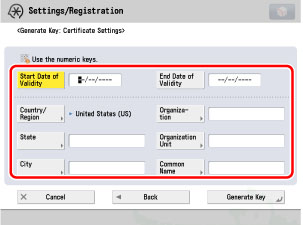
You cannot set an end date which is earlier than the start date.
Set at least one of the following items → press [Generate Key] to generate a key. You cannot issue a server certificate if all the items are left blank. When using IPPS printing with Windows Vista, make sure to enter the IP address of the machine in [Common Name].
|
[Country/Region]:
|
Select the country/region name from the 25 countries/regions in the list, or enter an Internet country code (2 characters maximum).
|
|
[State]:
|
Set the state name (24 characters maximum).
|
|
[City]:
|
Set the city name (24 characters maximum).
|
|
[Organization]:
|
Set the organization name (24 characters maximum).
|
|
[Organization Unit]:
|
Set the organization unit, such as the department name (24 characters maximum).
|
|
[Common Name]:
|
Set the IP address or FQDN (for example, starfish.company.com) of the machine (41 characters maximum).
|
|
IMPORTANT
|
|
A DNS server is necessary to use the FQDN of the machine in [Common Name]. Use the IP address of the machine if you do not have a DNS server.
The key pair you have registered cannot be used for encrypting communications with SSL until it has been set as the default key. For instructions on how to set the default key, see "Changing the Key Pair Used With SSL Encrypted Communications."
|
|
NOTE
|
|
To confirm the key pair and server certificate you have registered, see "Editing Key Pairs and Server Certificates."
After pressing [Generate Key], you cannot use any of the keys until a key pair has been generated and registered.
|
You can install a key pair file from a computer in order to use encrypted SSL communication for IPP printing, e-mail and I-faxes, the Remote UI, MEAP functions via a web browser, device information delivery, and the Advanced Space which is open to the public as a WebDAV server, or confirm Department IDs and passwords.
A key pair file and server certificate file created on a computer can be installed in the machine using a web browser (Remote UI). The procedure for registering installed files in the machine using the control panel is as follows:
|
IMPORTANT
|
|
Up to six key pairs can be registered.
|
|
NOTE
|
|
For instructions on how to install a key pair file and server certificate file, see "Installing a Key Pair and Server Certificate."
|
1.
Press → [Management Settings] → [Device Management] → [Certificate Settings] → [Register Key and Certificate].
→ [Management Settings] → [Device Management] → [Certificate Settings] → [Register Key and Certificate]. 2.
Select the file to register → press [Register] → enter the name of the private key in [Key Name], and the password for the private key in [Password] → press [OK].
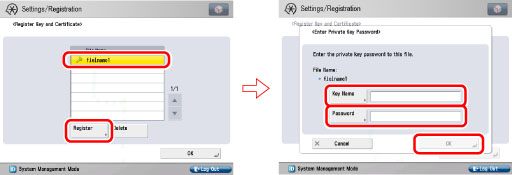
To delete an unnecessary file, select the file → press [Delete].
|
IMPORTANT
|
|
You can register only key pair files which use the RSA algorithm.
|
|
NOTE
|
|
For instructions on how to confirm a registered key pair and server certificate, see "Editing Key Pairs and Server Certificates."
|
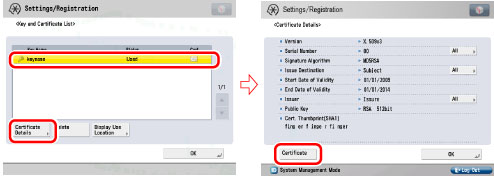
You can confirm the settings of registered key pairs and server certificates. You can also delete an unnecessary key pair and certificate, and check how a key pair is currently being used.
1.
Press → [Management Settings] → [Device Management] → [Certificate Settings] → [Key and Certificate List] → specify the following.
→ [Management Settings] → [Device Management] → [Certificate Settings] → [Key and Certificate List] → specify the following.If  (invalid) is displayed to the left of a key pair, it is corrupted or invalid. After erasing the corrupted or invalid key pair, register a key pair (see "Generating a Key Pair and Server Certificate" or "Registering a Key Pair File and Server Certificate File Installed from a Computer").
(invalid) is displayed to the left of a key pair, it is corrupted or invalid. After erasing the corrupted or invalid key pair, register a key pair (see "Generating a Key Pair and Server Certificate" or "Registering a Key Pair File and Server Certificate File Installed from a Computer").|
NOTE
|
|
The Device Signature Key is a key pair required for a device signature. For more information, see "Confirming a Key Pair and Device Certificate."
|
Select the key pair for the server certificate you want to confirm → press [Certificate Details] → [Certificate].
If [Certificate] is grayed out or <The key is corrupted or invalid.> is displayed, you cannot use the key pair. After erasing the corrupted or invalid key pair, register a key pair (see "Generating a Key Pair and Server Certificate" or "Registering a Key Pair File and Server Certificate File Installed from a Computer").
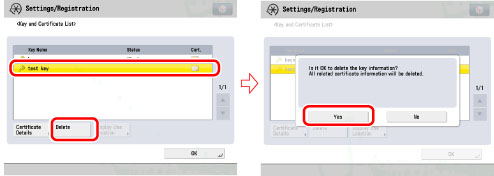
Select the key pair to delete → press [Delete] → press [Yes].
|
IMPORTANT
|
|
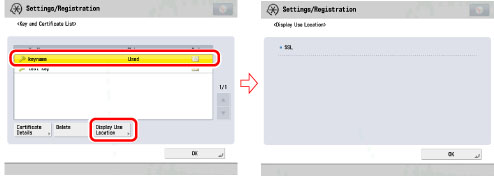
Key pairs for which 'Used' is displayed in <Status> cannot be deleted because they are being used with the IEEE802.1X authentication/IPSec or because SSL is set to 'On'. Press [Display Use Location] to check the type of security the key pair is being used for. To delete a key pair which is only being used with SSL, set the following settings to 'Off'. A key pair being used for the IEEE802.1X authentication/IPSec cannot be deleted.
<Use SSL> in [Remote UI] (See"Setting Remote UI.")
[Use SSL] in [MEAP Settings] (See "MEAP Settings.")
[IPP Print Settings] (See "Settings Common to TCP/IPv4 and TCP/IPv6.")
<SMTP Receive> in [E-Mail/I-Fax Settings] (See "Common Communication Settings for E-Mail/I-Fax.")
[Restrict Receiving for Each Function] in [Device Information Delivery Settings] (See "Registering/Deleting/Printing Delivery Destinations.")
[Confirm Dept. ID PIN] (See "Settings Common to TCP/IPv4 and TCP/IPv6.")
[WebDAV Server Settings] (See "Setting the Advanced Space to be Open to the Public as a WebDAV/SMB Server.")
|
Select a key pair with 'Used' displayed for <Status> → press [Display Use Location] to check the kind of security the key pair is being used for.
Apart from the X.509 (DER) format CA certificate preinstalled in the machine, you can also register a CA certificate file which has been installed using a web browser (Remote UI).
The procedure for registering installed files in the machine using the control panel is as follows:
|
IMPORTANT
|
|
For instructions on how to install a CA certificate file, see "Installing a CA Certificate."
|
|
NOTE
|
|
Up to 50 CA certificate files can be registered.
|
1.
Press → [Management Settings] → [Device Management] → [Certificate Settings] → [Register CA Certificate] → specify the following.
→ [Management Settings] → [Device Management] → [Certificate Settings] → [Register CA Certificate] → specify the following.
Select the file to register → press [Register].
To delete an unnecessary file, select the file → press [Delete]. When the confirmation message is displayed, press [Yes].
To confirm the CA certificate you have registered, see "Editing a CA Certificate."
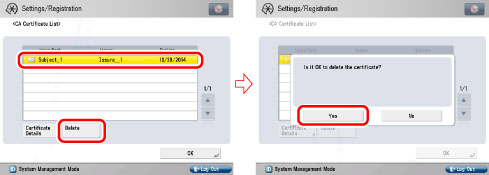
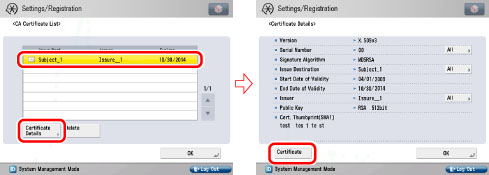
You can confirm the settings of registered CA certificates. You can also delete unnecessary CA certificates.
1.
Press → [Management Settings] → [Device Management] → [Certificate Settings] → [CA Certificate List] → specify the following.
→ [Management Settings] → [Device Management] → [Certificate Settings] → [CA Certificate List] → specify the following.Select the key pair for the CA certificate you want to confirm → press [Certificate Details] → [Certificate].
Select the CA certificate to delete → press [Delete] → [Yes].