Generating and Confirming a Key Pair and Device Signature Certificate and User Certificate for Adding Digital Signatures to PDF or XPS Files
The machine can add the following two types of digital signatures to PDF or XPS files. This section describes the procedures for specifying and confirming the settings necessary for adding digital signatures to PDF or XPS files using the control panel of the machine. For instructions on how to add digital signatures to PDF or XPS files, see "Adding a Digital Signature to a PDF or XPS" or "Installing a Certificate File."
For information on the optional products required to use this function, see "Optional Products Required for Each Function."
Enables the recipient to identify the device that scanned the document. To add a device signature to a PDF or XPS file, set a key pair and device certificate. (See "Setting a Key Pair and Device Certificate.")
Enables the recipient to identify the user who signed the document. To add a user signature to a PDF or XPS file, it is necessary to install a key pair and user certificate in the machine from a computer. (See "Installing/Checking/Erasing a User Signature Certificate and Key Pair.") You can confirm the installed key pair and user certificate using the control panel of the machine. (See "Confirming a Key Pair and User Certificate.")
The following procedures describe how to generate and update the key pair and device certificate necessary for adding a device signature to a PDF or XPS file.
For information on the optional products required to use this function, see "Optional Products Required for Each Function."
1.
Press  → [Management Settings] → [Device Management].
→ [Management Settings] → [Device Management].2.
Press [Certificate Settings] → [Generate Key].
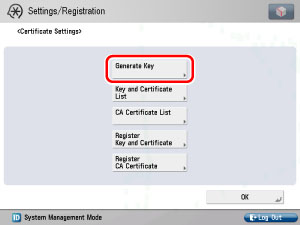
3.
Press [Generate/Update Device Signature Key] → [Yes].

|
IMPORTANT
|
|
You can register only one key pair.
|
|
NOTE
|
|
The name of the generated/updated key pair is set to 'Device Signature Key'. To confirm a key pair and device certificate, see "Confirming a Key Pair and Device Certificate."
|
The following procedure describes how to confirm a key pair and device certificate generated/updated in "Setting a Key Pair and Device Certificate."
|
IMPORTANT
|
|
For information on how a general user can check the device certificate, see "Confirming the Device Signature Certificate."
|
1.
Press → [Management Settings] → [Device Management] → [Certificate Settings] → [Key and Certificate List] → [Key and Certificate List for this Machine].
→ [Management Settings] → [Device Management] → [Certificate Settings] → [Key and Certificate List] → [Key and Certificate List for this Machine].If  (invalid) is displayed to the left of a key pair, the key pair is corrupted or invalid. Follow the procedure in "Setting a Key Pair and Device Certificate," to generate/update a key pair.
(invalid) is displayed to the left of a key pair, the key pair is corrupted or invalid. Follow the procedure in "Setting a Key Pair and Device Certificate," to generate/update a key pair.|
NOTE
|
|
You cannot delete or edit a key pair necessary for a device signature on the Key and Certificate List for this Machine screen.
|
2.
Select 'Device Signature Key' → press [Certificate Details] → [Certificate].

If [Certificate] is grayed out or <The key is corrupted or invalid.> is displayed, you cannot use the key pair. Follow the procedure in "Setting a Key Pair and Device Certificate," to generate/update a new key pair.
|
NOTE
|
|
<Cert. Thumbprint (SHA1)> contains sender information used to validate the reliability of a PDF or XPS file with a device signature, by matching it with the MD5 or SHA-1 message digest number.
The expiration date for the device signature is set to 5 years after its key pair was generated/updated.
|
The following procedure describes how the system manager can confirm the key pairs and user certificates for all users.
Install the key pair and user certificate used for adding a user signature to PDF or XPS files from a computer. (See "Installing/Checking/Erasing a User Signature Certificate and Key Pair.")
For information on the optional products required to use this function, see "Optional Products Required for Each Function."
|
NOTE
|
|
You can also use the Remote UI to confirm the key pairs and user certificates for all users. For more information, see "Installing/Checking/Erasing a User Signature Certificate and Key Pair."
For information on how a general user can display the user certificate, see "Checking a User Signature Certificate." However, in this case, only the user certificate for the user who is currently logged in is displayed. User certificates for other users cannot be displayed. The user certificate also cannot be deleted from this screen. A general user must use the Remote UI to delete their user certificate. (See "Installing/Checking/Erasing a User Signature Certificate and Key Pair.")
|
1.
Press → [Management Settings] → [Device Management] → [Certificate Settings] → [Key and Certificate List] → [Key and Certificate List for Users] → specify the following.
→ [Management Settings] → [Device Management] → [Certificate Settings] → [Key and Certificate List] → [Key and Certificate List for Users] → specify the following.User key pairs with (invalid) displayed to the left of them are corrupted or invalid key pairs. After erasing the key pair, install a key pair and user certificate in the machine from a computer. (See "Installing/Checking/Erasing a User Signature Certificate and Key Pair.")
(invalid) displayed to the left of them are corrupted or invalid key pairs. After erasing the key pair, install a key pair and user certificate in the machine from a computer. (See "Installing/Checking/Erasing a User Signature Certificate and Key Pair.")Select the key pair for the certificate you want to confirm → press [Certificate Details] → [Certificate].

If [Certificate] is grayed out or <The key is corrupted or invalid.> is displayed, you cannot use the key pair. After erasing the corrupted or invalid key pair, install a new key pair and user certificate from a computer. (See "Installing/Checking/Erasing a User Signature Certificate and Key Pair.")
Select the key pair to delete → press [Delete] → [Yes].
