After the machine's power is turned ON, you can change the display of the touch panel display. The available screens to set after the machine starts up are Main Menu, Quick Menu, Copy, Scan and Send, Access Stored Files, and other function screens. (See "Default Screen at Startup.")
 CAUTION CAUTION |
|
Press the touch panel display keys gently with your fingers or the edit pen. Do not press the touch panel display with a pencil, ballpoint pen, or other sharp objects that can scratch the surface of the touch panel display or break it.
|
|
NOTE
|
|
Before using the touch panel display, peel off the protective film from the display.
|
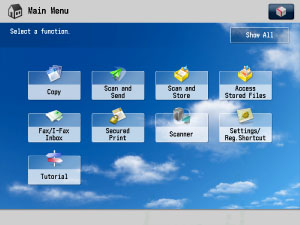
The Main Menu screen appears when you press  on the control panel.
on the control panel.You can use each function by selecting it from the Main Menu screen.
If favorite functions are set on the Quick Menu, you can access them by pressing  . Also, if you are using the login service, the Quick Menu set for each individual user can be displayed.
. Also, if you are using the login service, the Quick Menu set for each individual user can be displayed.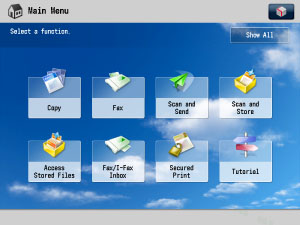
Press [Show All] to show functions which are not displayed on the Main Menu.
Press  on the top right of the screen to change the keys displayed on the Main Menu screen or each function screen. You can change the display of the screen such as the background image on the Main Menu screen or display shortcuts for frequently used function on each function screen to suit your needs.
on the top right of the screen to change the keys displayed on the Main Menu screen or each function screen. You can change the display of the screen such as the background image on the Main Menu screen or display shortcuts for frequently used function on each function screen to suit your needs.|
NOTE
|
|
For information on the available screens that can be set to display after the machine starts up, see "Default Screen at Startup."
For information on the Quick Menu screen settings, see "Quick Menu."
|
This section explains how to set the display of the Main Menu screen using the on the top right of the screen.
on the top right of the screen.If you press on the top right of the screen, the following screen is displayed. Select settings from the displayed screen and set the display of the Main Menu screen.
on the top right of the screen, the following screen is displayed. Select settings from the displayed screen and set the display of the Main Menu screen.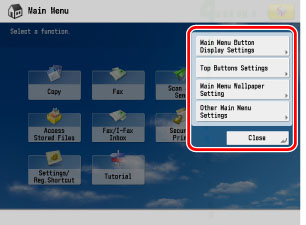
|
NOTE
|
|
To specify the settings of the Main Menu screen, you must log in to the machine as an administrator. As a default, system manager settings (System Manager ID/System Password) are set on the machine. Thus, the Administrator must log in by entering the System Manager ID and the System Password on the Settings/Registration screen. The default setting for both the System Manager ID and System Password is '7654321'.
|
You can set the number of buttons and the layout displayed on the Main Menu screen.
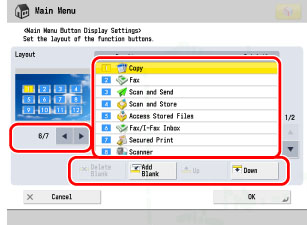
Press [ ] or [
 ]to select the number of buttons and the layout to be displayed. 3 to maximum of 16 buttons can be displayed on one screen.
] or []to select the number of buttons and the layout to be displayed. 3 to maximum of 16 buttons can be displayed on one screen.Select the function displayed on the list and press [Up] or [Down] to change the order in which it is displayed. By pressing [Add Blank], one blank button space can be placed on the Main Menu screen.
To delete blank space, press [Delete Blank].
|
NOTE
|
|
If there are more than 16 buttons, they are displayed after page 2 of the Main Menu screen.
If you press [Show All] on the Main Menu screen, it displays all functions including buttons not set to be displayed. To return to the customized screen, press [Show All] on the Display All screen again.
|
You can display up to two function shortcut keys on the top of the screen.
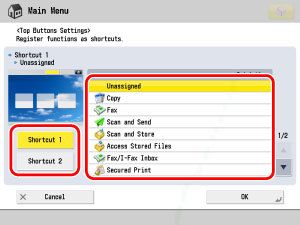
Press [Shortcut 1] or [Shortcut 2] → select the function to be displayed as the shortcut key.
If you do not want to select a function, press [Unassigned].
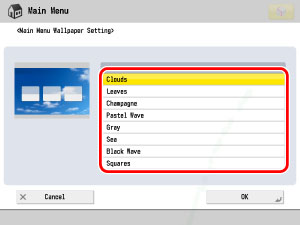
You can select the wallpaper for the Main Menu screen.
You can set whether the shortcut keys for modes such as changing the displayed language or changing the paper settings for copying/printing are displayed on the Main Menu screen.
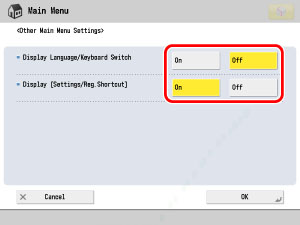
If [Display Language/Keyboard Switch] is set to 'On', the shortcut button for Language/Keyboard Switch screen is displayed on the Main Menu screen. On the Language/Keyboard Switch screen, shortcut button to change the displayed language appears.
Also, you can change the arrangement of the keyboard that is displayed when entering characters.
If the display for [Display [Settings/Reg. Shortcut]] is set to 'On', the shortcuts for [Settings/Reg. Shortcut] is displayed. If you press [Settings/Reg. Shortcut], [Auto Adjust Gradation], [Paper Settings], and [Paper Type Management Set.] are displayed as one button on the Main Menu screen.
|
NOTE
|
|
For more information on [Auto Adjust Gradation], [Paper Settings], and [Paper Type Management Set.], see "Automatic Gradation Adjustment," "Registering the Paper Type for the Paper Source," and "Registering/Editing Custom Paper Types."
For more information on [Language/Keyboard Switch], see "Changing the Display Language/Keyboard on the Touch Panel Display."
|
This section explains the display settings and the keys displayed for each function screen when on the top right of the screen is used.
on the top right of the screen is used.|
NOTE
|
|
The screen displayed when the power is turned ON can be changed from Settings/Registration. For information on the available screens that can be set to display after the machine starts up, see "Default Screen at Startup."
The available settings you can specify may differ, depending on the user's privileges.
|
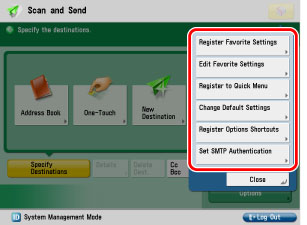
The Scan and Send screen is shown as an example below.
|
[Register/Edit Favorite Settings]:
|
You can assign a name and save current settings. You can access stored settings from [Favorite Settings] on each function screen.
|
|
[Register to Quick Menu]:
|
You can store current settings on the Quick Menu. (See "Registering/Using the Personal Button/Shared Button.")
|
|
[Change Default Settings]:
|
You can set current settings as the default screen for each function screen.
|
|
[Register Options Shortcuts]:
|
You can store [Options] shortcut key displayed on each function screen. Stored shortcut keys are displayed on each function screen.
|
|
[Set SMTP Authentication]:
|
You can set e-mail and I-fax to use SMTP authentication. If [Use SMTP Authentication for Each User] is set to 'On', you can register the user name and password.
|
|
NOTE
|
|
[Register Favorite Settings] and [Edit Favorite Settings] are shortcut keys for [Register Favorite Settings] and [Edit Favorite Settings] of Settings/Registration. (See "Favorite Settings Buttons.")
[Register Options Shortcuts] is a shortcut key for [Register Options Shortcuts] from the Settings/Registration screen. (See "Storing Shortcut Keys.")
[Set SMTP Authentication] is displayed only on the function screen for [Scan and Send]. For more information on setting the SMTP authentication, see "Common Communication Settings for E-Mail/I-Fax."
|
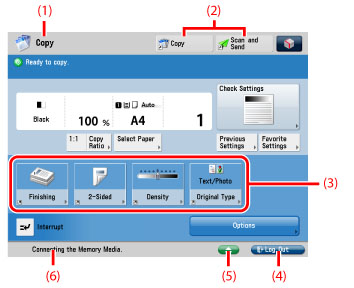
The Copy screen is shown as an example below.
|
(1)
|
The function name that is currently being used is displayed.
|
|
(2)
|
Presently stored function shortcut keys are displayed.
|
|
(3)
|
The shortcut keys for the functions you registered from [Register Options Shortcuts] are displayed.
|
|
(4)
|
If you are logged in using a login service, [Log Out] is displayed.
|
|
(5)
|
When there are paper or staple jams, or when USB Device is attached, a key is displayed.
|
|
(6)
|
The progress of jobs and copy operations, and the status of devices and consumables are displayed here. Also, depending on the login service you are using, the Department ID or user name can be displayed.
|
Below are examples of functions displayed on the Main Menu screen when optional equipment is attached.
The Duplex Color Image Reader Unit is attached
|
Attached Optional Equipment
|
Functions Displayed on the Main Menu Screen
|
|
FAX Board or Remote Fax Kit (activated)
|
 |
|
Web Access Software
|
 |