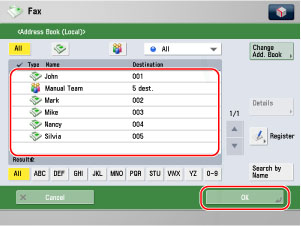
There are three types of Address Books: Local Address Book, Remote Address Book, and LDAP Server. You can select one of the Address Book, and then search and specify the destination. By storing the destination in the Local Address Book beforehand, you can specify the destination quickly. (See "Storing New Addresses.")
|
NOTE
|
|
To view the detailed information of a selected destination, select the destination → press [Details].
You can change, edit, or delete destinations on the Send Basic Features screen before scanning. (See "Checking/Changing Information for the Specified Destination" and "Deleting a Destination.")
A maximum of 256 destinations can be specified at the same time. However, if a group address is specified for the destination, each address stored in that group is counted as one destination.
|
|
NOTE
|
|
The Local Address Book can be saved and imported using the Remote User Interface. (See "Saving/Loading the Address List.")
|
1.
Press [Address Book].
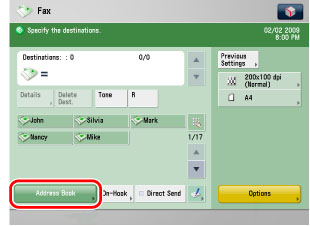
2.
Select the destination → press [OK].
You can select multiple destinations.
The following are the various methods you can search for the destination. Also, you can search using a combination of these methods.
<Specify Type of Destination button>:
If you press [All], [ ] (Fax) or [
 ] (Group), destinations for each type are displayed.
] (Fax) or [] (Group), destinations for each type are displayed.|
IMPORTANT
|
|
If the group destination that includes a destination other than fax is selected, fax cannot be sent.
|
<Address List drop-down list>:
Press the Address List drop-down list to display a list of Address Lists 1 to 10 or one-touch buttons. Address Lists categorize the addresses stored in the Address Book.
You cannot select a one-touch button stored in a Address List.
<Search Initial Letter button>:
Press the alphanumeric keys (e.g., [ABC]) to display the individual keys for each letter or number. You can select a letter or number to restrict the displayed range of entries. Press [All] to return to the full address list.
[Search by Name]:
If [Search by Name] is pressed, the pup-up screen for refining the address book is displayed.
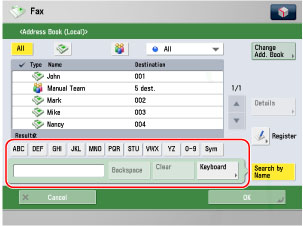
You can refine the search by entering not only the first character of the destination name but as many characters as you like.
Press the alphanumeric keys (e.g., [ABC]) to display the individual keys for each letter or number. You can also refine the addresses display by specifying the multiple letters pressing [Keyboard].
|
[Backspace]:
|
Press to delete the last letter entered.
|
|
[Clear]:
|
Press to delete all of the text entered.
|
|
[Keyboard]:
|
Displays the keyboard on the touch panel display.
|
Press [Search by Name] to return to the previous screen.
[Access No.]:
If you select a destination that is stored with an access number, press [Access No.] and then enter the access number using  -
-  (numeric keys). If you press [Addresses without Access Number], the destinations that are not managed with an access number are displayed.
- (numeric keys). If you press [Addresses without Access Number], the destinations that are not managed with an access number are displayed.|
NOTE
|
|
To cancel a selected destination, select the destination again.
[Access No.] is displayed on the screen only if [Manage Address Book Access Numbers] in Set Destination (Settings/Registration) is set to 'On'. (See "Access Number Management.")
|
You can specify the destination by searching for the destination in the Address Book of a server machine from a client machine that is connected to the server machine via a network. The Address Book with the destinations searched from the server machine and then displayed on the client machine is called the Remote Address Book. The imageRUNNER ADVANCE can be set as the server machine or client machine.
|
IMPORTANT
|
|
You must first set the settings to use the Remote Address Book. (See "Obtaining the Remote Address Book" and "Setting the Make Remote Add. Book Open.")
|
|
NOTE
|
|
If the display language for the server machine and client machine (this machine) is different, the Remote Address Book may have garbled characters.
|
1.
Press [Address Book].
2.
Press [Change Add.Book] → select [Remote].

|
NOTE
|
|
[Change Add. Book] is displayed when both the Remote Address Book and LDAP server are registered. If only the Remote Address Book is registered on the machine, [Remote] is displayed.
|
3.
Select the destination → press [OK].

You can select multiple destinations.
To check the information of the selected destination, press [Details].
The following are the various methods you can search for the destination. Also, you can search using a combination of these methods.
<Specify Type of Destination button>:
If you press [All], [] (Fax) or [] (Group), destinations for each type are displayed.
] (Fax) or [] (Group), destinations for each type are displayed.|
IMPORTANT
|
|
If the group destination that includes a destination other than fax is selected, fax cannot be sent.
|
<Address List drop-down list>:
Press the Address List drop-down list to display a list of Address Lists 1 to 10 or one-touch buttons. Address Lists categorize the addresses stored in the Address Book.
<Search Initial Letter button>:
Press the alphanumeric keys (e.g., [ABC]) to display the individual keys for each letter or number. You can select a letter or number to restrict the displayed range of entries. Press [All] to return to the full address list.
[Search by Name]:
If [Search by Name] is pressed, the pup-up screen for refining the address book is displayed.
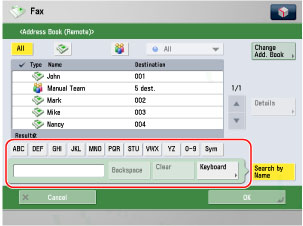
You can refine the search by entering not only the first character of the destination name but as many characters as you like.
Press the alphanumeric keys (e.g., [ABC]) to display the individual keys for each letter or number. You can also refine the addresses display by specifying the multiple letters pressing [Keyboard].
|
[Backspace]:
|
Press to delete the last letter entered.
|
|
[Clear]:
|
Press to delete all of the text entered.
|
|
[Keyboard]:
|
Displays the keyboard on the touch panel display.
|
Press [Search by Name] to return to the previous screen.
[Access No.]:
If you select a destination that is stored with an access number, press [Access No.] and then enter the access number using - (numeric keys). If you press [Addresses without Access Number], the destinations that are not managed with an access number are displayed.
- (numeric keys). If you press [Addresses without Access Number], the destinations that are not managed with an access number are displayed.|
IMPORTANT
|
||||||||||||||||
|
If the server machine is performing the system manager information settings, authentication between the server machine and the client machine is performed while the client machine is obtaining the remote address. Authentication is performed by matching the System Manager ID and System PIN set by the server machine and client machine. If the authentication failed between the server machine and client machine, authentication error notice is sent from the server machine to the client machine.
The availability of the Remote Address Book depends on the status of the system manager information settings for the server machine and client machine, as shown below.
For more information on setting the System Manager ID and System PIN, see System Manager
Information Setting in Management Settings (Settings/Registration). (See "Specifying the System Manager Settings.")
Up to eight machines, including this machine, can be connected as the client machine at the same time to the server machine with the public Remote Address Book. However, if the server machine is performing other network communication during this time, the number of machines that can connect may be less than eight machines. If this machine cannot connect, network error notice is sent.
If an authentication error between the server machine and client machine or a communication timeout due to network congestion occurs, you cannot obtain the destination. You can set the communication timeout from <Communication Timeout> in [Acquire Remote Address Book] in Set Destination (Settings/Registration). (See "Obtaining the Remote Address Book.")
|
|
NOTE
|
|
To cancel a selected destination, select the destination again.
Regardless of the settings on the server machine, [Access No.] is displayed when [Manage Address Book Access Numbers] in Set Destination (Settings/Registration) of this machine is set to 'On'. (See "Access Number Management.")
When the destination is specified from the Remote Address Book, the destination obtained from the server machine is treated as a new destination. If you select a group destination and press [OK], destinations in the group address are displayed on the Scan and Send Basic Features screen.
|
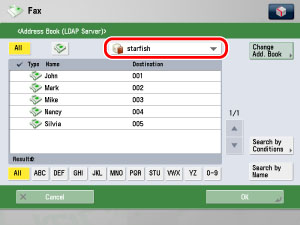
You can specify a destination by searching the directory listings on the network using LDAP (Lightweight Directory Access Protocol) servers.
|
NOTE
|
|
You may have to set up the LDAP servers beforehand, depending on the network environment. For information on setting an LDAP server, see "Registering an LDAP Server."
The information that can be obtained through the LDAP server consists of only names and fax numbers.
You cannot directly specify a destination that is obtained via a server as a forwarding destination. To specify the destination as a forwarding destination, you must first store it in the Local Address Book. (See "Storing Addresses Obtained via an LDAP Server.")
|
1.
Press [Address Book].
2.
Press [Change Add.Book] → select [LDAP Server].
|
NOTE
|
|
[Change Add. Book] is displayed when both the Remote Address Book and LDAP server are registered. If only the LDAP server is registered on the machine, [LDAP Server] is displayed.
|
3.
Press the Server to Search drop-down list → select the desired server to search.
If the Enter Network Password screen is displayed, enter the user name and the password → press [OK]. After pressing [OK], the password that you entered appears as asterisks (********) on the Enter Network Password screen.
The Enter Network Password screen is displayed if either one of the following is true:
If <Login Information> in Register LDAP Server in Set Destination (Settings/Registration) is set to 'Use', and <Display Authentication Screen When searching> in Register LDAP Server in Set Destination (Settings/Registration) is set to 'On'.
If the user name, password, and domain name specified in Register LDAP Server in Set Destination (Settings/Registration) are incorrect.
|
IMPORTANT
|
|
Searching for a destination via an LDAP server is not possible if the time setting of the server and the time setting of the machine are more than five minutes apart. If you cannot send even when the user name and password are correct, check the time settings on the server and the machine.
The number of search results displayed will not exceed the maximum limit set in Register LDAP Server in Set Destination (Settings/Registration). If the desired destination is not displayed, either increase the maximum number of addresses to search, or change the search criteria. (See "Registering an LDAP Server.")
|
|
NOTE
|
|
If multiple LDAP servers are registered and [Auto Search When Using LDAP Server] in Set Destinations (Settings/Registration) is set to 'On', the first registered server displayed on the drop-down list is searched.
|
4.
The destination is searched.
|
IMPORTANT
|
|
If a new destination search is performed when a search result is already displayed on the destination list screen, the displayed search result is cleared.
If the search result for specified criteria is displayed, the search result is cleared and search for all criteria is processed when you press [All].
If the [Auto Search When Using LDAP Server] in Set Destination (Settings/Registration) is set to 'Off', nothing is displayed on the destination list screen until a search is performed.
If the search result from [Search by Conditions] is displayed on the search list screen, you cannot additionally press [Search by Name] to narrow the search by name.
|
If you want to narrow the search for destination by entering characters of the name on the keyboard:
Press [Search by Name].
Enter the text to search on the keyboard screen → press [OK].
Enter the first character of the name for the destination. You cannot search if you enter a character other than the first character of the name.
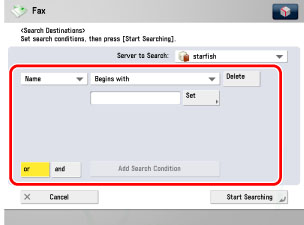
Press [Search by Conditions].
Press the search category drop-down list → select the desired search category.
The available search categories are:
|
[Name]:
|
Search by name.
|
|
[Fax]:
|
Search by fax number.
|
|
[Organization]:
|
Search by organization name.
|
|
[OrganizationUnit]:
|
Search by organizational unit (e.g., departments in an organization).
|
For example, if cn(common name)=user1, ou(organization unit)=salesdept, o(organization)=canon, c (country)=jp is the distinguished name in the directory, enter the organization/organizationUnit of the user as follows:
organization=canon
organizationUnit=salesdept
organization=canon
organizationUnit=salesdept
|
NOTE
|
|
The organization/organizationUnit can be used as search categories only if the information has been registered on the LDAP Server.
Search by organization/organizationUnit may not be performed, depending on whether the attribute types have been registered on the LDAP server, and depending on the type of application on the server.
You can also add additional user-defined search attributes. For more information on registering or editing a search attribute, see "Registering an LDAP Server."
|
Press the search condition drop-down list → select the desired search condition.
You can select from the following search conditions:
|
[Contains]:
|
The result must contain the entered name, fax number, organization, or organizational unit.
|
|
[Does Not Contain]:
|
The result must not contain the entered name, fax number, organization, or organizational unit.
|
|
[Equals]:
|
The result must be exactly the same as the entered name, fax number, organization, or organizational unit.
|
|
[Differs from]:
|
The result must be different from the entered name, fax number, organization, or organizational unit.
|
|
[Begins with]:
|
The result must begin with the same first few letters that you entered for the name, fax number, organization, or organizational unit.
|
|
[Ends with]:
|
The result must end with the same last few letters that you entered for the name, fax number, organization, or organizational unit.
|
Press [Set] → enter the search criterion → press [OK].
If you want to edit the stored search criteria, press [Set] → enter the new search criteria.
To continue adding more search criteria, press [or] or [and] → [Add Search Condition] → repeat steps.
|
[or]:
|
The machine searches and returns a result that matches any of the specified search criteria.
|
|
[and]:
|
The machine searches and returns a result that matches all of the specified search criteria.
|
To delete the search criteria, press [Delete]. If you want to set new search criteria, press [Delete] → repeat steps to specify the search criteria.
|
NOTE
|
|
You can specify up to four different search criteria at a time.
If you specify three or more search criteria, you cannot use both [or] and [and] together.
|
Press [Start Searching].
To cancel searching while the machine is searching for your criteria, press [Stop].
If the machine finds some results before you press [Stop], these search results are displayed.
|
NOTE
|
|
If you press [Start Searching] without specifying any search criteria, all of the addresses stored on the LDAP server are displayed.
|
5.
Select the desired destination from the search results → press [OK].
You can specify multiple destinations.
|
NOTE
|
|
To cancel a selected destination, select the destination again.
|