If you register a destination in one-touch buttons, you can save yourself the effort of entering the destination every time it is used. That destination can also be selected from one-touch buttons for use in any other customized setting.
You can store up to 200 destinations as one-touch buttons.
If <Enable Fax in Scan and Send Function> is set to 'On' in Display Fax Function in Display Settings in Preferences (the Settings/Registration screen), you can register a fax number. (See "Display Fax Function.")
For instructions on registering or editing a fax number in a one-touch buttons, see "Storing Destinations in One-Touch Buttons."
|
IMPORTANT
|
|
If Language/Keyboard Switch On/Off is set to 'On' in Display Settings in Preferences (Settings/Registration), the host name and folder path of the file server destination may not be displayed correctly, so you may not be able to refer to them.
|
|
NOTE
|
|
Destinations stored in one-touch buttons are also displayed in the Local Address Book.
A new destination cannot be registered in a group destination that is stored in a one-touch button. The destination must be registered in a one-touch button in advance.
If you want to search the destination, search is performed using the text entered here. To search, you can sort the destination by the initial letter or narrow the search for destination by using a maximum of 24 characters. For more information on refining the destination, see "Specifying Destinations Using the Address Book (Local)."
For more information on the maximum data size for sending, see [Maximum Data Size for Sending] in E-Mail/I-Fax Settings in Settings/Registration. (See "Maximum Data Size for Send.")
|
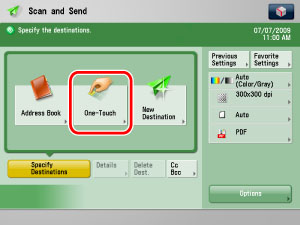
1.
Press [One-Touch].
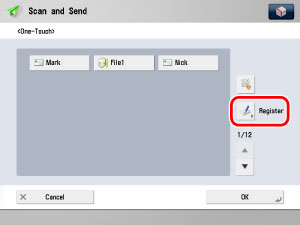
2.
Press [Register].
3.
select a one-touch button to store or edit → press [Register/Edit].
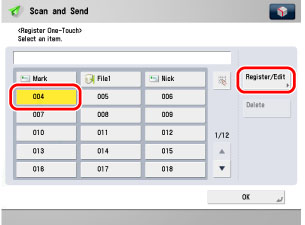
If you know the one-touch button's three digit number, press [ ] (One-Touch Button Number) → enter the three digit number of the desired one-touch button using
  -
-  (numeric keys).
] (One-Touch Button Number) → enter the three digit number of the desired one-touch button using - (numeric keys).If you select a one-touch button already storing a destination, proceed to step 4.
|
NOTE
|
|
For the one-touch button with settings already stored, one of the following icon is displayed to indicate the type of destination.
 (E-Mail) (E-Mail) (Fax) (Fax) (I-Fax) (I-Fax) (File server) (File server) (Group) (Group)If you select a one-touch button that already has destinations stored in it, the destinations are displayed.
If you register multiple destinations as a group address in a one-touch button, the number of destinations registered in the group address is displayed.
|
4.
Select [E-Mail], [Fax], [I-Fax], [File], [Group], or [LDAP Server].

|
NOTE
|
|
If you select [Fax], see "Storing Destinations in One-Touch Buttons."
|
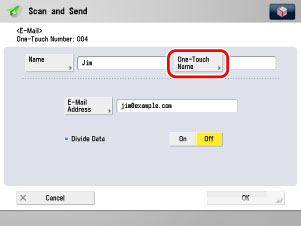
Press [Name] → enter a name for the e-mail address → press [OK].
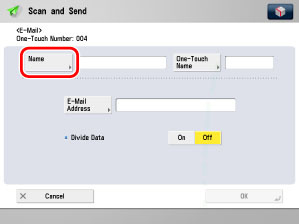
Press [One-Touch Name] → enter a name for the one-touch button → press [OK].
Press [E-Mail Address] → enter a name for the e-mail address → press [OK].
Select [On] or [Off] for <Divide Data>.
|
[On]:
|
Select [On] if the destination's e-mail software has a function to combine divided data. If the size of the data being sent exceeds the value set for Maximum Data Size for Sending in E-Mail/I-Fax Settings in Send in Function Settings (Settings/Registration), the data is divided into multiple parts before being sent. Once the destination machine receives all the parts of the data, it combines them into one item of data.
|
|
[Off]:
|
Select [Off] if the destination's e-mail software has no function to combine divided data. If the size of the data being sent exceeds the value set for Maximum Data Size for Sending in E-Mail/I-Fax Settings in Send in Function Settings (Settings/Registration), the data is divided into pages and sent as multiple e-mail messages.
|
|
IMPORTANT
|
|
Make sure to check the specifications of the destination's e-mail software before setting this mode. A sending error may occur if the destination's e-mail software is not able to combine divided data.
|
Press [Name] → enter a name for the I-fax address → press [OK].
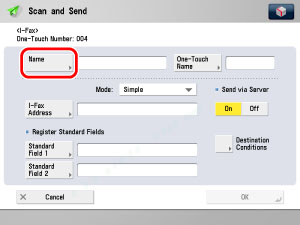
Press [One-Touch Name] → enter a name for the one-touch button → press [OK].
Press the Mode drop-down list → select [Simple] or [Full].
|
[Simple]:
|
Sends scanned data as an image via the Internet.
|
|
[Full]:
|
Sends scanned data as an image via the Internet, and enables you to receive a delivery confirmation message telling you whether your I-fax was sent successfully.
|
In order for you to receive a confirmation message telling you the delivery status of your I-fax document, the recipient's machine must have I-fax capabilities and be compatible with the Full mode.
|
NOTE
|
|
If you send documents using the Full mode to a machine that does not support the Full mode, delivery confirmation cannot be carried out. When this happens, the job concerned is not considered as complete even though the actual sending of the document is successful. Such jobs are displayed as <Waiting for TX result...> on the Status Monitor/Cancel screen until the time set for Full Mode TX Timeout in E-Mail/I-Fax Settings in Send in Function Settings (Settings/Registration) has lapsed. After the timeout, the job is moved to the log, and the result is shown as <-> when sending of the document to a server or other destination could not be verified.
|
Press [I-Fax Address] → enter the I-fax address → press [OK].
|
NOTE
|
|
If you do not send documents via a server, and if the recipient's IP address is not registered with a DNS server, enter the domain name in the following format: (user)@(the recipient's IP address).
|
Press [Standard Field 1] and [Standard Field 2] → enter their respective standard fields → press [OK].
Standard Field 1 and Standard Field 2 are settings required for using an Internet fax service. For details, contact your service provider.
If you do not use an Internet fax service, this step is not necessary.
|
NOTE
|
|
After pressing [OK], the standard field that you entered appears as asterisks (********) on the I-Fax Settings screen.
|
Select [On] or [Off] for <Send via Server>.
|
[On]:
|
Sends documents via a server. You can send documents to destinations via the Internet in the same way as e-mail.
|
|
[Off]:
|
Does not send documents via a server. You can send large amounts of image data to a recipient within the same LAN (Local Area Network) environment without placing a burden on the mail server. This enables you to send documents quickly and directly to the recipient. To use this setting, it is necessary to set up an MX (Mail eXchange) record on the DNS server. Ask your System Manager whether this type of sending is possible before you set Send via Server to 'Off'.
|
If you specify the Standard Field settings, set Send via Server to 'On'.
|
IMPORTANT
|
|
To be able to specify the Send via Server setting, set Use Send via Server to 'On' in E-Mail/I-Fax Settings in Send in Function Settings (Settings/Registration) beforehand. If Use Send via Server is set to 'Off', <Send via Server> is grayed out and cannot be pressed. (See "Use Send Via Server.")
It is recommended to set Allow MDN Not via Server to 'On' in E-Mail/I-Fax Settings in Send in Function Settings (Settings/Registration). (See "Allow MDN Not Via Server.")
|
|
NOTE
|
|
Even if <Send via Server> is set to 'Off', delivery confirmation of documents sent using the Full mode is carried out via the server.
|
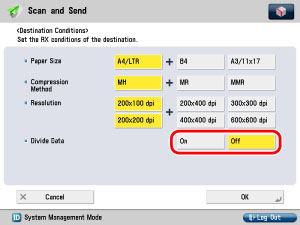
Press [Destination Conditions].
Select [On] or [Off] for <Divide Data>.
|
[On]:
|
Select [On] if the destination machine has a function to combine divided data. If the size of the data being sent exceeds the value set for [Maximum Data Size for Sending] in E-Mail/I-Fax Settings in Send in Function Settings (Settings/Registration), the data is divided into multiple parts before being sent. Once the destination machine receives all the parts of the data, it combines them into one item of data.
|
|
[Off]:
|
Select [Off] if the destination machine has no function to combine divided data. If the size of the data being sent exceeds the value set for [Maximum Data Size for Sending] in E-Mail/I-Fax Settings in Send in Function Settings (Settings/Registration), a sending error occurs.
|
|
IMPORTANT
|
|
Set the destination conditions according to the specifications of the recipient's machine. An error in transmission may occur if you set conditions that the recipient's machine does not support.
|
Press [OK].
Press [Name] → enter a name for the file server → press [OK].
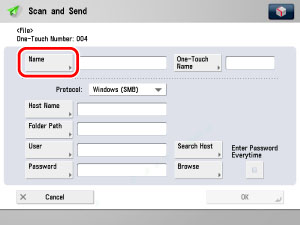
Press [One-Touch Name] → enter a name for the one-touch button → press [OK].
Press the Protocol drop-down list → select the desired protocol.
|
NOTE
|
|
For more information on the available protocols, see "Using the Keyboard."
|
Set [Host Name], [Folder Path], [User], and [Password].
If [Enter Password Each Time] is set to 'On', when sending to a file server, a screen to enter the registered password is displayed.
|
NOTE
|
|
For instructions on specifying each of the settings for FTP, Windows (SMB), and WebDAV, see "Specifying the File Server Not Stored in the Address Book."
|
Press [OK].
Press [Name] → enter a name for the group address → press [OK].
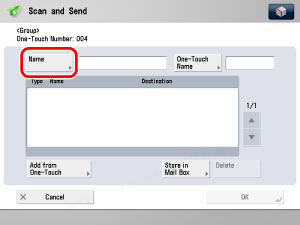
Press [One-Touch Name] → enter a name for the one-touch button → press [OK].
Select a destination to store in the group address from [Add from One-Touch] or [Store in Mail Box] → press [OK].
Only one mail box can be stored in a group address.
Only destinations that are already stored in one-touch buttons can be selected as part of a one-touch button group address.
If you know the one-touch button's three digit number, press [] (One-Touch Button Number) → enter the three digit number of the desired one-touch button using - (numeric keys).
] (One-Touch Button Number) → enter the three digit number of the desired one-touch button using - (numeric keys).Press the Server to Search drop-down list → select the desired server to search.

If the Enter Network Password screen is displayed, enter the user name and the password → press [OK]. After pressing [OK], the password that you entered appears as asterisks (********) on the Enter Network Password screen. The Enter Network Password screen is displayed if either one of the following is true:
If <Login Information> in Register LDAP Server in Set Destination (Settings/Registration) is set to 'Use', and <Display Authentication Screen When Searching> on the same screen is set to 'On'.
If the user name, password, and domain name specified in Register LDAP Server in Set Destination (Settings/Registration) are incorrect.
|
NOTE
|
|
If multiple LDAP servers are registered and [Auto Search When Using LDAP Server] is set to 'On' in Set Destinations (Settings/Registration), the first registered server displayed on the drop-down list is searched.
|
Specify the search criteria.
|
NOTE
|
|
If a new destination search is performed when a search result is already displayed on the destination list screen, the displayed search result is cleared.
If the search result for specified criteria is displayed, the search result is cleared and search for all criteria is processed when you press [ALL].
If Auto Search When Using LDAP Server is set to 'Off' in Set Destination (Settings/Registration), nothing is displayed on the destination list screen until a search is performed.
If the search result from [Search by Conditions] is displayed on the search list screen, you cannot additionally press [Search by Name] to narrow the search by name.
If you want to search for a destination that is registered with an e-mail address and a fax number, you can search for the e-mail address by entering the fax number as the search criterion, and vice versa.
|
If you want to narrow the search for destination by entering characters of the name on the keyboard:
Press [Search by Name].
Enter the text to search on the keyboard screen → press [OK].
Enter the first character of the name for the destination. You cannot search if you enter a character other than the first character of the name.
If you want to search for destination by entering search criteria:
Press [Search by Conditions].
Press the search category drop-down list → select the desired search category.

The available search categories are:
|
[Name]:
|
Search by name.
|
|
[E-mail]:
|
Search by e-mail address.
|
|
[Fax]:
|
Search by fax number.
|
|
[Organization]:
|
Search by organization name.
|
|
[OrganizationUnit]:
|
Search by organizational unit (e.g., departments in an organization).
|
For example, if cn(common name)=user1, ou(organization unit)=salesdept, o(organization)=canon, c(country)=jp is the distinguished name in the directory, enter the organization/organizationUnit of the user as follows:
organization=canon
organizationUnit=salesdept
|
NOTE
|
|
The organization/organizationUnit can be used as search categories only if the information has been registered on the LDAP Server.
Detailed Search by organization/organizationUnit may not be performed, depending on whether the attribute types have been registered on the LDAP server, and depending on the type of application on the server.
You can also add additional user-defined search attributes. For more information on registering or editing a search attribute, see "Registering/Editing LDAP Search Attributes."
|
Press the search condition drop-down list → select the desired search condition.
You can select from the following search conditions:
|
[Contains]:
|
The result must contain the entered name, e-mail address, fax number, organization, or organizational unit.
|
|
[Does Not Contain]:
|
The result must not contain the entered name, e-mail address, fax number, organization, or organizational unit.
|
|
[Equals]:
|
The result must be exactly the same as the entered name, e-mail address, fax number, organization, or organizational unit.
|
|
[Differs from]:
|
The result must be different from the entered name, e-mail address, fax number, organization, or organizational unit.
|
|
[Begins with]:
|
The result must begin with the same first few letters that you entered for the name, e-mail address, fax number, organization, or organizational unit.
|
|
[Ends with]:
|
The result must end with the same last few letters that you entered for the name, e-mail address, fax number, organization, or organizational unit.
|
Press [Set] → enter the search criterion → press [OK].
If you want to edit the stored search criteria, press [Set] → enter the new search criteria.
To continue adding more search criteria, press [or] or [and] → repeat the procedure above.
[or]: The machine searches and returns a result for either of the specified search criteria.
[and]: The machine searches and returns a result for all of the specified search criteria.
To delete the search criteria, press [Delete]. If you want to set new search criteria, press [Delete] → repeat steps to specify the search criteria.
|
NOTE
|
|
You can specify up to four different search criteria at a time.
If you specify three or more search criteria, you cannot use both [or] and [and] together.
|
Press [Start Searching].
To cancel searching while the machine is searching for your criteria, press [Stop]. If the machine finds some results before you press [Stop], these search results are displayed.
|
NOTE
|
|
If you press [Start Searching] without specifying any search criteria, all the addresses stored on the LDAP server are displayed.
|
Select the destination that you want to store in the Address Book from the search results → press [Next].
You cannot select multiple destinations.
You can register the selected e-mail address as an I-fax address by pressing [Register E-mail as I-Fax]. To register e-mail addresses as I-fax addresses, register one e-mail address at a time.
|
NOTE
|
|
To cancel a selected destination, select the destination again.
|
Press [One-Touch Name] → enter a name for the one-touch button → press [OK].
|
IMPORTANT
|
|
The information that can be obtained via the LDAP server consists of only names, e-mail addresses, and fax numbers.
|
5.
Press [OK].