|
NOTE
|
|
If you use the Fax function with the Remote Fax Kit, the following items are sent according to the settings of the Remote Fax Server.
ECM TX
Sending Speed
Long Distance
|
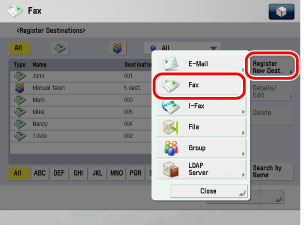
1.
Press [Address Book] → [Register].

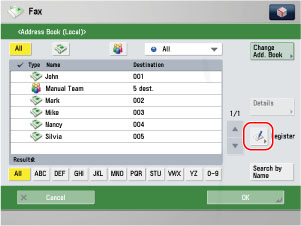
2.
Press [Register New Dest.] → [Fax].
3.
Press [Name].

4.
Enter a name for the recipient of the fax number → press [OK].
|
NOTE
|
|
For more information on refining the destination, see "Specifying Destinations Using the Address Book."
|
5.
Press the Address List drop-down list → select one of the numbered Address Lists.
Address Lists 1 to 10 are used to divide the Address Book into 10 parts, called Address Lists. This is a convenient way to classify destinations.
The fax number that you enter will be stored in the Address List that you select here.
6.
Enter the recipient's fax number using  -
-  (numeric keys),
  , and
, and  .
.
- (numeric keys), , and .
|
[Pause]:
|
Press to insert a pause of several seconds in the fax number that you are dialing. If you insert a pause, the letter <p> is displayed between the numbers, and the letter <P> appears at the end of the number. When dialing an overseas number, insert a pause after the country code, and at the end of the telephone number. (See "Pause Time.")
|
|
[Tone]:
|
Press when you want to directly call an extension line that is connected to a PBX (Private Branch eXchange) which accepts only tone signals. If you press [Tone], the letter <T> appears. (See "Fax Information Services.")
|
|
[
 ] [ ] [ ]: ]: |
Press to move the position of the cursor.
|
|
[Backspace]:
|
Press to delete the last number entered.
|
|
[Space]:
|
Press to insert a space between the area code and the local fax number.
|
|
[R]:
|
Press to use the R-Key. (See "Special Dialing.")
|
|
[Set Details]:
|
Press to set the subaddress, password, ECM TX, Sending Speed, and Long Distance. If the Super G3 2nd Line Fax Board is installed, press to select the telephone line to use for transmission.
|
|
[+]:
|
Use to insert a country code. Press [+] after the country code, and before the fax number.
|
|
IMPORTANT
|
|
You cannot insert a pause or a space at the beginning of a number.
|
|
NOTE
|
|
If you enter a pause at the end of the number, the pause is always 10 seconds long.
|
Specify each setting → press [OK].
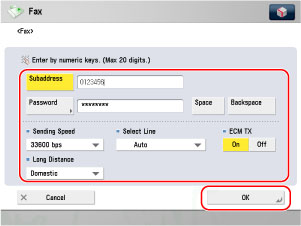
[Subaddress] and [Password]:
Press [Subaddress] → enter the recipient's subaddress using - (numeric keys), , and .
- (numeric keys), , and .Press [Password] → enter the recipient's password using - (numeric keys), , and .
- (numeric keys), , and . Press [Confirm] → re-enter the recipient's password for confirmation → press [OK].
Press [Space] to insert a space.
Press [Backspace] to delete the last digit entered.
If the recipient did not set a password for the target subaddress, you do not need to enter a password.
<ECM TX>:
Select [On] or [Off].
<Sending Speed>:
Press the Sending Speed drop-down list → select the desired sending speed.
If your document transmissions are slow in starting, this may mean that the telephone lines in your area are in poor condition. Select a slower speed. You can select [33600 bps], [14400 bps], [9600 bps], or [4800 bps].
<Long Distance>:
Press the Long Distance drop-down list → select the type of call.
Select [Long Distance (1)] if transmission errors occur frequently when you make overseas calls (when the number is stored in the Address Book). If errors persist, try selecting [Long Distance (2)] or [Long Distance (3)].
<Select Line>:
Press the Select Line drop-down list → select the line.
|
[Line 1]:
|
Standard line
|
|
[Line 2]:
|
Additional line (Super G3 2nd Line Fax Board is installed)
|
|
[Auto]:
|
Selects the line according to the settings specified for <Priority TX> in [Select TX Line] in Set Line in Fax Settings in Set in Function Settings (Settings/Registration). (See "Selecting the Type of Telephone Line.")
|
|
IMPORTANT
|
|
If you want to attach a subaddress to your send job, make sure that the recipient's fax machine supports ITU-T standard subaddresses.
|
|
NOTE
|
|
The Select Line drop-down list is displayed only if Super G3 2nd Line Fax Board is installed in addition to installing the optional Super G3 FAX Board.
|
7.
Finish storing the address.
Press [Next].
Press [Access No.].
Press [Access No.] → enter the access number using - (numeric keys).
- (numeric keys).Press [Confirm] → re-enter the access number for confirmation using - (numeric keys) → press [OK] → [OK].
- (numeric keys) → press [OK] → [OK].If you do not want to set an access number for this destination, press [OK] without entering any number.
Press [OK].