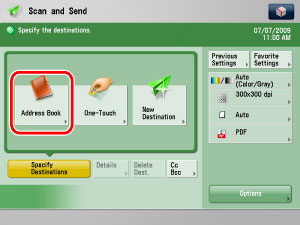
You can select a destination stored in the Address Book or a one-touch button, or specify a new address altogether. You can also recall the stored destinations and settings for scan/send in favorite settings. (See "Favorite Settings.")
There are three types of Address Books: Local Address Book, Remote Address Book, and LDAP Server. You can select one of the Address Book, and then search and specify the destination. By storing the destination in the Local Address Book beforehand, you can specify the destination quickly. (See "Storing E-Mail Addresses in the Address Book (Local).")
You can specify the destination by searching for the destination in the Address Book of a server machine from a client machine that is connected to the server machine via a network. The address book with the destinations searched from the server machine and then displayed on the client machine is called the Remote Address Book. The imageRUNNER ADVANCE can be set as the server machine or client machine
|
NOTE
|
|
To view the detailed information of a selected destination, select the destination → press [Details].
You can change, edit, or delete destinations on the Scan and Send Basic Features screen before scanning. (See "Checking/Changing a Destination" and "Deleting a Destination.")
The maximum of destinations can be specified at the same time is 256. If you specify a group, which is made up of several destinations, each destination is counted as a separate address.
You must first set the settings to use the Remote Address (See "Obtaining the Remote Address Book" and "Setting the Make Remote Add. Book Open.")
If the display language for the server machine and client machine (this machine) is different, the Address Book may have garbled characters.
|
1.
Press [Address Book].
2.
Press [Change Add. Book] → select [Remote].

|
NOTE
|
|
[Change Add. Book] is displayed when both the Remote Address Book and LDAP server are registered. If only the Remote Address Book is registered on the machine, [To Remote Add. Book] is displayed.
|
3.
Select the destination → press [OK].

You can select multiple destinations.
To check the information of the selected destination, press [Details].
The following are the various methods you can search for the destination. Also, you can search using a combination of these methods.
<Specify Type of Destination button>:
If you press [All], [ ] (E-Mail), [
 ] (Fax),[
 ] (I-Fax), [
 ] (File), or [
 ] (Group), destinations for each type are displayed.
] (E-Mail), [] (Fax),[] (I-Fax), [] (File), or [] (Group), destinations for each type are displayed.<Address List drop-down list>:
Press the Address List drop-down list to display a list of Address Lists 1 to 10 or one-touch buttons. Address Lists categorize the addresses stored in the Address Book.
<Search Initial Letter button>:
Press the alphanumeric keys (e.g., [ABC]) to display the individual keys for each letter or number. You can select a letter or number to restrict the displayed range of entries. Press [All] to return to the full address list.
[Search by Name]:
If [Search by Name] is pressed, the pup-up screen for refining the address book is displayed.

You can refine the search by entering not only the first character of the destination name but as many characters as you like. Press the alphanumeric keys (e.g., [ABC]) to display the individual keys for each letter or number. You can also refine the addresses display by specifying the multiple letters pressing [Keyboard].
|
[Backspace]:
|
Press to delete the last letter entered.
|
|
[Clear]:
|
Press to delete all of the text entered.
|
|
[Keyboard]:
|
Displays the keyboard on the touch panel display.
|
Press [Search by Name] to return to the previous screen.
[Access No.]:
If you select a destination that is stored with an access number, press [Access No.] and then enter the access number using  -
-  (numeric keys). If you press [Addresses without Access Number], the destinations that are not managed with an access number are displayed.
- (numeric keys). If you press [Addresses without Access Number], the destinations that are not managed with an access number are displayed.|
IMPORTANT
|
||||||||||||||||
|
If the server machine is performing the system manager information settings, authentication between the server machine and the client machine is performed while the client machine is obtaining the remote address. Authentication is performed by matching the System Manager ID and System PIN set by the server machine and client machine. If the authentication failed between the server machine and client machine, authentication error notice is sent from the server machine to the client machine.
The availability of the Remote Address Book depends on the status of the system manager information settings for the server machine and client machine, as shown below.
For instructions on setting the System Manager ID and System PIN, see [System Manger Information Settings] in User Management in Management Settings (Settings/Registration). (See "Specifying the System Manager Settings.")
Up to eight machines, including this machine, can be connected as the client machine at the same time to the server machine with the public Remote Address Book. However, if the server machine is performing other network communication during this time, the number of machines that can connect may be less than eight machines. If this machine cannot connect, network error notice is sent.
If an authentication error between the server machine and client machine or a communication timeout due to network congestion occurs, you cannot obtain the destination. You can set the communication timeout from <Communication Timeout> in [Acquire Remote Address Book] in Set Destination (Settings/Registration). (See "Communication Timeout.")
|
|
NOTE
|
|
To cancel a selected destination, select the destination again.
Regardless of the settings on the server machine, [Access No.] is displayed when [Manage Address Book Access Numbers] in Set Destination (Settings/Registration) of this machine is set to 'On'. (See "Access Number Management.")
When the destination is specified from the Remote Address Book, the destination obtained from the server machine is treated as a new destination. If you select a group destination and press [OK], destinations in the group address are displayed on the Scan and Send Basic Features screen.
|