The flow of basic scan and store operations is shown below.
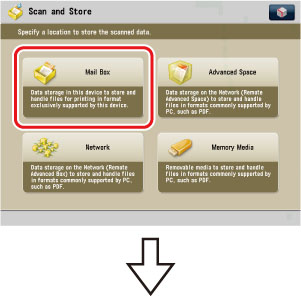
Storage Selection Screen
Select the storage where you want to store the scanned file.
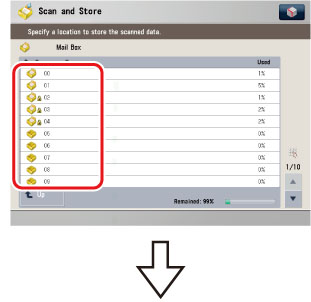
Mail box Selection Screen
Specify the Mail box that you want to store the file in.
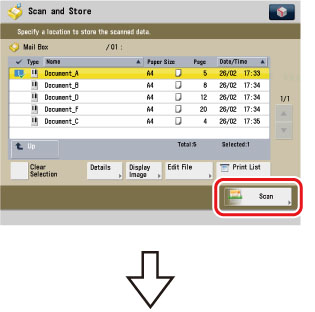
File Selection Screen
Press [Scan].
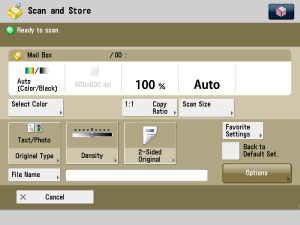
Scan Screen
Specify the settings for scanning your original.
|
IMPORTANT
|
|
No additional files can be stored in the Mail Box when any of the following conditions are met:
2,000 files have been stored in the selected Mail Box.
a total of 2,000 files have been stored in all of the Mail Boxes.
a total of about 8,000 pages of files have been stored in all of the Mail Boxes.
|
|
NOTE
|
|
It is recommended that you delete unwanted files or image data from your mail box to make space for storing new files.
|
The screen below, which appears when you select [Mail Box], is called the Mail Box Selection screen.
Mail Box numbers, names, and available memory are displayed for each mail box. Also, an icon indicating whether it is set with a password is displayed next to the mail box number.
 is the icon for an empty mail box.
 is the icon for a mail box with files.
 is the icon for a mail box that is set with a password.
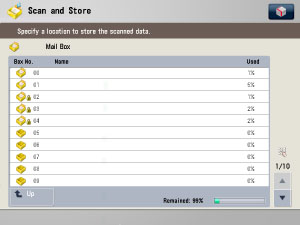
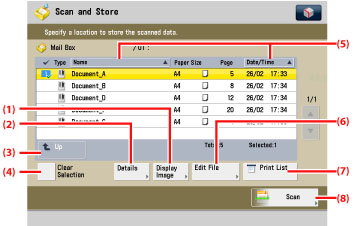
The screen below, which appears after you select the desired mail box, is called the File Selection screen.
Each icon indicates the colour mode used when the file is stored and whether it is stored with print settings.
|
(1)
|
Display Image
Press to view the contents of the selected file. |
|
(2)
|
Details
Press to check the details of a file stored in a mail box. |
|
(3)
|
Up
Press to return to the upper level. |
|
(4)
|
Select All (Max 100 Files)
Press to select all of the files in a mail box. If a file is selected, this key changes to [Clear Selection]. |
|
(5)
|
Name
Press to sort the documents in ascending or descending order by document name. Date/Time
Press to sort the documents in ascending or descending order by date/time. |
|
(6)
|
Edit File
Press to edit or check a file in a mail box. |
|
(7)
|
Print List
Press to print a list of files stored in a mail box. |
|
(8)
|
Scan
Press to scan an original and store it in the selected mail box. |
|
NOTE
|
|
For more information on the icons displayed for mail boxes, see Types of mail box Icons in "Overview of This Function."
For instructions on checking detailed information for a file stored in a mail box, printing the file list, and editing stored files, see "Checking a File's Detailed Information," "Printing Lists," and "File Options."
|
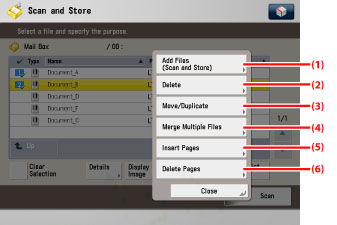
When you press [Edit File] on the File Selection screen, the screen below appears, which is called Edit File screen.
Use this screen to edit a file in a Mail Box.
|
(1)
|
Add Files (Scan and Store)
Press to add a file. |
|
(2)
|
Delete
Press to delete a file stored in a mail box. |
|
(3)
|
Move/Duplicate
Press to move or duplicate files to another Mail Box. |
|
(4)
|
Merge Multiple Files
Press to combine multiple files to create a new file. |
|
(5)
|
Insert Pages
Press to insert a file before a certain page in another file, to create a new file. |
|
(6)
|
Delete Pages
Press to delete certain pages from a file. |
|
NOTE
|
|
For instructions on deleting, moving, duplicating stored files, merging multiple stored files, inserting a page to the stored file, or deleting a page from the stored file, see "File Options."
|
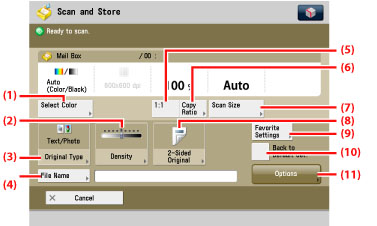
The screen below, which appears when you press [Scan] on the File Selection screen of a Mail Box, is called the Scan screen.
Display this screen when you want to scan an original and store it as a file in the selected Mail Box.
|
NOTE
|
|
To scan in colour, it is necessary to install the Additional Memory Type B (512MB) to expand the memory capacity of the machine.
|
|
(1)
|
Select Color
Press to select the colour mode for scanning. |
|
(2)
|
Density
Press to adjust the density. |
|
(3)
|
Original Type
Press to select the type of original (original that contains text only, photo only, or both text and photo) you are going to scan. |
|
(4)
|
File Name
Press to assign the file a name. |
|
(5)
|
1:1
Press to scan your document in the same size as your original. |
|
(6)
|
Copy Ratio
Press to reduce or enlarge the scanning size of the original. |
|
(7)
|
Scan Size
Press to set the size of the original that you are going to scan. |
|
(8)
|
2-Sided Original
Press if you are scanning a two-sided original. |
|
(9)
|
Favorite Settings
Press to recall scan settings or register frequently used settings in the Favorite Settings. |
|
(10)
|
Back to Default Set.
Press to cancel all settings and restore the default settings for Scan and Store. |
|
(11)
|
Options
Press to select and use other modes available for scanning. |