This section describes the procedure for setting TCP/IPv4 using the control panel. After specifying the settings for TCP/IPv4, follow the procedure in "Settings Common to TCP/IPv4 and TCP/IPv6" to specify the required settings, and the procedure in "Confirming TCP/IPv4 Settings" to check whether the network settings are correct. If the settings for TCP/IPv6 are already specified and you have finished specifying the settings common to TCP/IPv4 and TCP/IPv6, only check the network settings after completing this procedure.
If you want to use IPv6 communications at the same time, follow the procedure in "TCP/IPv6 Settings," to specify the required settings, and the procedure in "Confirming TCP/IPv6 Settings," to confirm the settings.
1.
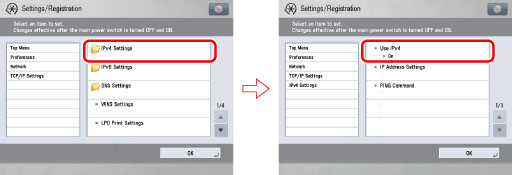
On the TCP/IP Settings screen, press [IPv4 Settings] → [Use IPv4].
2.
In <Use IPv4>, specify the following.
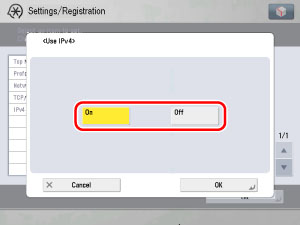
[On] for <Use IPv4>: IPv4 networks can be used.
[Off] for <Use IPv4>: IPv4 networks cannot be used, regardless of the settings specified for IPv4 on the Settings/Registration screen. The ARP (Address Resolution Protocol) table is also disabled.
|
IMPORTANT
|
|
If you set <Use IPv4> to 'Off', you cannot use an SMB/CIFS network.
|
3.
On the TCP/IPv4 Settings screen, press [IP Address Settings] → specify the following.
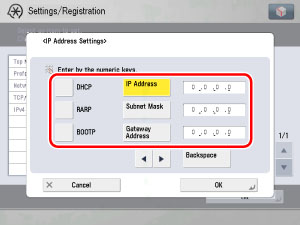
[DHCP], [RARP], and [BOOTP]: [Off]
Enter the appropriate values in [IP Address], [Subnet Mask], and [Gateway Address].
|
IMPORTANT
|
|
It takes about two minutes to check whether the DHCP, RARP, or BOOTP settings can be used. If you do not plan to use one of these settings, it is recommended that you turn them off.
|
[DHCP], [RARP], or [BOOTP]: [On]
If this information cannot be obtained via DHCP, RARP, or BOOTP after you restart the machine, enter the IP address, subnet mask, and gateway address to use the settings entered in this step.
|
NOTE
|
|
If the machine is restarted after DHCP, RARP, or BOOTP settings are specified, the TCP/IP Settings screen displays the IP address setting values obtained from the DHCP, RARP, or BOOTP server. (If the IP address, host name, and domain name have been previously set, these will be overwritten by the setting values obtained from DHCP, RARP, or BOOTP.)
If you use DHCP without the DNS dynamic update function, it is recommended that an identical IP address be assigned to the machine at all times. (If the IP address is not identical, the host name for the machine will not correspond to the IP address.)
|
4.
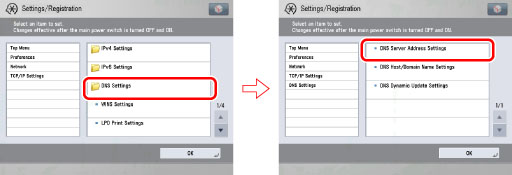
On the TCP/IP Settings screen, press [DNS Settings] → [DNS Server Address Settings].
5.
In <IPv4>, specify the following.
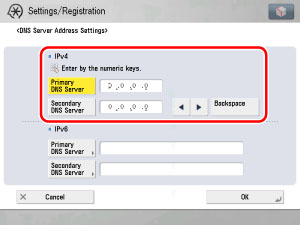
If you want to use dynamic DNS updating, enter the IPv4 address of the DNS server in [Primary DNS Server].
If you do not want to set up a secondary DNS server, enter <0.0.0.0>.
|
IMPORTANT
|
|
If you set [BOOTP] or [DHCP] to 'On' in step 3, the IP address of a DNS server you set manually will be overwritten.
|
6.
On the DNS Settings screen, press [DNS Host/Domain Name Settings] → in <IPv4>, specify the following.
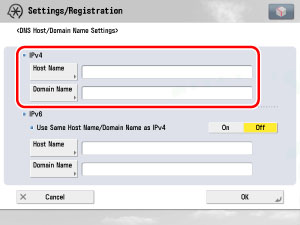
Enter the name of the machine as [Host Name], and the network domain name of the machine as [Domain Name]. If you want to use dynamic DNS updating, it is necessary to set a host name and domain name.
|
IMPORTANT
|
|
If you set [BOOTP] or [DHCP] to 'On' in step 3, the host name and domain name you set manually will be overwritten.
|
7.
On the DNS Settings screen, press [DNS Dynamic Update Settings] → in <IPv4>, specify the following.
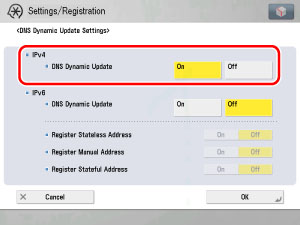
[On] for <DNS Dynamic Update>: If your environment includes a dynamic DNS server, you can automatically register the IPv4 address, host name, and domain name set for the machine in the DNS server using dynamic DNS updating.
|
NOTE
|
|
If you have a DHCP server running Windows 2000 Server that uses the DHCP service and want to register the machine's DNS record, configure the following settings in the DHCP server:
In the DHCP server, right-click the [Scope] icon → click [Properties]. In the [DNS] sheet of the displayed dialog box, select [Automatically update DHCP client information in DNS] → [Update DNS only if DHCP client requests].
If you have a DHCP server running Windows 2003 Server that uses the DHCP service and want to register the machine's DNS record, configure the following settings in the DHCP server:
In the DHCP server, right-click the [Scope] icon → click [Properties]. In the [DNS] sheet of the displayed dialog box, select [Enable DNS dynamic updates according to the settings below] → [Dynamically update DNS A and PTR (Pointer Record) records only if requested by the DHCP clients].
In the Active Directory environment, right-click the icon of the DHCP server you are using → select [Properties]. In the [Advanced] sheet of the displayed dialog box, click [Credentials]. In the [DNS dynamic update credentials] dialog box, enter the user name, domain, and password for the Active Directory.
If you have a DHCP server running Windows 2008 Server that uses the DHCP service and want to register the machine's DNS record, configure the following settings in the DHCP server:
In the DHCP server, right-click the [Scope] icon in IPv4 → click [Properties]. In the [DNS] sheet of the displayed dialog box, select [Enable DNS dynamic updates according to the settings below] → [Dynamically update DNS A and PTR records only if requested by the DHCP clients].
In the Active Directory environment, right-click the icon of the DHCP server you are using → select [Properties]. In the [Advanced] sheet of the displayed dialog box, click [Credentials]. In the [DNS dynamic update credentials] dialog box, enter the user name, domain, and password for the Active Directory.
|
8.
On the Network screen, press [Firewall Settings] → [IPv4 Address Filter] → specify the following.
By specifying the settings described below, you can filter received packets and transmitted packets using IPv4 addresses and improve security when sending and receiving data between your computer and the machine. The possibility of a third person gaining unauthorized access can be reduced by configuring the settings for [IPv4 Address Filter] in accordance with the environment you are using.
If you want to deny data transmission/reception between a computer with a specified IPv4 address and the machine, set the default policy for the transmission or reception filter so as to allow transmission/reception, and enter the IPv4 address to be denied. Data transmission/reception between the computer having the specified IPv4 address and the machine will be disabled. Also, the Remote UI cannot be used, and information regarding the machine cannot be displayed or set using a utility on the computer whose IPv4 address has been specified.
If you want to enable data transmission/reception only with a computer having a specified IPv4 address, set the default policy for the transmission or reception filter so as to deny transmission/reception, and enter the IPv4 address to be allowed. Data transmission/reception will be enabled only between the computer having the specified IPv4 address and the machine.
If you want to deny transmission/reception of data with the computer having the specified IPv4 address:
Press [TX Filter] or [RX Filter] → set <Use Filter> to 'On'.
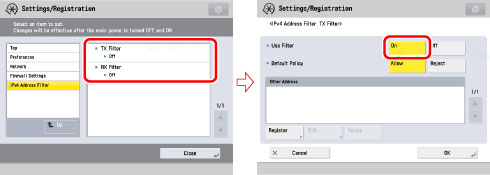
Set <Default Policy> to [Allow].
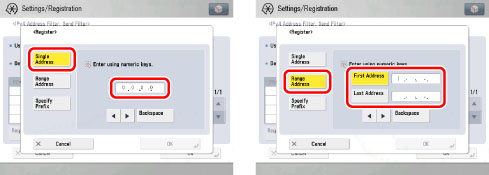
Press [Register] → set the IPv4 address or range of addresses for which data transmission/reception is to be denied, or specify the prefix and prefix length of the IPv4 address(es).
|
NOTE
|
|
If data transmission/reception is attempted between the device having the IPv4 address specified in this procedure and the machine, a block log will be generated. To display the block log, see "Confirming Settings and Block Log."
|
If you want to allow transmission/reception of data only with the computer having the specified IPv4 address:
Press [TX Filter] or [RX Filter] → set <Use Filter> to 'On'.
Set <Default Policy> to [Reject].
Press [Register] → set the IPv4 address or range of addresses for which data transmission/reception is to be allowed, or specify the prefix and prefix length of the IPv4 address(es).
Press [TX Filter] or [RX Filter] → set <Use Filter> to 'Off'.
|
IMPORTANT
|
|
You can register up to 16 IPv4 addresses, IPv4 address ranges, or IPv4 address prefixes.
The value of [First Address] should be less than or equal to that of [Last Address].
If the usage of a protocol or print application is not permitted on your device, it cannot be used even after settings in [Firewall Settings] have been changed; on your device, configure the settings to permit the protocol or print application.
If you enter '255' in [Prefix Length], no IPv4 addresses will be set.
If you enter '0' in [Prefix Length], all IPv4 addresses will be set.
If you enter '32' in [Prefix Length], the IPv4 address for the machine will be set.
|