|
|
Top ContentsHelpGlossary ContentsHelpGlossary |
||
|---|---|---|---|
|
Category
|
|
 Category TopOptional Equipment and System RequirementsChecking Your Network EnvironmentNetwork Environment Setup ProceduresConnecting the Machine to a Computer or NetworkTouch Panel Display TransitionInterface SettingsCommunication Environment SetupIEEE802.1X Authentication SettingsTCP/IP Network Setup Procedures
 Protocol SettingsTCP/IPv4 SettingsTCP/IPv6 SettingsSettings Common to TCP/IPv4 and TCP/IPv6Confirming TCP/IPv4 and TCP/IPv6 SettingsChanging the Key Pair Used With SSL Encrypted CommunicationsIPSec SettingsStartup Time SettingsSetting Up a Computer for Printing/Sending a FaxPrinter Connection Method (LPD/Raw)Printer Connection Method (IPP/IPPS)Printer Connection Method (FTP)Printer Connection Method (WSD)Setting Up a Computer as a File ServerFTP Server SettingsWebDAV Server SettingsNetWare Network Setup ProceduresNetWare Print Service SettingsProtocol SettingsSetting Up a Computer for Printing/Sending a FaxSMB/CIFS Network Setup ProceduresProtocol SettingsSetting Up a Computer for Printing/Sending a FaxSetting Up a Computer as a File ServerAppleTalk Network Setup ProceduresProtocol SettingsSetting Up a Computer for PrintingNetwork Connection Problems and RemediesPrinting Problems and RemediesData Sending/File Sharing Problems and RemediesEncrypted SSL Data Communication Problems and RemediesIEEE802.1X Authentication Problems and RemediesConfirming Settings and Block LogObtaining the Public Key of the Machine to Use SSL with Windows Vista
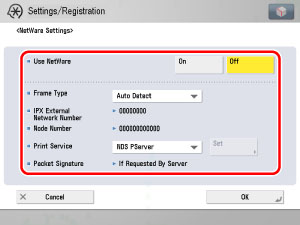
|
IMPORTANT
|
|
If [NetWare Settings] is not displayed, consult your local authorized Canon dealer.
If you set <Use NetWare> to 'On', the machine will not enter a complete Sleep mode.
|
|
IMPORTANT
|
|
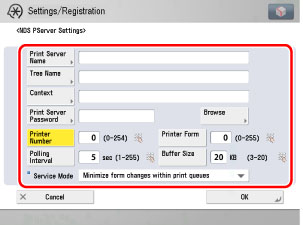
If you want to use [Browse] to specify each item, make sure you press [Browse] after the expiration of the time specified in "Startup Time Settings."
|
|
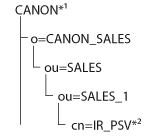
Tree:
|
<CANON>
|
|
Context:
|
<ou=SALES_1.ou=SALES.o=CANON_SALES>
or <SALES_1.SALES.CANON_SALES>
|
| © CANON Inc. 2010 All Rights Reserved. | Disclaimer CopyrightTrademarksOffice LocationsUSRM1-6162-00 CopyrightTrademarksOffice LocationsUSRM1-6162-00 |
|---|