The Set by Length mode enables you to reduce or enlarge originals by individually entering the dimensions of the original and record size. The available zoom ratios are from 25% to 400%.
The following two Set by Length modes are available.
|
IMPORTANT
|
|
For information on the modes which cannot be set in combination with this mode, see "Unavailable Combination of Functions."
|
|
NOTE
|
|
This mode is only available for storing files in the Mail Box.
The specified sizes are converted into a zoom ratio (%) by the machine using the formula below.
The result is rounded to the closest integer. Copy ratio (%) = (record size/original size) × 100 To cancel this setting, press [Copy Ratio] → [Set by Length] → [Cancel Settings].
To set the zoom ratio to 100%, press [1:1].
|
You can set the same zoom ratio for both the horizontal (X) and vertical (Y) axes.
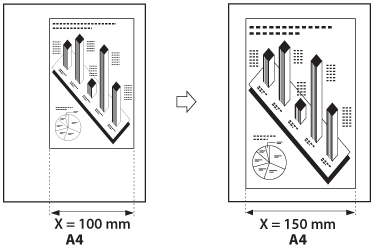
You can set the same zoom ratio for both the horizontal (X) and vertical (Y) axes.
1.
Select the desired Mail Box.
2.
Place your originals → press [Scan].
3.
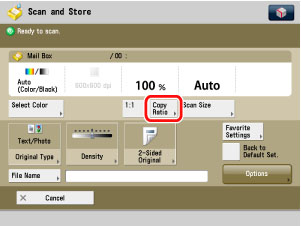
Press [Copy Ratio].
4.
Press [Set by Length].
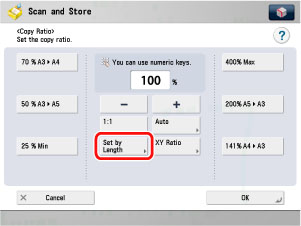
5.
Use the numeric keys on the touch panel display to enter values for the original size and record size.
Press [Original Size] → enter a value.
Press [Select Data Output Size] → enter a value.
Press [OK].

You can enter either the width or the length of the original size. If you enter the width for the original size, make sure to enter the width for the record size as well, and vice versa.
The machine automatically calculates the correct zoom ratio based on the values you entered; however, the original image may be cut off slightly depending on the record size.
If the computation results in a zoom ratio less than 25% or greater than 400%, a message appears telling you that values below 25% will be set to 25%, and values above 400% will be set to 400%.
|
NOTE
|
|
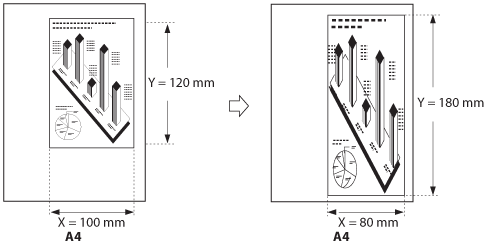
To specify the horizontal (X) and vertical (Y) axis independently, press [XY Independent]. (See "Scanning with Different XY Zoom Ratios (XY Independent) .")
|
6.
Press  .
.
.1.
Select the desired Mail Box.
2.
Place your originals → press [Scan] → [Copy Ratio] → [Set by Length] → [XY Independent].
3.
Use the numeric keys on the touch panel display to enter values for the original size and record size.
Press [X] (horizontal axis) for Original Size → enter a value.
Press [Y] (vertical axis) for Original Size → enter a value.
Press [X] (horizontal axis) for Data Output Size → enter a value.
Press [Y] (vertical axis) for Data Output Size → enter a value.
Press [OK].

You can enter either the width or the length of the original size. If you enter the width for the original size, make sure to enter the width for the record size as well, and vice versa.
The machine automatically calculates the correct zoom ratio based on the values you entered; however, the original image may be cut off slightly depending on the record size.
If the computation results in a zoom ratio less than 25% or greater than 400%, a message appears telling you that values below 25% will be set to 25%, and values above 400% will be set to 400%.
|
NOTE
|
|
To specify the same zoom ratio for both the horizontal (X) and vertical (Y) axes, press [XY Same Ratio]. (See "Scanning with the Same XY Zoom Ratio (XY Same Ratio) .")
|
4.
Press .
.