If you attach the Paper Deck Unit-A1 or Paper Deck Unit-D1 to the machine, you have one additional source of paper for printing jobs.Paper Deck Unit-A1 and Paper Deck Unit-D1 hold up to 3,500 sheets of paper (80 g/m2).
|
IMPORTANT
|
|
If the machine is in the Sleep mode (the touch panel is not displayed, and only the main power indicator is lit), you may not be able to open the paper deck. In this case, press the control panel power switch to reactivate the machine, and then press the open button on the paper deck.
|
|
NOTE
|
||||
|
The following paper sizes can be loaded into the Paper Deck Unit-A1 or Paper Deck Unit-D1:
The paper size of the Paper Deck Unit-A1 is fixed to A4. For instructions on changing the paper size that can be loaded in the Paper Deck Unit-A1, contact your local authorized Canon dealer.
|
If you select the paper deck when it has no paper, or if the paper deck runs out of paper during a print job, a screen prompting you to load paper appears on the touch panel display.
Follow the procedure below to load paper into the paper deck.
|
IMPORTANT
|
|
The paper deck can only accommodate paper from 52 to 220 g/m2 in weight.
Never place paper or any other items in the empty part of the paper deck next to the paper stack. Doing so may cause paper jams.
A screen prompting you to load paper also appears if the paper deck is not fully inserted to the machine. Make sure that paper deck is properly in place.
Do not load the following types of paper into the paper deck. Doing so may cause a paper jam.
The paper over 220 g/m2
Coated paper
Transparency
Labels
Tracing paper
Tab paper
You can load paper into the Paper Deck Unit-A1 or Paper Deck Unit-D1 following the same procedure. However, this manual explains the procedure using the Paper Deck Unit-A1 as an example.
|
|
NOTE
|
|
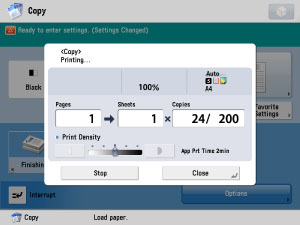
If a message prompting you to load paper appears during printing, the remaining prints are automatically made after you load the correct paper. If you select another paper source, the remaining prints are made after you press [OK].
|
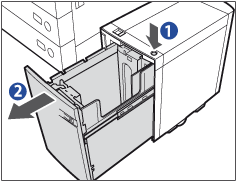
1.
Press the open button to open the paper deck.
 |
|
|
The inside lifter automatically descends to the paper loading position.
|
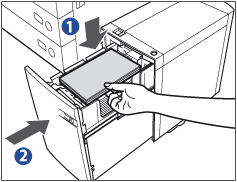
2.
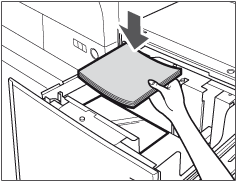
Open a package of paper, and remove the paper stack.
3.
Load the paper stack into the paper deck, and close the paper deck.
 |
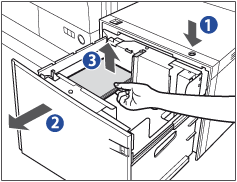
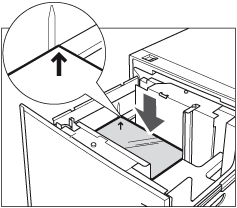
1.Load the paper stack.
Make sure that the inside lifter has lowered before loading paper, and even out the edges of the paper stack, and stack the paper neatly against the inner paper guide.
|
|
|
||
|
||
|
2.Gently push the paper deck back into the machine until it clicks into place in the closed position.
The inside lifter automatically rises, and prepares the paper deck for feeding.
|
 ) on the inside of the paper deck.
This section explains how to change the paper size for the Paper Deck Unit. It is necessary to register the paper size for the paper deck in Register Sizes for Side Paper Deck in Common Settings (from the Settings/Registration screen) before loading the paper. (See "Registering the Paper Type for the Paper Source.")
1.
Register the desired paper size for the paper deck in Register Sizes for Side Paper Deck in Common Settings (from the Settings/Registration screen).
For instructions on registering the paper size for the Paper Deck Unit, see "Registering the Paper Type for the Paper Source."
2.
Remove all of the loaded paper and the paper size sheet from the paper deck in the paper deck.
 |
|
3.
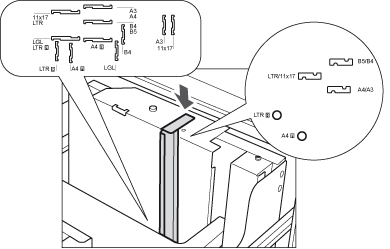
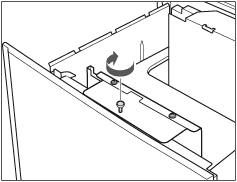
Remove the white screw on the top of the back size switch plate A by turning it counterclockwise.
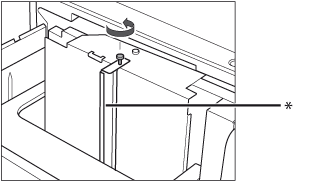
* Back Size Switch Plate A
4.
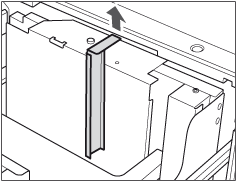
Remove the back size switch plate A.
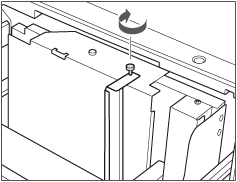
5.
Remove the white screw on the back size switch plate B.
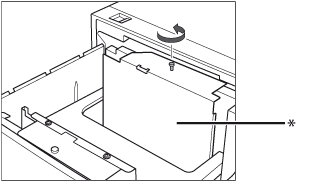
* Back Size Switch Plate B
6.
Remove the back size switch plate B.

7.
Align the back size switch plate B with the marks for the desired paper size.
8.
Fix the back size switch plate B to the paper deck with the white screw by turning it clockwise.

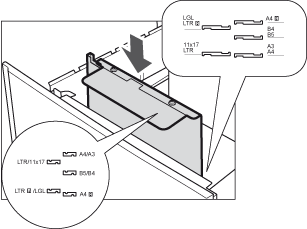
9.
Insert and align the back size switch plate A with the marks for the desired paper size.
10.
Fix the back size switch plate A with the white screw by turning it clockwise.
|
IMPORTANT
|
|
If the back size switch plates A and B are not adjusted properly for the paper size loaded in the paper deck, the correct paper size may not appear on the touch panel display.
Adjust the back size switch plates A and B correctly to avoid causing a paper jam, dirty prints, or make the inside of the machine dirty.
|
11.
Remove the white screw on the front size switch plate by turning it counterclockwise.
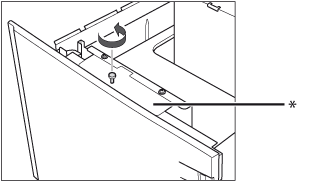
* Front Size Switch Plate
12.
Remove the front size switch plate.

13.
Align the front size switch plate with the marks for the desired paper size.
14.
Fix the front size switch plate to the paper deck with the white screw by turning it clockwise.
|
IMPORTANT
|
|
If the front size switch plate is not adjusted properly for the paper size loaded in the paper deck, the correct paper size may not appear on the touch panel display.
Adjust the front size switch plate correctly to avoid causing a paper jam, dirty prints, or make the inside of the machine dirty.
|
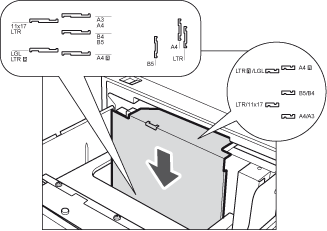
15.
Insert the correct underlay sheet that matches the new paper size into the paper deck.
Align the arrow on the underlay sheet with the guide on the paper deck's left wall.
16.
Load the paper stack into the paper deck.
17.
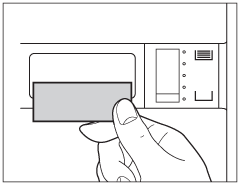
Place a size sticker indicating the new paper size that is loaded in the paper deck.
18.
Close the paper deck.