This section describes how to load paper into the paper drawers of the main unit and to replace the toner cartridge.
Paper Drawers 1 and 2 hold approximately 1,500 sheets of paper (80 g/m2).
Paper Drawers 3 and 4 hold approximately 550 sheets of paper (80 g/m2).
Paper Drawers 3 and 4 hold approximately 550 sheets of paper (80 g/m2).
If the selected paper runs out, or the selected paper drawer runs out of paper during printing, a screen prompting you to load paper appears on the touch panel display.
In this case, follow the procedure below to load paper into the paper drawers.

|
IMPORTANT
|
|
A screen prompting you to load paper also appears if the selected paper drawer is not fully inserted into the machine. Make sure that the paper drawer is properly in place.
You cannot load the following types of paper into the Paper Drawers 1 and 2, heave paper (more than 220 g/m2), coated paper, transparencies, labels, tracing paper, and tab paper.
You cannot load the following types of paper into the Paper Drawers 3 and 4, heave paper (more than 220 g/m2), coated paper, transparencies, labels, and tracing paper.
The following paper sizes can be loaded into Paper Drawers 1, 2, 3, and 4.
Paper Drawers 1 and 2: A4
Paper Drawers 3 and 4: A3, A4, A4R, or Custom Size (139.7 mm x 182 mm to 297 mm x 487.7 mm)
For more information on available paper stock that can be loaded into the paper drawers, see "Available Paper Stock."
You can load nonstandard paper into Paper Drawers 3 and 4 if both of the sides are between 182 mm and 487.7 mm in length, and between 139.7 mm and 297 mm in width. You cannot load nonstandard paper into Paper Drawers 3 and 4 if either one of the sides is shorter than 182 mm and longer than 487.7 mm in length, or longer than 297 mm in width.
Never place paper or any other items in the empty part of the drawer next to the paper stack. Doing so may cause paper jams.
|
|
NOTE
|
|
If a message prompting you to load paper appears during printing, the remaining prints are automatically made after you load the correct paper. If you select another paper drawer, the remaining prints are made after you press [OK].
To cancel printing, press [Stop].
|
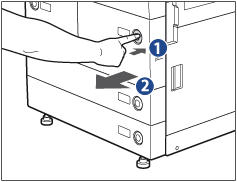
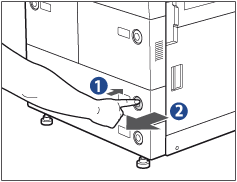
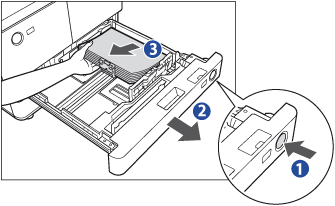
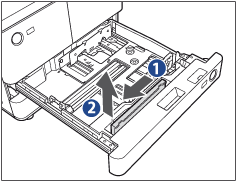
1.
Pull out the paper drawer.
2.
Open the package of paper, and remove the paper stack.
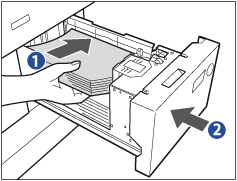
3.
Load the paper stack into the paper drawer.
Even out the edges of the paper stack. Load the paper stack against the right wall of the paper drawer.
 |
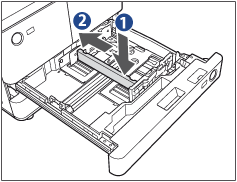
1.Load the paper stack into the paper drawer.
|
||||
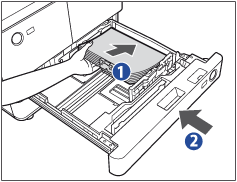 |
2.Gently push the paper drawer back into the machine until it clicks into place in the closed position.
|
 ) at the back of the paper drawer.
If you want to load a different paper size into Paper Drawer 3 or 4, follow the procedure described below to adjust the paper drawer guides.
|
IMPORTANT
|
|
You can adjust the paper drawers to hold the following standard paper sizes: A3, A4, or A4R.
Only the paper sizes of Paper Drawer 3 and 4 can be changed.
|
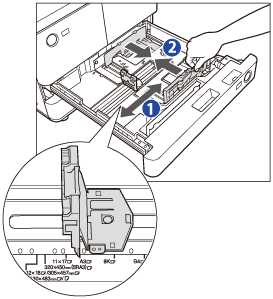
1.
Remove all of the remaining paper in the paper drawer.
2.
Adjust the position of the left and front guides.
 |
||
|
3.
Load the appropriate size paper into the paper drawer.
4.
Change the paper drawer's size plate to match the new paper size.

5.
Gently push the paper drawer back into the machine until it clicks into place in the closed position.
Tab paper can be loaded into Paper Drawer 3 or 4. Follow the procedure described below to adjust the paper drawer to hold tab paper.
|
IMPORTANT
|
|
Only A4 Tab Paper can be used.
|
|
NOTE
|
|
When tab paper is loaded into the paper drawer, the side facing down is the one printed on.
Load the tab paper face down with the tabs to the left side as shown in the illustration below.
 If you want to insert printed tab paper as a chapter pages, insert a blank paper where the tab paper will be inserted.
|
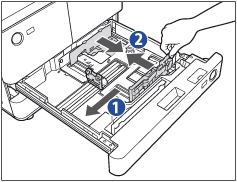
1.
Pull out the paper drawer.
2.
Adjust the position of the left and front guides.
 |
1.Squeeze the upper part of the left guide. Without releasing it, slide the left guide to the left as far as it will go.
|
|
|
2.Squeeze the upper part of the front guide. Without releasing it, slide the front guide to align it with the mark for tab paper (A4).
|
||
|
3.
Remove the tab paper guide.
4.
Place the tab paper guide aligning the mark for tab paper.
 |
|
5.
Load the tab paper into the paper drawer.
 |
Even out the edges of the paper stack.
Load the paper stack against the right wall of the paper drawer.
|
|
|
||
|
||
|
You can load the transparencies only to the Multi-purpose Tray.
Unlike normal paper, transparencies have a specific printable surface to ensure the optimal reproduction of images.
When the transparency is loaded in the Multi-purpose Tray, the side facing up is the one printed on.
Only A4 transparencies can be used.
When loading transparencies, be careful not to touch the printable surface. Hold transparencies by their edges.
Do not load transparencies into a paper source while a print job is in progress. This may cause paper jams.
Only use transparencies that are specially recommended for use in this machine. Other transparencies may damage the machine.
To prevent paper jams or the folding of transparencies, it is recommended that you remove them from the output tray as soon as possible.
Replace unused transparencies into the box in which they came. Leaving them in the Multi-purpose Tray for an extended period of time may cause the transparencies to adhere to one another and result in paper jams. Avoid storing transparencies in a location subject to high-temperatures or humidity.
If transparencies do become adhered to one another and a paper jam occurs, remove the transparencies, fan them well, make sure that fewer than 100 sheets of transparencies are loaded, or use new transparencies.
When printing on transparencies, image density may be high, depending on the image type. In this case, adjust the output image density.
|
NOTE
|
|
If a paper jam occurs, remove the transparencies and fan them well before reloading them into the Multi-purpose Tray.
|
When there is only a small amount of toner remaining inside the machine, the following message appears on the touch panel display. You can continue printing, but at this time you should purchase a new toner cartridge to have it available when needed.

When toner runs out completely and prints can no longer be made, a screen with instructions on how to replace the toner cartridge, like the one shown below, appears on the touch panel display. Follow the instructions on the touch panel display, and the procedure described below to help you replace the toner cartridge.

If you press [Close], you can continue operations, such as setting modes and scanning originals, even if you do not replace the toner cartridge immediately.
 WARNING WARNING |
|
Do not burn or throw used toner cartridges into open flames, as this may cause the toner remaining inside the cartridges to ignite, resulting in burns or a fire.
|
 CAUTION CAUTION |
|
Keep toner out of the reach of small children. If toner is ingested, consult a physician immediately.
Take care not to allow toner to come into contact with your hands or clothing. If toner gets onto your hands or clothing, wash it off immediately with cold water. Washing it off with warm water will set the toner, and make it impossible to remove the toner stains.
|
|
IMPORTANT
|
|
Use only toner cartridges intended for use with this machine.
Do not replace toner cartridges until the message prompting you to do so appears.
You can replace a toner cartridge while the machine is printing.
|
|
NOTE
|
|
When the message appears, the remaining toner is low. It is recommended that you get a new toner cartridge ready for replacement before the toner runs out.
If toner runs out during a print job, the remaining prints are made after you replace the toner cartridge.
After replacing toner cartridges, if the colour of the copies or prints is different in gradation or density from the colour of the copies or prints before you replaced the toner cartridges, perform an Auto Adjust Gradation in Adjustment/Maintenance (from the Settings/Registration screen). (See "Automatic Gradation Adjustment.")
|
1.
Press [ ].
].
].|
NOTE
|
|
If a screen with instructions on how to replace the toner cartridge appears on the touch panel display, this step is not necessary.
|
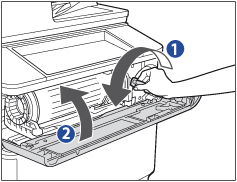
2.
Push the toner replacement cover, as shown below.
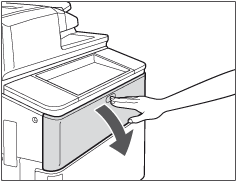
The toner replacement cover is open.
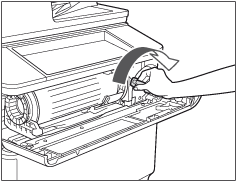
3.
Turn the locking lever to the right until it stops.
|
IMPORTANT
|
|
Make sure to turn the locking lever to the right until it stops. (Otherwise, you may not be able to remove the toner cartridge.)
|
4.
Remove the toner cartridge, supporting it with both hands.
|
WARNING |
|
Do not burn or throw used toner cartridges into open flames, as this may cause the toner remaining inside the cartridges to ignite, resulting in burns or a fire.
|
|
CAUTION |
|
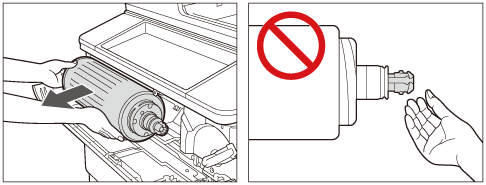
Do not touch the tip of the toner cartridge or subject it to shock by hitting it. Doing so may cause the toner cartridge to leak.
|
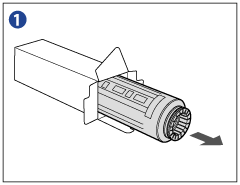
5.
Take the new toner cartridge out of the box, and remove the red protective cap from the new toner cartridge.
Remove the red protective cap from the new toner cartridge by twisting it in the direction indicated by the arrow in the illustration right below.
 |
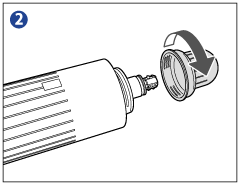 |
6.
Insert the new toner cartridge.
Align the end of the toner cartridge with the toner supply port as shown by the arrow in the illustration below, and insert the toner cartridge straight into the machine.

|
IMPORTANT
|
|
Only use toner cartridges intended for use in this machine. You cannot insert the toner cartridge not intended for use in this machine, because the shape of the toner cartridge does not match the toner supply port of the machine.
Insert the toner cartridge horizontally into the machine. Otherwise, the toner cartridge may leak.
|
7.
Turn the locking lever to the left until it stops, and close the toner replacement cover.
 |
||
|
||
The toner confirmation screen is displayed.