Details of each item are shown below.
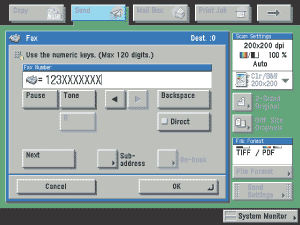
| [Pause]: |
Press to insert a pause of several seconds in the fax number that you are dialing. If you insert a pause, the letter <p> is displayed between the numbers, and the letter <P> appears at the end of the number. When dialing an overseas number, insert a pause after the country code, and at the end of the telephone number. (See "Pause Time.") |
| [Tone]: |
Press when you want to directly call an extension line that is connected to a PBX (Private Branch eXchange) which accepts only tone signals. If you press [Tone], the letter <T> appears. (See "Fax Information Services.") |
[ ][ ][ ]: ]: |
Press to move the position of the cursor. |
| [Backspace]: |
Press to delete the last number entered. |
| [R]: |
Press to use the R-Key. (See "Special Dialing.") |
| [Direct]: |
Press to send documents directly to the recipient. If you do not select Direct Sending, Memory Sending is used. (See "Sending a Fax.") |
| [Next]: |
Press to specify another destination after specifying the first destination using the numeric keys. |
| [Option]: |
Displayed if the optional Super G3 2nd Line FAX Board or Super G3 2nd/3rd Line FAX Board is installed in addition to installing the optional Super G3 FAX Board. Press to set the subaddress and password, or to select the line type of the additional line. |
| [Subaddress]: |
Displayed if the optional Super G3 FAX Board is installed. Press to set an optional subaddress and password. |
| [On-hook]: |
Press to use tone dialing or to send a fax document manually. (See "Fax Information Services.") |
 -
-  (numeric keys),
  , and
, and  . You can also specify several numbers in succession, and send the original to several destinations in a single operation (Sequential Broadcast).