
0WR8-088
This section describes the method for scanning a document by starting Color Network ScanGear 2 from an application. You can also scan a part of the document by specifying the scanning area.
From the control panel
1
Place the document. Placing Documents
To specify the scanning area, place the document on the platen glass.
To scan multiple pages successively, place the document in the feeder.
2
Press <Scanner> on the Main Menu. <Main Menu> Screen
3
Press <Online>.
Now you are ready for scanning from your computer.
During the online state, other functions such as copying are not available.
From a computer
4
From the application menu, select the command that starts the scanning.
Color Network ScanGear 2 starts. For more information, see the instruction manual for each application.
5
At [Scanning Method] of the [Basic Settings] tab, select the location where the document is placed.
When placing the document on the platen glass, select [Platen Glass].
When placing a 1-sided document in the feeder, select [Feeder (1-sided)]. For 2-sided document, select [Feeder (2-sided)].
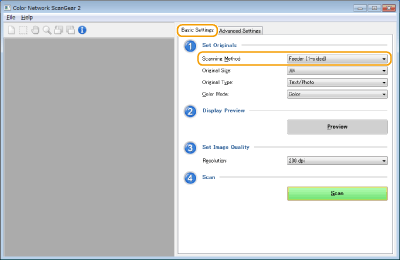
6
Specify the scan settings as necessary.
You can specify the color, resolution, and document size for scanning. Clicking the [Advanced Settings] tab enables you to perform detailed settings such as document orientation. For more information, see Help for Color Network ScanGear 2.
7
Click [Scan].
Scanning a document starts.
When scanning is complete, the Color Network ScanGear 2 screen closes and the scanned document is displayed on the application screen.
When the scanning operations are complete, press <Offline> on the <Scanner> screen.
