You can set a department ID and PIN beforehand in the ScanGear Tool in order to scan using the Department ID Management function.
|
Note
|
|
The window displayed may differ according to the operating system etc.
The descriptions and explanations herein are given using images from Color Network ScanGear.
|
1.
Start ScanGear Tool.
2.
Select a scanner to use.
For details about how to start ScanGear Tool or to select a scanner, see "Selecting the Network Scanner to be Used."
3.
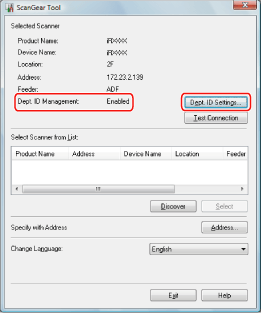
Confirm that [Enabled] is displayed for [Dept. ID Management] under [Selected Scanner] → click [Dept. ID Settings].

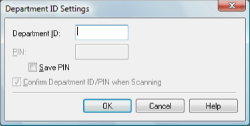
The [Department ID Settings] dialog box appears.

4.
Select [Save PIN].
5.
Enter the department ID and PIN in [Department ID] and [PIN].
6.
To confirm the department ID and PIN each time you scan, select the [Confirm Department ID/PIN when Scanning] check box.
7.
Click [OK] to close the dialog box.
8.
Click [Exit] in the ScanGear Tool.
The settings are saved and ScanGear Tool is closed.
Scanning with the selected scanner from then onward is performed with the department ID and PIN.