This mode enables you to erase shadows and lines that appear when scanning various types of originals. There are three types of the Frame Erase mode: Erase Original Frame, Erase Book Frame, and Erase Binding.
|
IMPORTANT
|
|
For information on the modes which cannot be set in combination with this mode, see "Unavailable Combination of Functions."
|
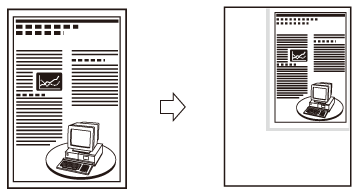
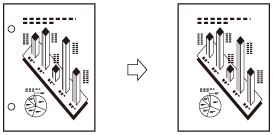
This mode erases the dark borders and frame lines that appear around the scanned image if the original is smaller than the selected record size. You can also use this mode to create a blank border around the edge of the recorded page.
To scan A5 originals as the A4 record size:
Original Frame Erase Selected
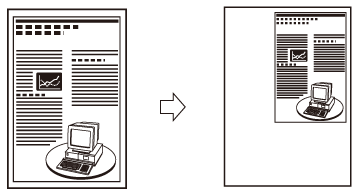
Original Frame Erase Not Selected
|
NOTE
|
|
As an example, the procedure for scanning an original and storing it in a mail box is explained in this section.
|
1.
Select the desired Mail Box.
2.
Place your originals → press [Scan] → [Options] → [Erase Frame].
3.
Press [Erase Original Frame].

4.
Press [-] or [+] to set the frame erase width.
Press [-] or [+] to set the width of frame erase.

Press [Adjust Independently].

Select the desired frame erase borders → press [-] or [+] to set their respective frame erase widths.

To return to the screen for setting the same width for all four borders, press [Uniform Width].
5.
Press [Change] for the original size.

6.
Select the desired original size → press [OK].
|
IMPORTANT
|
|
You can set the Erase Original Frame mode only for the original paper sizes shown on the touch panel display.
|
|
NOTE
|
|
To select an inch paper size, press [Inch-Size].
|
7.
Press [OK] → [Close].
8.
Press 
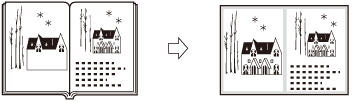
This mode erases the dark border, as well as centre and contour lines that appear if you are scanning facing pages in a book or bound original onto a single sheet of recorded page.
Book Frame Erase Selected
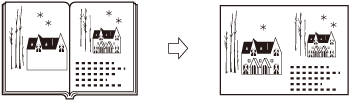
Book Frame Erase Not Selected
|
NOTE
|
|
As an example, the procedure for scanning an original and storing it in a mail box is explained in this section.
|
1.
Select the desired Mail Box.
2.
Place your originals → press [Scan] → [Options] → [Erase Frame].
3.
Press [Erase Book Frame].

4.
Press [-] or [+] to set the frame erase widths.
Press [Center] and [Sides] → press [-] or [+] to set their respective frame erase widths.

Press [Adjust Independently].

Select the desired frame erase borders → press [-] or [+] to set their respective frame erase widths.

To return to the screen for setting the same width for all four borders, press [Uniform Width].
5.
Press [Change] for the original size.
6.
Select the desired original size → press [OK].
|
IMPORTANT
|
|
You can set the Book Frame Erase mode only for the original paper sizes shown on the touch panel display.
|
|
NOTE
|
|
To select an inch paper size, press [Inch-Size].
|
7.
Press [OK] → [Close].
8.
Press .
.This mode erases the shadows that appear on scanned image from binding holes on originals.
Binding Erase Selected
Binding Erase Not Selected

|
IMPORTANT
|
|
Make sure you place your original on the platen glass. Do not place originals with binding holes in the feeder, as this may damage the originals.
When using the Binding Erase mode, the borders you do not select are also erased by 4 mm.
|
|
NOTE
|
|
As an example, the procedure for scanning an original and storing it in a mail box is explained in this section.
|
1.
Select the desired Mail Box.
2.
Place your originals on the platen glass → press [Scan] → [Options] → [Erase Frame].
3.
Press [Erase Binding] → select the border where the binding holes are located.

The border is where the binding holes are located on the original, if you visualize the original as being face up.
4.
Select the desired frame erase borders → press [-] or [+] to set their respective frame erase widths.

5.
Press [OK] → [Close].
6.
Press .
.