The flow of basic scan and store operations is shown below.
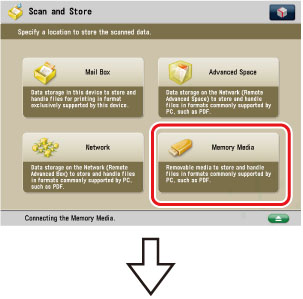
Storage Selection Screen
Select the storage where you want to store the scanned file.
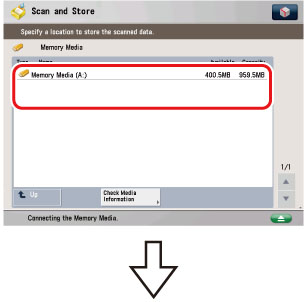
Space Selection Screen
On the Memory Media Selection screen, Available media is displayed.
On the Memory Media Selection screen, Available media is displayed.
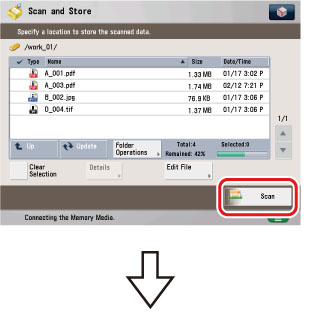
File Selection Screen
Press [Scan].
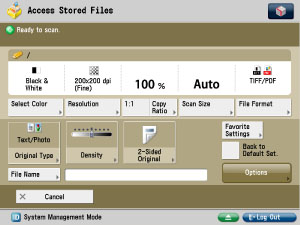
Scan Screen
Specify the settings for scanning your original.
|
IMPORTANT
|
|
Free space is not available in the Memory Media.
|
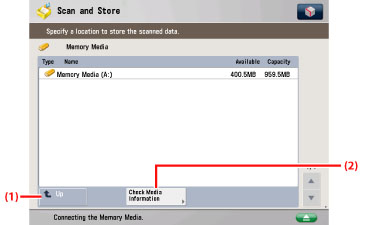
The screen below, which appears when you select [Memory Media], is called the Memory Media Selection screen.
On the Memory Media Selection screen, available memory media is displayed.
|
(1)
|
Up
Press to return to the upper level. |
|
(2)
|
Check Media Information
Press to check the details of Memory Media. |
|
NOTE
|
|
For information on the icons displayed for the Advanced Space, Network, and Memory Media, see "Overview of This Function."
For instructions on checking detailed information for the memory media, see "Checking Detailed Information of a Memory Media."
|
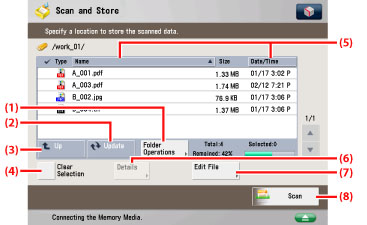
The screen below, which appears after you select the desired memory media, is called the File Selection screen. A list of folders and files in the selected memory media is displayed.
An icon indicating the file format of each file when it was scanned or saved is displayed.
|
(1)
|
Folder Operations
Press to edit folders in the memory media. |
|
(2)
|
Update
Press to update the contents of the memory media. |
|
(3)
|
Up
Press to return to the upper level. |
|
(4)
|
Clear Selection
Press to cancel the selection of a file. |
|
(5)
|
Name
Press to sort the documents in ascending or descending order by document name. Date/Time
Press to sort the documents in ascending or descending order by date/time. |
|
(6)
|
Details
Press to check the details of the selected file. |
|
(7)
|
Edit File
Press to add a file or delete the selected file. |
|
(8)
|
Scan
Press to scan an original and store it in the selected memory media. |
|
NOTE
|
|
For instructions on arranging folders, checking detailed information for the stored file, editing stored files, and printing the file list, see "Access Stored Files."
|
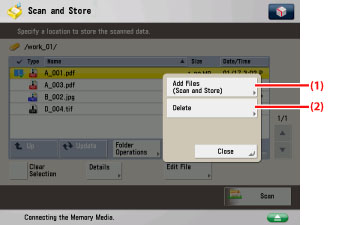
When you press [Edit File] on the File Selection screen, the screen below appears, which is called the Edit File screen.
Display this screen when you want to edit a file stored in the memory media.
|
(1)
|
Add Files (Scan and Store)
Press to add a file. |
|
(2)
|
Delete
Press to delete the files stored in the memory media. You can select and delete up to 32 files at a time. |
|
NOTE
|
|
For instructions on deleting the file stored in the memory media, see "Deleting a File."
|
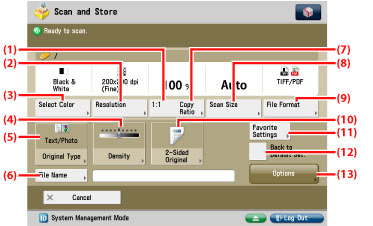
The screen below, which appears when you select a file and press [Scan] on a File Selection screen, is called the Scan screen.
Display this screen when you want to scan an original and store it as a file in the selected memory media.
|
NOTE
|
|
To scan in colour when resolution is set to 200 × 400 dpi, 400 × 400 dpi, or 600 × 600 dpi, it is necessary to install the Additional Memory Type B (512MB) to expand the memory capacity of the machine.
|
|
(1)
|
1:1
Press to scan your document in the same size as your original. |
|
(2)
|
Resolution
Press to select the resolution for scanning. |
|
(3)
|
Select Color
Press to select the colour mode for scanning. |
|
(4)
|
Density
Press to adjust the density. |
|
(5)
|
Original Type
Press to select the type of original (original that contains text only, photo only, or both text and photo) you are going to scan. |
|
(6)
|
File Name
Press to assign the file a name. |
|
(7)
|
Copy Ratio
Press to reduce or enlarge the scanning size of the original. |
|
(8)
|
Scan Size
Press to set the size of the original that you are going to scan. |
|
(9)
|
File Format
Press to select the file format for scanning. |
|
(10)
|
2-Sided Original
Press if you are scanning a two-sided original. |
|
(11)
|
Favorite Settings
Press to select Favorite Settings for scanning. |
|
(12)
|
Back to Default Set.
Press to cancel all settings and restore the default settings for Scan and Store. |
|
(13)
|
Options
Press to select and use other modes available for scanning. |