This section describes how to use Quick Menu from the touch panel display of the machine.
You can perform several operations, such as registering, editing, and deleting the Personal button/Shared button from the touch panel display of the machine. This section describes the basic operations you can perform using the touch panel display of the machine.
|
NOTE
|
|
For more information on login services, see "MEAP." If the authentication function is not set, the Log In screen is not displayed.
|
1.
Log in from the Log In screen.
Enter the Department ID and password → press [Log In].
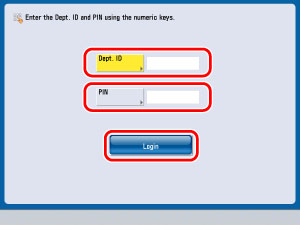
The Main Menu screen is displayed.
Enter the user name and password → press [Log In].
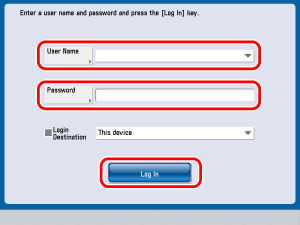
The Main Menu screen is displayed.
2.
Press  .
.
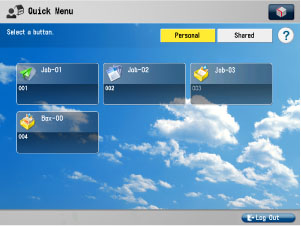
.The Quick Menu Screen is displayed.
|
NOTE
|
|
Press
 to return to the Main Menu screen. to return to the Main Menu screen. |
The screen below, which appears when is pressed, is called the Quick Menu screen. The following keys are displayed on the Quick Menu screen.
is pressed, is called the Quick Menu screen. The following keys are displayed on the Quick Menu screen.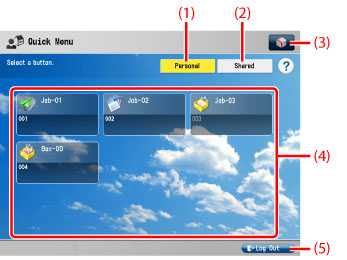
|
(1)
|
Personal
Press to display the buttons registered as Personal buttons. [Personal] is displayed only when a login service is set. |
|
(2)
|
Shared
Press to display the buttons registered as Shared buttons. |
|
(3)
|

Press to edit the Quick Menu screen. You can change the size of buttons, edit/delete a button, change the wallpaper settings, and specify users who can use the Shared button.
|
|
(4)
|
Personal button/Shared button Display Area
The registered Personal buttons/Shared buttons are displayed in this area. |
|
(5)
|
Log Out
Press to log out. [Log Out] is displayed only if a login service is used to log in. |
The following icons are displayed on the screen and indicate the job type.
|
Icon
|
Function Type
|
 |
Copy
|
 |
Scan and Send
|
 |
Scan and Store
|
 |
Shortcut to the Stored Folders
|