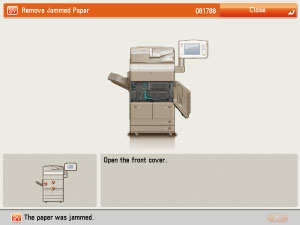
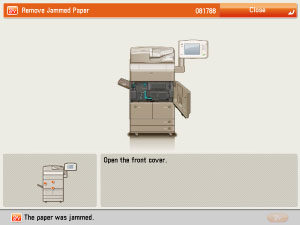
If a paper jam occurs inside the Shift Tray or Copy Tray, a screen similar to the one shown below appears on the touch panel display. Check the location of the paper jam, and follow the procedure described below, and the procedure that appears on the touch panel display, to remove the jammed paper.
Shift Tray
Copy Tray
 CAUTION CAUTION |
|
The fixing unit and its surroundings inside the machine may become hot during use. When removing jammed paper or when inspecting the inside of the machine, do not touch the fixing unit and its surroundings, as doing so may result in burns or electrical shock.
|
|
NOTE
|
|
If a paper jam occurs inside the Shift Tray or Copy Tray, you can remove the jammed paper by following the procedure described below. This manual uses the Shift Tray as an example.
|
1.
Remove all of the outputted paper from the output tray.
|
IMPORTANT
|
|
If there is any jammed paper, do not pull out by force. Proceed to the next step.
|
2.
Open the front cover of the main unit.

3.
Remove any jammed paper.
If you pull the jammed paper gently and you can pull out, remove the paper.
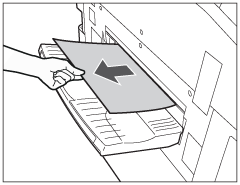
If the edge of the paper can be seen a little, you may not be able to pull out the paper from the output tray. In this case, turn the knob to the left twice or three times until the edge of the paper cannot be seen completely.

|
IMPORTANT
|
|
If you pull jammed paper gently and fail to pull out, proceed to the next step. Do not pull out jammed paper by force, as this may leave torn pieces inside the machine and cause the machine to malfunction.
|
4.
Pull out the fixing transport unit.
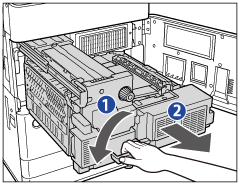
5.
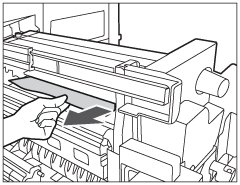
Remove any jammed paper from the left guide.

6.
Remove any jammed paper from the fixing unit.
|
IMPORTANT
|
|
If you cannot pull out the jammed paper, proceed to the next step. Do not pull out jammed paper by force, as this may leave torn pieces inside the machine and cause the machine to malfunction.
|
7.
Remove any jammed paper from the lower guide.
 |
|
8.
Remove any jammed paper from the fixing unit.
 |
|
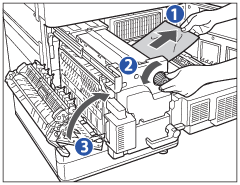
9.
Push the fixing transport unit back into its original position, and close the front cover.
 |
|
10.
Follow the instructions on the touch panel display.