| Erasing Addresses |
|
You can erase destinations stored in the address book. |
|
 (Additional Functions) → [Address Book Settings] → [Register Address].
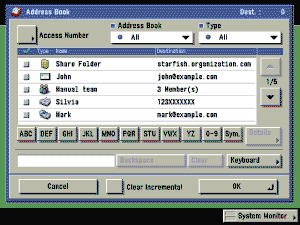
You cannot erase multiple destinations at the same time. Press the alphanumeric keys (e.g., [ABC]) to display the individual keys for each letter or number. You can select a letter or number to restrict the displayed range of entries. Press [All] to return to the full address list. If [Incremental] is pressed, the screen for refining the address book is displayed.
Press the alphanumeric keys (e.g., [ABC]) to display the individual keys for each letter or number. You can also refine the addresses display by specifying the multiple letters pressing [Keyboard]. [Backspace]: Press to delete the last letter entered. [Clear]: Press to delete all of the text entered. [Keyboard]: Displays the keyboard on the touch panel display. [Clear Incremental]: Returns the display to the Address Book. You can restrict the type of destinations displayed in the results list by pressing the Type drop-down list. Press the Address Book drop-down list to display a list of subaddress books 1 to 10. Subaddress books categorize the addresses stored in the Address Book. You cannot select a one-touch button stored in a subaddress book. If you select [All] in the Address Book drop-down list, the destinations stored in the one-touch buttons are displayed. However, you cannot erase these destinations. For instructions on erasing one-touch buttons, see "Erasing One-Touch Buttons." If you select a destination that is stored with an access number, press [Access Number] and then enter the access number using
|
 -
-  (numeric keys). If you press [No Access Number], the destinations that are not managed with an access number are displayed.
|