| Sending an E-Mail Message |
|
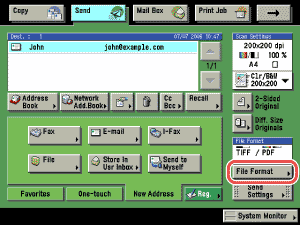
You can scan a document and send it as an attached file in an e-mail message. You can add the document's name, a subject line, message body text, and reply-to address. The scanned document can be sent as a JPEG, TIFF, PDF, or XPS file. |
| Remark |
|
|
|||||
|
|
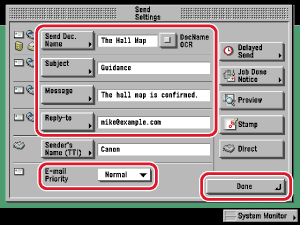
[Send Doc. Name]: Press [Send Doc. Name] → enter the name of the document that you want to send → press [OK]. [DocName OCR]: When [PDF (OCR)] or [XPS (OCR)] is set as the file format, set [DocName OCR] to 'On' to automatically extract the first text block in the document for use as its filename. You can set the number of characters that are extracted for [DocName OCR] in <Num. of Char. for Doc. Name Setting> in OCR (Text Searchable) Settings in TX Settings under <Common Settings> in Communications Settings (from the Additional Functions screen). (See "OCR (Text Searchable) Settings.") The first text block extracted from the first page of the document is automatically set as the document name. Characters such as ",", "/", "[", or "]", which are invalid when sending a file, will not be extracted. If a document name is already entered, the extracted text is appended to the end of the filename. Characters over the character limit will be cut off. The encrypted PDF mode and [DocName OCR] cannot be set at the same time. [Subject]: Press [Subject] → enter a subject of the e-mail message → press [OK]. [Message]: Press [Message] → enter a message body text → press [OK]. [Reply-to]: Press [Reply-to] → select a reply-to address → press [OK]. If Access Number Management in Restrict the Send Function in System Settings (from the Additional Functions screen) is set to 'On', and you want to select a destination that is stored with an access number, press [Access Number] → enter the access number. (See "Using the Address Book.") The selected destination is set as the reply-to e-mail address. [E-mail Priority]: Press the E-mail Priority drop-down list → select a priority for your e-mail message.
|
 (Additional Functions) → [System Settings] → [Communications Settings] → [E-Mail/I-Fax Common Settings]. (See "
|
 (Start).