|
You can set the scan mode that a document is scanned in. The machine has the following preset scan modes:
- If the optional Color Universal Send Kit is activated and the optional System Upgrade RAM is installed:
| Eight scan modes: |
Clr/B&W 200 × 200 dpi,
Clr/B&W 300 × 300 dpi,
B&W 200 × 200 dpi,
B&W 300 × 300 dpi,
Clr/Gray 200 × 200 dpi,
Clr/Gray 300 × 300 dpi,
Clr/Gray 600 × 600 dpi,
B&W 600 × 600 dpi
(Clr stands for color.) |
- If only the optional Color Universal Send Kit is activated:
| Seven scan modes: |
Clr/B&W 200 × 200 dpi,
Clr/B&W 300 × 300 dpi,
B&W 200 × 200 dpi,
B&W 300 × 300 dpi,
Clr/Gray 200 × 200 dpi,
Clr/Gray 300 × 300 dpi,
B&W 600 × 600 dpi
(Clr stands for color.) |
- If only the optional fax board is installed:
| Four scan modes: |
Black 200 × 100 dpi,
Black 200 × 200 dpi,
Black 200 × 400 dpi,
Black 400 × 400 dpi |
Select the desired mode from the preset scan modes or user defined scan modes (user preset keys), according to the type of original that you are sending.
|
 (Reset).
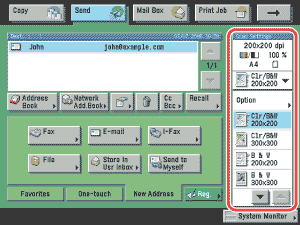
 (Start).