Send/Fax > Using the Main Unit to Send/Receive > Specifying Registered Destinations > Using a Server
*
Using a Server

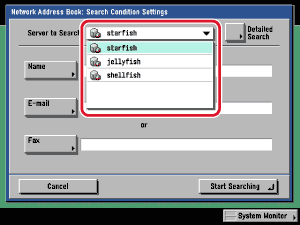
You can specify a destination by searching the directory listings on the network using LDAP (Lightweight Directory Access Protocol) servers. LDAP servers are for looking up a particular piece of information, such as a user name, e-mail address, or other contact information.


Remark
  • You may have to set up the LDAP servers beforehand, depending on the network environment.
  • For more information on LDAP servers, see "LDAP Server Settings."
  • You can send to a maximum of 64 destinations at the same time, including destinations that are specified via a server.
  • The information that can be obtained through the LDAP server varies, depending on the following:
  • If only the optional Color Universal Send Kit is activated: names and e-mail addresses
  • If only the optional fax board is installed: names and fax numbers
  • If both the optional Color Universal Send Kit is activated and the optional fax board is installed: names, e-mail addresses, and fax numbers
  • You cannot directly specify a destination that is obtained via a server as a forwarding destination. To specify the destination as a forwarding destination, you must first store it in the Address Book. (See "Addresses Obtained via a Server.")

  1. Press [Network Add.Book].
  1. Press the Server to Search drop-down list → select the desired server to search.


  1. Specify the search criteria.
  • If you want to search for a destination that is registered with an e-mail address and a fax number, you can search for the e-mail address by entering the fax number as the search criterion, and vice versa.
  • To use Simple Search:
  • To use Detailed Search:

  • To use Simple Search:
  • Press [Name], [E-mail], or [Fax] → enter the name, e-mail address, or fax number for which you want to search → press [OK].

The search criteria boxes that are not filled out, are not searched.

To make a more detailed search with multiple search conditions, press [Detailed Search], and follow the directions below. The search criteria you entered for Simple Search are continuously used in Detailed Search.

  • Proceed To Next Step

  • To use Detailed Search:
  • Press [Detailed Search].
  • Press the search category drop-down list → select the desired search category.

The available search categories are:

[Name]: Search by name.
[E-mail]: Search by e-mail address.
[Fax]: Search by fax number.
[Organization]: Search by organization name.
[OrgnztionUnit]: Search by organizational unit (e.g., departments in an organization).

For example, if cn(common name)=user1, ou(organization unit)=salesdept, o(organization)=canon, c(country)=jp is the distinguished name in the directory, enter the organization/organizationUnit of the user as follows:
organization=canon
organizationUnit=salesdept

  • The organization/organizationUnit can be used as search categories only if the information has been registered on the LDAP Server.
  • Detailed Search by organization/organizationUnit may not be performed, depending on whether the attribute types have been registered on the LDAP server, and depending on the type of application on the server.
  • You can also add additional user-defined search attributes. For more information on registering or editing a search attribute, see "Registering/Editing LDAP Search Attributes."
  • Press the search condition drop-down list → select the desired search condition → press [Settings].

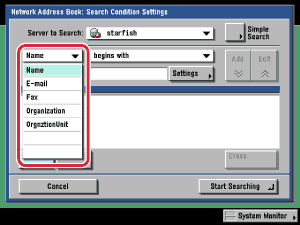
You can select from the following search conditions:

[contains]: The result must contain the entered name, e-mail address, fax number, organization, or organizational unit.
[does not contain]: The result must not contain the entered name, e-mail address, fax number, organization, or organizational unit.
[equals]: The result must be exactly the same as the entered name, e-mail address, fax number, organization, or organizational unit.
[differs from]: The result must be different from the entered name, e-mail address, fax number, organization, or organizational unit.
[begins with]: The result must begin with the same first few letters that you entered for the name, e-mail address, fax number, organization, or organizational unit.
[ends with]: The result must end with the same last few letters that you entered for the name, e-mail address, fax number, organization, or organizational unit.
  • Enter the search criterion → press [OK].
  • Press [Add].

To continue adding more search criteria, press [or] or [and] → repeat step 3.

[or]: The machine searches and returns a result that matches any of the specified search criteria.
[and]: The machine searches and returns a result that matches all of the specified search criteria.

To edit the search criteria, select the search criterion that you want to edit → press [Edit] → [Settings]. To delete the search criteria, select the criterion that you want to erase → press [Erase].

  • You can specify up to four different search criteria at a time.
  • If you specify three or more search criteria, you cannot use both [or] and [and] together.
  • If you press [Simple Search] after specifying search criteria on the Detailed Search screen, the display changes to the Simple Search screen, and the specified detailed search criteria are deleted.
  • Proceed To Next Step

  1. Press [Start Searching].

To cancel searching while the machine is searching for your criteria, press [Cancel]. If the machine finds some results before you press [Cancel], these search results are displayed.

  • Searching for a destination via an LDAP server is not possible if the time setting of the server and the time setting of the machine are more than five minutes apart. If you cannot send even when the user name and password are correct, check the time settings on the server and the machine.
  • The number of search results displayed will not exceed the maximum limit set in Register LDAP Server in System Settings (from the Additional Functions screen). If the desired destination is not displayed, either increase the maximum number of addresses to search, or change the search criteria. (See "LDAP Server Settings.")
  • If you press [Start Searching] without specifying any search criteria, all of the addresses stored on the LDAP server are displayed.
  • If the Enter Network Password screen is displayed:

  • If the Enter Network Password screen is displayed:
  • Specify each setting → press [OK].

The Enter Network Password screen is displayed if either one of the following is true:

  • If <Login Information> in Register LDAP Server in System Settings (from the Additional Functions screen) is set to 'Use', and <Display authentication dialog when searching> is set to 'On'.
  • If the user name, password, and domain name specified in Register LDAP Server in System Settings (from the Additional Functions screen) are incorrect.

[User]:

Press [User] → enter the user name → press [OK].

[Password]:

Press [Password] → enter the password → press [OK].

After pressing [OK], the password that you entered appears as asterisks (********) on the Enter Network Password screen.

  • Proceed To Next Step

  1. Select the desired destination from the search results → press [OK].

To continue searching, press [Back].

You can specify multiple destinations.

If the optional Color Universal Send Kit is activated, e-mail addresses that meet the specified search criteria are displayed. If you press [Select e-mail for I-Fax], the key lights showing that this setting is turned on, and the selected e-mail address can be specified as an I-fax destination.

If the optional fax board is installed, fax numbers that meet the specified search criteria are displayed.

If both the optional Color Universal Send Kit is activated and the optional fax board is installed, you can sort and limit the view of the displayed addresses by using the Type drop-down list.

  • To cancel a selected destination, select the destination again to clear the check mark.
  • If you specify an e-mail address as an I-fax destination, the only information that can be retrieved from the server is the I-fax address. To specify settings to match the recipient's receiving conditions, press [Details] on the Send screen.
  • If you select only one destination, press (Start) to send from the Search Results screen.
  1. If a fax number or I-fax address is specified as the destination, read the displayed message → press [OK].

  • Back To Top