|
- Press the Mode drop-down list → select [Simple] or [Full].
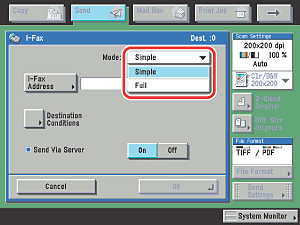
Details of each item are shown below.
| [Simple]: |
Sends scanned data as an image via the Internet. |
| [Full]: |
Sends scanned data as an image via the Internet, and enables you to receive a delivery confirmation message telling you whether your I-fax was sent successfully. |
- In order for you to receive a confirmation message telling you the delivery status of your I-fax document, the recipient's machine must have I-fax capabilities and be compatible with the Full mode.
- If you send documents using the Full mode to a machine that does not support the Full mode, delivery confirmation cannot be carried out. When this happens, the job concerned is not considered as complete even though the actual sending of the document is successful. Such jobs are displayed as <Waiting for result...> on the Status screen until the time set for <Full Mode TX Timeout > in E-Mail/I-Fax Common Settings in Communications Settings in System Settings (from the Additional Functions screen) has lapsed. After the timeout, the job is moved to the log, and the result is shown as <-> when sending of the document to a server or other destination could not be verified.
|
 (Additional Functions) → [System Settings] → [Communications Settings] → [E-Mail/I-Fax Common Settings]. If <Use Send Via Server> is set to 'Off', <Send Via Server> is grayed out. (See "