| Settings Common to TCP/IPv4 and TCP/IPv6 |
|
This section describes the procedure for specifying the settings common to TCP/IPv4 and TCP/IPv6 using the control panel. Specify the settings required for your network environment. If you want to use both TCP/IPv4 communications and TCP/IPv6 communications, specify the settings required for both protocols. After performing this procedure, follow the procedure in "Confirming TCP/IPv4 Settings" and "Confirming TCP/IPv6 Settings" to check whether the network settings are correct. |
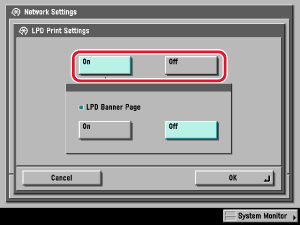
Specify the LPD print settings if you are using the optional UFR II Printer Kit, the optional UFR II/PCL Printer Kit, the optional PCL Printer Kit, the optional PS Printer Kit, or the optional Super G3 FAX Board. [On]: You can use LPD as the print application.
|
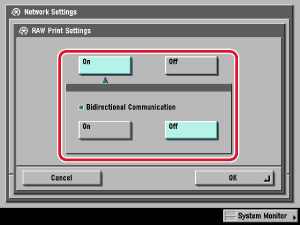
Specify the Raw print settings if you are using the optional UFR II Printer Kit, the optional UFR II/PCL Printer Kit, the optional PCL Printer Kit, the optional PS Printer Kit, or the optional Super G3 FAX Board. [On]: You can use Raw as the print application. If you want to establish bidirectional communication using Port 9100, press [On] for <Bidirectional Communication>. |
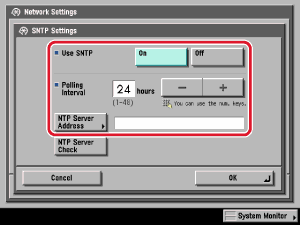
[On] for <Use SNTP>: You can perform time synchronization using SNTP. Select the interval for performing time synchronization in <Polling Interval>. In [NTP Server Address], enter the NTP server IP address or host name.
|
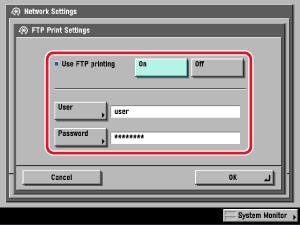
Specify the FTP print settings if you are using the optional UFR II Printer Kit, the optional UFR II/PCL Printer Kit, the optional PCL Printer Kit, or the optional PS Printer Kit. [On] for <Use FTP printing>: You can use FTP as the print application. In [User], enter the login user name for access to the FTP server. In [Password], enter the login password for access to the FTP server.
|
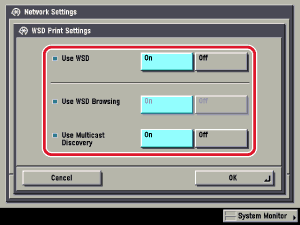
Specify the WSD print settings if you are using Windows Vista, and the optional UFR II Printer Kit, the optional UFR II/PCL Printer Kit, the optional PCL Printer Kit, the optional PS Printer Kit, or the optional Super G3 FAX Board. [On] for <Use WSD>: You can use WSD (Web Services for Devices) as the print application. <Use WSD Browsing> is automatically set to 'On' if you set <Use WSD> to 'On', and enables device information to be obtained using WSD. If you want to respond to multicast discovery requests, set <Use Multicast Discovery> to 'On'. |
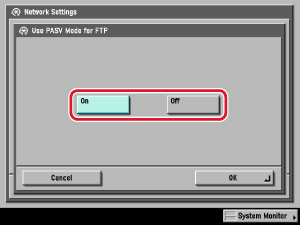
Set the PASV mode for FTP if you are using the optional Color Universal Send Kit.
|
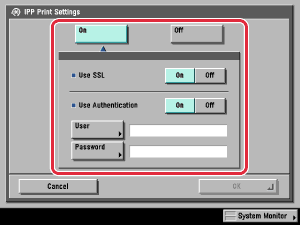
Specify the IPP print settings if you are using the optional UFR II Printer Kit, the optional UFR II/PCL Printer Kit, the optional PCL Printer Kit, the optional PS Printer Kit, or the optional Super G3 FAX Board. [On]: You can use IPP as the print application. Pressing [On] for [IPP Print Settings] automatically sets [Use HTTP] to 'On'. To use SSL to encrypt the IPP data, press [On] for <Use SSL>. If you are using IPP authentication, press [On] for <Use Authentication> → enter the user name to use for IPP authentication in [User], and the password to use for IPP authentication in [Password].
|
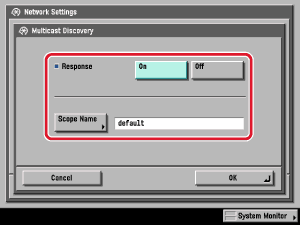
[On] for <Response>: You can use device information from other devices, such as an Address Book or Department ID Management settings, or respond to a multicast discovery from utilities. Optionally, press [Scope Name] and enter the scope name for a multicast discovery.
|
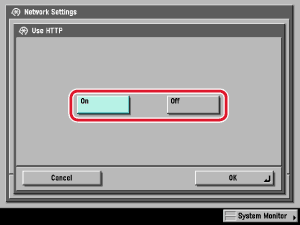
[On]: You can use the Remote UI or IPP. Pressing [Off] for [Use HTTP] automatically sets [Remote UI] (in the System Settings screen) and [IPP Print Settings] to 'Off'. |
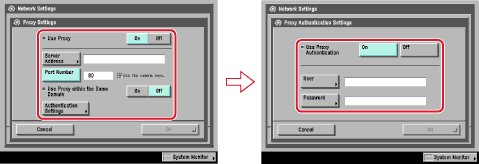
In the following cases, specify the proxy settings, according to the network environment you are using:
In [Server Address], enter a proxy server IP address or FQDN (for example, starfish.company.com). In [Port Number], enter the port number of a proxy server using If you want to use a proxy in the same domain, press [On] for <Use Proxy within the Same Domain>. If you want to use proxy authentication, press [Authentication Settings] → [On] for <Use Proxy Authentication> → enter the user name to use for proxy authentication in [User], and the password to use for proxy authentication in [Password].
|
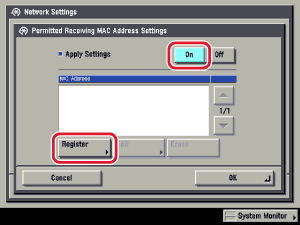
[On] for <Apply Settings>: You can enable a MAC address filter. Press [Register] → specify the MAC addresses to allow access to.
|
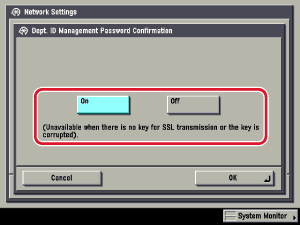
Select [On] or [Off] if you are using the optional UFR II Printer Kit, the optional UFR II/PCL Printer Kit, the optional PCL Printer Kit, the optional PS Printer Kit, or the optional Super G3 FAX Board. [On]: You can confirm the Department ID and password when printing using a driver that supports Windows Vista.
|
 -
-  (numeric keys).